Difference between revisions of "An iOS 10 Local Notification Tutorial"
| Line 48: | Line 48: | ||
| − | [[File:]] | + | [[File:ios_11_notify_demo_request.png]] |
Figure 99-1 | Figure 99-1 | ||
| Line 69: | Line 69: | ||
| − | [[File:]] | + | [[File:ios_11_notify_demo_ui.png]] |
| − | Figure 99 2 | + | Figure 99-2 |
== Creating the Message Content == | == Creating the Message Content == | ||
| Line 90: | Line 90: | ||
| − | [[File:]] | + | [[File:ios_11_notify_demo_notification_badge.png]] |
Figure 99-3 | Figure 99-3 | ||
| Line 163: | Line 163: | ||
| − | [[File:]] | + | [[File:ios_11_notify_demo_notification.png]] |
Figure 99-4 | Figure 99-4 | ||
| Line 257: | Line 257: | ||
| − | [[File:]] | + | [[File:ios_11_notify_demo_actions.png]] |
Figure 99-5 | Figure 99-5 | ||
| Line 299: | Line 299: | ||
| − | [[File:]] | + | [[File:ios_11_notify_demo_global_preview_settings.png]] |
Figure 99-6 | Figure 99-6 | ||
| Line 307: | Line 307: | ||
| − | [[File:]] | + | [[File:ios_11_notify_demo_app_preview_settings.png]] |
Figure 99-7 | Figure 99-7 | ||
| Line 331: | Line 331: | ||
| − | [[File:]] | + | [[File:ios_11_notify_demo_hidden_content.png]] |
Figure 99-8 | Figure 99-8 | ||
| Line 365: | Line 365: | ||
| − | [[File:]] | + | [[File:ios_11_notify_demo_show_title.png]] |
Figure 99-9 | Figure 99-9 | ||
Latest revision as of 15:28, 11 April 2018
Learn SwiftUI and take your iOS Development to the Next Level |
Notifications provide a mechanism for an application to schedule an alert to notify the user about an event. These notifications take the form of a notification panel containing a message accompanied by a sound and the vibration of the device.
Notifications are categorized as either local or remote. Notifications initiated by apps running on a device are referred to as local notifications. A remote notification, on the other hand, is initiated by a remote server and pushed to the device where it is displayed to the user.
Both local and remote notifications are managed using the classes of the UserNotifications framework in conjunction with the user notification center. In the course of covering the steps to create, send and manage local notifications, this chapter will also outline the various classes provided within the UserNotifications framework together with the methods provided by the user notification center.
Creating the Local Notification App Project
The first step in demonstrating the use of local notifications is to create a new Xcode project. Begin by launching Xcode and selecting the options to create a new Swift based project using the Single View Application template. When prompted to do so, name the product NotifyDemo.
Requesting Notification Authorization
Before an app can issue notifications, it must first seek permission to do so from the user. This involves making a call to the user notification center.
The user notification center is responsible for handling, managing and coordinating all of the notifications on a device. In this case, a reference to the current notification center instance needs to be obtained and the requestAuthorization method called on that object.
Edit the ViewController.swift file to import the UserNotifications framework, request authorization and add a variable to store the subtitle of the message, which the user will be able to change from within the notification later in this tutorial:
import UIKit
import UserNotifications

class ViewController: UIViewController {

    var messageSubtitle = "Staff Meeting in 20 minutes"

    override func viewDidLoad() {
        super.viewDidLoad()
        UNUserNotificationCenter.current().requestAuthorization(options:
			[[.alert, .sound, .badge]],
				completionHandler: { (granted, error) in
            // Handle Error
        })
    }
.
.
}
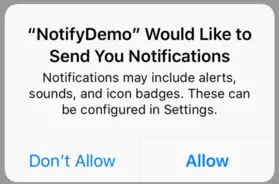
Run the app on an iOS device and tap the Allow button when the permission request dialog (Figure 99-1) appears:
Figure 99-1
Designing the User Interface
Select the Main.storyboard file and drag and drop a Button object so that it is positioned in the center of the scene. Using the Auto Layout Resolve Auto Layout Issues menu, select the option to reset to suggested constraints for all of the views in the view controller.
Change the text on the button to read Send Notification, display the Assistant Editor panel and establish an action connection from the button to a method named buttonPressed.
Edit the ViewController.swift file and modify the buttonPressed action method to call a method named sendNotification:
@IBAction func buttonPressed(_ sender: Any) {
    sendNotification()
}
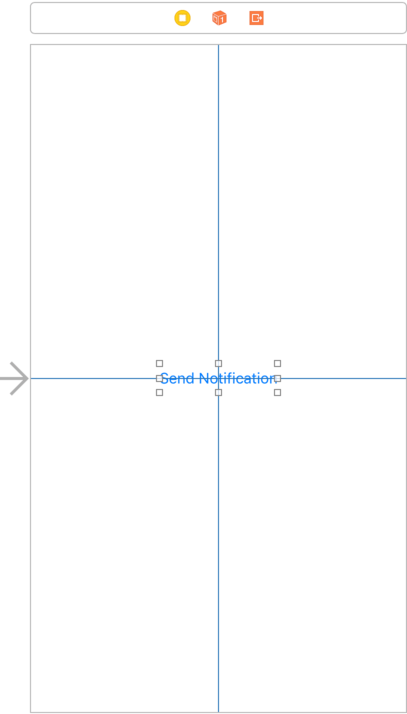
On completion of the layout work, the user interface should match that shown in Figure 99-2 below:
Figure 99-2
Creating the Message Content
The first part of the notification to be created is the message content. The content of the message for a local notification is represented by an instance of the UNMutableNotificationContent class. This class can contain a variety of options including the message title, subtitle and body text. In addition, the message may contain media content such as images and videos. Within the ViewController.swift file, add the sendNotification method as follows:
func sendNotification() {
    let content = UNMutableNotificationContent()
    content.title = "Meeting Reminder"
    content.subtitle = messageSubtitle
    content.body = "Don't forget to bring coffee."
    content.badge = 1
}
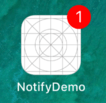
Note also that the badge property of the content object is set to 1. This configures the notification count that is to appear on the app launch icon on the device after a notification has been triggered as illustrated in Figure 99-3:
Figure 99-3
Specifying a Notification Trigger
Once the content of the message has been created, a trigger needs to be defined that will cause the notification to be presented to the user. Local notifications can be triggered based on elapsed time interval, a specific date and time or a location change. For this example, the notification will be configured to trigger after 5 seconds have elapsed (without repeating).
func sendNotification() {
    let content = UNMutableNotificationContent()
    content.title = "Meeting Reminder"
    content.subtitle = messageSubtitle
    content.body = "Don't forget to bring coffee."
    content.badge = 1

    let trigger = UNTimeIntervalNotificationTrigger(timeInterval: 5,
			repeats: false)
}
Learn SwiftUI and take your iOS Development to the Next Level |
Creating the Notification Request
The next step is to create a notification request object containing the content and trigger objects together with an identifier that can be used to access the notification later if it needs to be modified or deleted. The notification request takes the form of a UNNotificationRequest object, code for which will now need to be added to the sendNotification method:
func sendNotification() {
    let content = UNMutableNotificationContent()
    content.title = "Meeting Reminder"
    content.subtitle = messageSubtitle
    content.body = "Don't forget to bring coffee."
    content.badge = 1

    let trigger = UNTimeIntervalNotificationTrigger(timeInterval: 5,
			repeats: false)

    let requestIdentifier = "demoNotification"
    let request = UNNotificationRequest(identifier: requestIdentifier,
			content: content, trigger: trigger)
}
Adding the Request
The request object now needs to be added to the notification center where it will be triggered when the specified time has elapsed:
func sendNotification() {
    let content = UNMutableNotificationContent()
    content.title = "Meeting Reminder"
    content.subtitle = messageSubtitle
    content.body = "Don't forget to bring coffee."
    content.badge = 1

    let trigger = UNTimeIntervalNotificationTrigger(timeInterval: 5,
			repeats: false)

    let requestIdentifier = "demoNotification"
    let request = UNNotificationRequest(identifier: requestIdentifier,
		content: content, trigger: trigger)

    UNUserNotificationCenter.current().add(request,
		withCompletionHandler: { (error) in
        	// Handle error
    })
}
Learn SwiftUI and take your iOS Development to the Next Level |
Testing the Notification
Compile and run the NotifyDemo app on a device or simulator session. Once the app has loaded, tap the Send Notification button and press the Home button to place the app into the background. After 5 seconds have elapsed the notification will appear as shown in Figure 99 4:
Figure 99-4
Open the app once again and tap the button, but do not place the app into the background. This time the notification will not appear. This is the default behavior for user notifications. If the notifications issued by an app are to appear while that app is in the foreground, an additional step is necessary.
Receiving Notifications in the Foreground
As demonstrated in the previous section, when an app that issues a notification is currently in the foreground the notification is not displayed. To change this default behavior, it will be necessary for the view controller to declare itself as conforming to the UNUserNotificationCenterDelegate protocol and implement the userNotification:willPresent method. The current class will also need to be declared as the notification delegate. Remaining within the ViewController.swift file, make these changes as follows:
import UIKit
import UserNotifications

class ViewController: UIViewController, UNUserNotificationCenterDelegate {
.
.
    override func viewDidLoad() {
        super.viewDidLoad()
        UNUserNotificationCenter.current().requestAuthorization(options: [[.alert, .sound, .badge]], completionHandler: { (granted, error) in
            // Handle Error
        })
        UNUserNotificationCenter.current().delegate = self
    }
.
.
.
    func userNotificationCenter(_ center: UNUserNotificationCenter, willPresent notification: UNNotification, withCompletionHandler completionHandler: @escaping (UNNotificationPresentationOptions) -> Void) {

    completionHandler([.alert, .sound])
}
The userNotification:willPresent method simply calls the provided completion handler indicating that the notification should be presented to the user using both the alert message and sound.
Adding Notification Actions
The default action when a notification is tapped by the user is to dismiss the notification and launch the corresponding app. The UserNotifications framework also allows action buttons to be added to notifications. These buttons are displayed when the user presses down with force on the notification message, or swipes the message to the left. For this example, two action buttons will be added to the notification, one of which will instruct the app to repeat the notification while the other will allow the user to input different text to appear in the message subtitle before also repeating the notification.
This will require the creation of two notification action objects as follows:
let repeatAction = UNNotificationAction(identifier:"repeat",
			title:"Repeat",options:[])

let changeAction = UNTextInputNotificationAction(identifier: "change",
			title: "Change Message", options: [])
Next, these action objects need to be placed in a notification category object and the category object added to the user notification center after being assigned an identifier:
let category = UNNotificationCategory(identifier: "actionCategory",
		actions: [repeatAction, changeAction],
		intentIdentifiers: [], options: [])

content.categoryIdentifier = "actionCategory"

UNUserNotificationCenter.current().setNotificationCategories([category])
Combining these steps with the existing sendNotification method results in code that reads as follows:
func sendNotification() {
    let content = UNMutableNotificationContent()
    content.title = "Meeting Reminder"
    content.subtitle = messageSubtitle
    content.body = "Don't forget to bring coffee."
    content.badge = 1

    let repeatAction = UNNotificationAction(identifier:"repeat",
		title:"Repeat",options:[])
    let changeAction = UNTextInputNotificationAction(identifier:
		"change", title: "Change Message", options: [])

    let category = UNNotificationCategory(identifier: "actionCategory",
		 actions: [repeatAction, changeAction],
		intentIdentifiers: [], options: [])

    content.categoryIdentifier = "actionCategory"

    UNUserNotificationCenter.current().setNotificationCategories(
							[category])
.
.
.
}
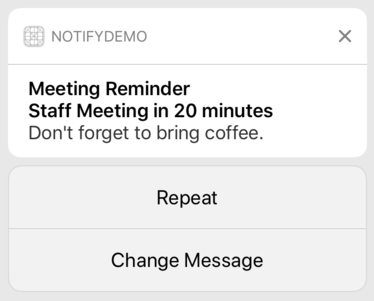
Compile and run the app on a physical device, trigger the notification and perform a deep press on the message when it appears. The action buttons should appear beneath the message as illustrated in Figure 99-5 below:
Figure 99-5
Tap the Change Message button and note that the keyboard and text input field appear. Although the action buttons are now present, some work still needs to be performed to handle the actions within the view controller.
Handling Notification Actions
When an action is selected by the user, the userNotification:didReceive method of the designated notification delegate is called by the user notification center. Since the ViewController class has already been declared as implementing the UNUserNotificationCenterDelegate protocol and assigned as the delegate, all that needs to be added to the ViewController.swift file is the userNotification:didReceive method:
func userNotificationCenter(_ center: UNUserNotificationCenter, didReceive
 response: UNNotificationResponse, withCompletionHandler completionHandler:
  @escaping () -> Void) {

    switch response.actionIdentifier {
        case "repeat":
            self.sendNotification()
        case "change":
            let textResponse = response
			as! UNTextInputNotificationResponse
            messageSubtitle = textResponse.userText
            self.sendNotification()
        default:
            break
    }
    completionHandler()
}
Learn SwiftUI and take your iOS Development to the Next Level |
Compile and run the app once again and verify that the actions perform as expected.
Hidden Notification Content
iOS provides a range of options that allow the user to control the information that is displayed within a notification when it appears on the device lock screen. As we have seen in this example, the default setting is for all of the information contained within a notification (in this case the title, subtitle and body content) to be displayed when the notification appears on the lock screen.
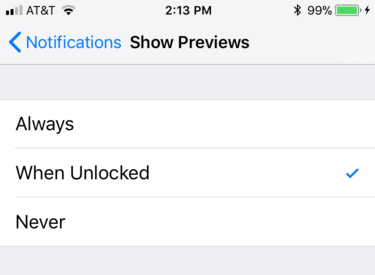
These notification preview settings can be specified on a per app basis, or globally for all installed apps. To view and change the current global settings, open the Settings app and select Notifications -> Show Previews. As shown in Figure 99-6, options are available to show notification previews always, only when the device is unlocked or never:
Figure 99-6
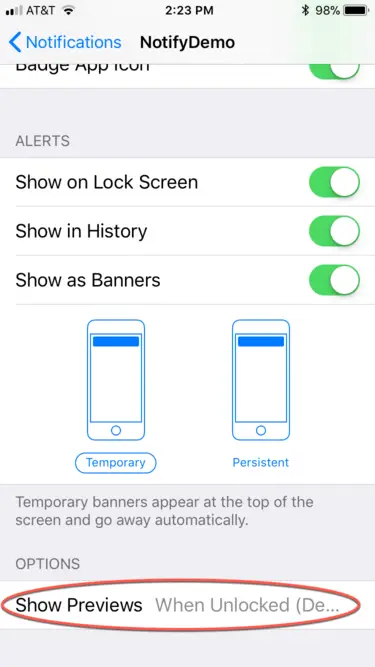
These global settings can be overridden for individual apps from within the Settings app by displaying the Notifications screen, selecting the app from the list and scrolling down to the Show Previews option as highlighted in Figure 99 7.
Figure 99-7
The current notification preview settings configured by the user may be identified by accessing the showPreviewSettings property of the current notification center settings. For example:
UNUserNotificationCenter.current().getNotificationSettings { (settings) in

    switch settings.showPreviewsSetting {
        case .always :
            print("Always")
        case .whenAuthenticated :
            print("When unlocked")
        case .never :
            print("Never")
    }
}
On the device on which the NotifyDemo app is installed, locate the notification preview settings for the app and change the current setting to When Unlocked. After making the change, run the app, trigger a notification and then immediately lock the device. When the notification appears it will no longer contain any information except for the app name and the word Notification (Figure 99-8):
Figure 99-8
When creating a notification from within an app, it is possible to configure options that allow more information to be displayed in this situation. When the notification code was implemented earlier in this chapter, a UNNotificationCategory object was created and initialized with information about the notification including the identifier and the two actions. This category object was then assigned to the notification before it was sent:
.
.
let category = UNNotificationCategory(identifier: "actionCategory",
                          actions: [repeatAction, changeAction],
                intentIdentifiers: [],
                          options: [])

content.categoryIdentifier = "actionCategory"

UNUserNotificationCenter.current().setNotificationCategories([category])
.
.
The category object also contains an array of options which, in the above code, was left empty. It is within this options array that properties can be declared that will allow the title, subtitle or both to be displayed within the lock screen notification even when the preview mode is set to When Unlocked. The two settings are represented by the .hiddenPreviewsShowSubtitle and .hiddenPreviewsShowSubtitle option values. For example, modify the code for the NotifyDemo app so the category object is initialized as follows:
let category = UNNotificationCategory(identifier: "actionCategory",
                        actions: [repeatAction, changeAction],
                        intentIdentifiers: [],
                        options: [.hiddenPreviewsShowTitle])
Run the app, trigger a notification and lock the device. This time when the notification appears, the title is included in the preview though the subtitle and body still remain hidden:
Figure 99-9
Modify the options array once more, this time adding the subtitle option as follows:
let category = UNNotificationCategory(identifier: "actionCategory",
                        actions: [repeatAction, changeAction],
                        intentIdentifiers: [],
                        options: [.hiddenPreviewsShowTitle,
                                  .hiddenPreviewsShowSubtitle])
This time when a notification preview from the app appears on the lock screen it will display both the title and subtitle while the body content remains hidden.
Managing Notifications
In addition to creating notifications, the UserNotifications framework also provides ways to manage notifications, both while they are still pending and after they have been delivered. One or more pending notifications may be removed by passing an array of request identifiers through to the removal method of the user notification center:
UNUserNotificationCenter.current()
 .removePendingNotificationRequests(withIdentifiers:
			[demoIdentifer, demoIdentifier2])
Similarly, the content of a pending intent may be updated by creating an updated request object with the same identifier containing the new content and adding it to the notifications center:
UNUserNotificationCenter.current().add(updatedRequest,
		withCompletionHandler: { (error) in
        	// Handle error
})
Finally, previously delivered notifications can be deleted from the user’s notification history by a call to the user notification center passing through one or more request identifiers matching the notifications to be deleted:
UNUserNotificationCenter.current()
 .removeDeliveredNotifications(withIdentifiers: [demoIdentifier])
Summary
Notifications can be triggered locally by an app or sent remotely via a server. Both forms of notification are managed by the UserNotifications framework. An application that needs to issue local notifications must first seek permission to do so from the user.
A notification consists of a content object, a request object and access to the notifications center. In addition, a notification may also include actions which appear in the form of buttons when a force touch press is performed on the notification message. These actions include the ability for the user to input text to be sent to the app that initiated the intent.
iOS provides users the ability to control content that is shown in the preview when the device is currently locked. The app can, however, configure options within the notification to display the title and subtitle content within the notification preview regardless of user settings.
Learn SwiftUI and take your iOS Development to the Next Level |


