Difference between revisions of "Twitter Log In Authentication using the Firebase SDK"
(→Designing the User Interface Layout) |
|||
| Line 48: | Line 48: | ||
| − | [[File: | + | [[File:firebase_auth_twitter_ui.png]] |
Figure 15-1 | Figure 15-1 | ||
| Line 62: | Line 62: | ||
| − | [[File: | + | [[File:firebase_auth_twitter_ui_complete.png]] |
Figure 15-2 | Figure 15-2 | ||
| Line 84: | Line 84: | ||
Return the layout editor to design mode and note the button appearance has changed to a Twitter LoginButton button: | Return the layout editor to design mode and note the button appearance has changed to a Twitter LoginButton button: | ||
| − | [[File:]] | + | [[File:firebase_auth_twitter_button.png]] |
Figure 15-3 | Figure 15-3 | ||
| Line 219: | Line 219: | ||
| − | [[File:]] | + | [[File:firebase_auth_twitter_authorize.png]] |
Figure 15-4 | Figure 15-4 | ||
| Line 233: | Line 233: | ||
| − | [[File:]] | + | [[File:firebase_auth_twitter_connect.png]] |
Figure 15-5 | Figure 15-5 | ||
| Line 444: | Line 444: | ||
| − | [[File:]] | + | [[File:firebase_auth_twitter_users.png]] |
Figure 15-6 | Figure 15-6 | ||
| Line 457: | Line 457: | ||
| − | [[File:]] | + | [[File:firebase_auth_twitter_privacy.png]] |
Figure 15-7 | Figure 15-7 | ||
| Line 469: | Line 469: | ||
| − | [[File:]] | + | [[File:firebase_auth_twitter_permissions.png]] |
Figure 15-8 | Figure 15-8 | ||
| Line 514: | Line 514: | ||
| − | [[File:]] | + | [[File:firebase_auth_twitter_share_email.png]] |
Figure 15-9 | Figure 15-9 | ||
Revision as of 17:32, 14 August 2017
In addition to Google and Facebook, Firebase user authentication may also be performed using the Twitter SDK. As with Google and Facebook integration, the user is instructed to sign in to a Twitter account, the details of which are then used to create a new account within the project’s Firebase authentication user database. Once a Firebase authentication account has been associated with the user’s Twitter identity, the user will be able to sign into the app using those Twitter credentials.
Authentication using Firebase and the Twitter SDK
Twitter-based authentication requires that the user first sign into a Twitter account in order to receive an access token from the Twitter SDK. This access token is then used to create a Firebase authentication credential. The Firebase credential is then used to create a Firebase authentication user account. Once the account has been created, the user may continue to use the Twitter Log In process to sign into the app. Each time, the Twitter access token will be exchanged for the user’s Firebase credentials which, in turn, will be used to sign into the app.
Similar to the Facebook LoginButton class, the Twitter SDK provides the TwitterLoginButton. This class provides a Twitter-branded button for inclusion within a user interface layouts. Unlike the Facebook LoginButton, however, the Twitter button does not also serve as a “Sign Out” button.
Once integrated with the user interface of an app, callbacks are registered on the TwitterLoginButton instance which are called by the Twitter SDK to notify the app of the status of sign-in requests. On a successful Twitter account sign-in, the appropriate callback method is called and passed a TwitterSession object containing the users access token which is then used to register the user in Firebase via the TwitterAuthProvider class.
Creating the TwitterAuth Project
Begin by launching Android Studio and selecting the Start a new Android Studio project quick start option from the welcome screen.
Within the new project dialog, enter TwitterAuth into the Application name field and your domain as the Company Domain setting before clicking on the Next button.
On the form factors screen, enable the Phone and Tablet option and set the minimum SDK to API 16: Android 4.1 (Jellybean). Continue to proceed through the screens, requesting the creation of an Empty Activity named TwitterAuthActivity with a corresponding layout named activity_twitter_auth.
Connecting the Project to Firebase
Within Android Studio, use the Tools -> Firebase menu to display the Firebase assistant panel, locate and click on the Authentication category, select the Email and password authentication link and then click on the Connect to Firebase button to display the Firebase connection dialog.
Choose the option to store the app in an existing Firebase project and select the Firebase Examples project created in the beginning of the book.
With the project’s Firebase connection established, refer to the Firebase assistant panel once again, this time clicking on the Add Firebase Authentication to your app button. A dialog will appear outlining the changes that will be made to the project build configuration to enable Firebase authentication. Click on the Accept Changes button to commit the changes to the project configuration.
Enabling Twitter Authentication
This tutorial will make use of the app created in the Twitter Application Management console in the chapter entitled Twitter Sign-In Authentication using FirebaseUI Auth, including the previously generated Twitter Consumer Key and Consumer Secret values. If you have not yet completed these steps, return to the earlier chapter and complete these initial setup steps.
Adding the Twitter Library Dependency
With the app configured in both the Firebase and Twitter Application Management consoles, return to Android Studio, edit the module level build.gradle file and add an entry to the dependencies section to reference the Twitter API SDK library as follows:
compile 'com.twitter.sdk.android:twitter:3.0.0'
Designing the User Interface Layout
The user interface for the main activity is going to consist of an ImageView, two TextViews and two Buttons. Begin by loading the activity_twitter_auth.xml file into the layout editor tool and turning off Autoconnect mode.
Select and delete the default “Hello World” TextView object and drag and drop an ImageView component from the Palette onto the layout canvas. When the ImageView is released onto the layout, a resources dialog will appear providing a list of images available to be displayed on the ImageView object. Scroll down the rows of images in the resources dialog and select tw_composer_logo_blue icon as the placeholder.
With the image selected, click on the OK button to apply the image to the ImageView and dismiss the resources dialog.
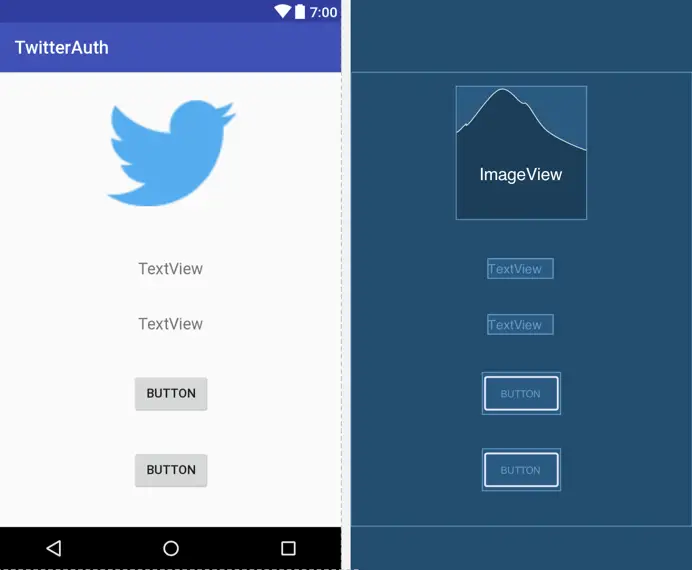
Remaining within the layout editor increase the size of the ImageView object and add the TextView and Button widgets to the layout so that it resembles the layout shown in Figure 15-1. Shift-click on the TextView buttons so that both are selected and increase the textSize attribute in the properties window to 18sp:
Figure 15-1
Using the Properties tool window, change the text attribute on the lower of the two Button objects so that it reads “Sign Out” and is assigned an onClick method named signOut.
Select the ImageView and, using the properties tool panel, change the ID to profileImage. Also change the IDs of the two TextView objects and the Button to userText, statusText and loginButton respectively.
With the view components added to the layout it is now time to add some constraints. Click in the upper right-hand corner of the layout canvas and drag the resulting rectangle until it encompasses all of the widgets. On releasing the mouse button, all four widgets should now be selected. Right-click on the ImageView object and, from the resulting menu, select the Center Horizontally menu option. Repeat this step once again, this time selecting the Center Vertically menu option.
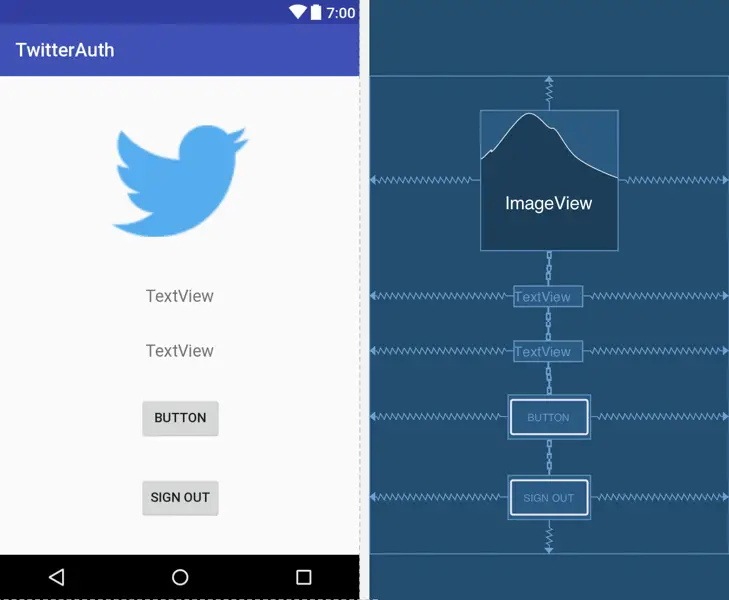
At this stage, appropriate constraints should have been added such that the layout will be responsive to different screen sizes and device orientations:
Figure 15-2
Adding the Twitter Login Button
The first of the two Button objects added to the layout in the previous section was used as a placeholder and now needs to be replaced by an instance of the TwitterLoginButton. With the activity_twitter_auth.xml layout resource file still open in the layout editor, switch the editor to text mode, locate the first Button widget in the XML description and change the class type from Button to com.twitter.sdk.android.core.identity.TwitterLoginButton as follows:
<com.twitter.sdk.android.core.identity.TwitterLoginButton
    android:id="@+id/loginButton"
    android:layout_width="wrap_content"
    android:layout_height="wrap_content"
    android:text="Button"
    app:layout_constraintRight_toRightOf="parent"
    app:layout_constraintLeft_toLeftOf="parent"
    app:layout_constraintBottom_toTopOf="@+id/button3"
    app:layout_constraintTop_toBottomOf="@+id/statusText" />
Return the layout editor to design mode and note the button appearance has changed to a Twitter LoginButton button:
Figure 15-3
Performing Initialization Tasks
A few more initialization tasks now need to be performed within the main activity class. Begin by loading the TwitterAuthActivity.java file into the Android Studio code editor and adding some variables and import directives that will be used later in the code:
package com.ebookfrenzy.twitterauth;

import android.content.Intent;
import android.support.v7.app.AppCompatActivity;
import android.os.Bundle;

import android.view.View;
import android.widget.ImageView;
import android.widget.TextView;
import android.util.Log;

import com.google.firebase.auth.FirebaseAuth;
import android.support.annotation.NonNull;
import com.google.firebase.auth.FirebaseUser;

import com.twitter.sdk.android.core.DefaultLogger;
import com.twitter.sdk.android.core.Twitter;
import com.twitter.sdk.android.core.TwitterAuthConfig;
import com.twitter.sdk.android.core.Callback;
import com.twitter.sdk.android.core.Result;
import com.twitter.sdk.android.core.TwitterAuthConfig;
import com.twitter.sdk.android.core.TwitterConfig;
import com.twitter.sdk.android.core.TwitterException;
import com.twitter.sdk.android.core.TwitterSession;
import com.twitter.sdk.android.core.identity.TwitterLoginButton;

public class TwitterAuthActivity extends AppCompatActivity {

    private static final String TWITTER_KEY = "<Your Twitter Key Here>";
    private static final String TWITTER_SECRET =
					"<Your Twitter Secret Here>";

    private static final String TAG = "TwitterAuth";

    private FirebaseAuth fbAuth;
    private FirebaseAuth.AuthStateListener authListener;

    private TwitterLoginButton loginButton;
    private TextView userText;
    private TextView statusText;
    private ImageView imageView;

    @Override
    protected void onCreate(Bundle savedInstanceState) {
        super.onCreate(savedInstanceState);
        TwitterConfig config = new TwitterConfig.Builder(this)
            .logger(new DefaultLogger(Log.DEBUG))
            .twitterAuthConfig(new TwitterAuthConfig(TWITTER_KEY,
						TWITTER_SECRET))
            .debug(true)
            .build();
        Twitter.initialize(config);

        setContentView(R.layout.activity_twitter_auth);

        userText = (TextView) findViewById(R.id.userText);
        statusText = (TextView) findViewById(R.id.statusText);
        imageView = (ImageView) findViewById(R.id.profileImage);

        loginButton = (TwitterLoginButton) findViewById(R.id.loginButton);
    }
.
.
}
Handling Callbacks and Activity Results
As with the Facebook integration, a set of callback methods act as the bridge between the app and the Twitter SDK, allowing the SDK to notify the app of events relating to the authentication process.
With the activity TwitterAuthActivity class file still loaded into the Android Studio code editor add code to register a callback handler on the TwitterLoginButton instance within the onCreate() method. This will need to contain both success() and failure() callback methods:
@Override
protected void onCreate(Bundle savedInstanceState) {
    super.onCreate(savedInstanceState);

    TwitterConfig config = new TwitterConfig.Builder(this)
            .logger(new DefaultLogger(Log.DEBUG))
            .twitterAuthConfig(new TwitterAuthConfig(TWITTER_KEY,
				TWITTER_SECRET))
            .debug(true)
            .build();
    Twitter.initialize(config);


    setContentView(R.layout.activity_twitter_auth);

    userText = (TextView) findViewById(R.id.userText);
    statusText = (TextView) findViewById(R.id.statusText);
    imageView = (ImageView) findViewById(R.id.profileImage);

    loginButton = (TwitterLoginButton) findViewById(R.id.loginButton);

    loginButton.setCallback(new Callback<TwitterSession>() {

        @Override
        public void success(Result<TwitterSession> result) {
            Log.d(TAG, "loginButton Callback: Success");
        }

        @Override
        public void failure(TwitterException exception) {
            Log.d(TAG, "loginButton Callback: Failure " +
                    exception.getLocalizedMessage());
        }
    });
}
When the TwitterLoginButton is tapped by the user the Twitter activity will launch another activity to handle the authentication of the user’s Twitter identity. The onActivityResult() method must now be overridden within the TwitterAuthActivity class so that it will be called when the Twitter authentication activity returns. This method must, in turn, call the onActivityResult() method of the TwitterLoginButton instance, passing through the activity results to notify the button of the status of the Twitter login operation. Without this method the callback methods on the login button will not be called and the app will unaware of the results of the Twitter authentication:
@Override
protected void onActivityResult(int requestCode, int resultCode, Intent data) {
    super.onActivityResult(requestCode, resultCode, data);
    loginButton.onActivityResult(requestCode, resultCode, data);
}
Testing the Twitter Authentication
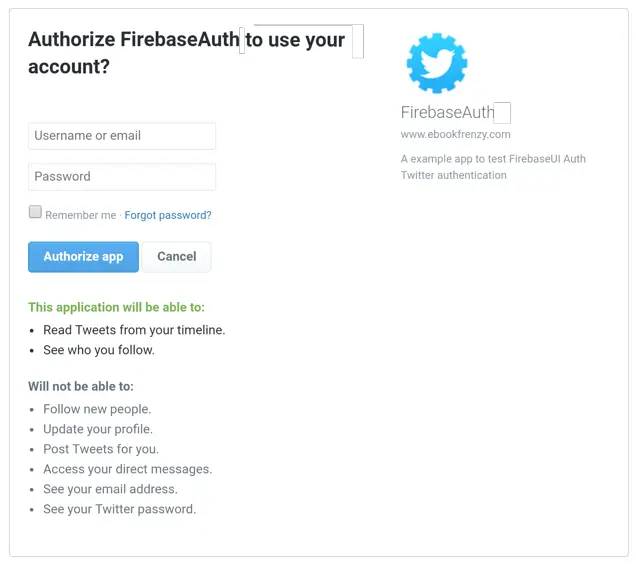
The Twitter phase of the authentication process is now ready to be tested. Compile and run the app on a device or emulator. When the app is launched and running, tap the Log in with Twitter button to launch the Twitter authorization activity. If the device does not have the Twitter app installed, the screen shown in Figure 15-4 will appear seeking Twitter account access authorization:
Figure 15-4
Enter the username and password for a valid Twitter account before selecting the Authorize app button. After a short pause control will return to the main activity. Within Android Studio, check the logcat output in the Android Monitor tool window for evidence that the success() method was called:
D/TwitterAuth: loginButton Callback: Success
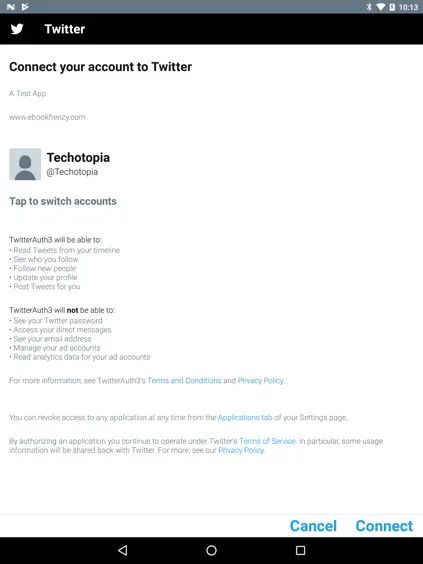
If the Twitter app is installed and the user has already signed in with a Twitter account, the screen shown in Figure 15 5 will appear requesting permission to connect the Twitter account to the TwitterAuth app:
Figure 15-5
Clicking on the Connect button will authorize the connection and log the user in.
Assuming that the code added so far is functioning correctly, it is time to implement the code to exchange the Twitter token for a Firebase authentication credential.
Initializing Firebase
Before undertaking the steps to exchange the user’s Twitter identity for a Firebase user account, the standard tasks of initializing the Firebase SDK and adding the authentication state listener to the activity must be completed.
Remaining in the TwitterAuthActivity class file, add the following code to the bottom of the onCreate() method to obtain a reference to the FirebaseAuth instance and install the authentication state listener:
@Override
protected void onCreate(Bundle savedInstanceState) {
    super.onCreate(savedInstanceState);
.
.
.
        fbAuth = FirebaseAuth.getInstance();

        authListener = new FirebaseAuth.AuthStateListener() {
            @Override
            public void onAuthStateChanged(
				@NonNull FirebaseAuth firebaseAuth) {
                FirebaseUser user = firebaseAuth.getCurrentUser();
                if (user != null) {
                    userText.setText(user.getDisplayName());
                    statusText.setText("Signed In");

                    if (user.getPhotoUrl() != null) {
                        displayImage(user.getPhotoUrl());
                    }
                } else {
                    userText.setText("");
                    statusText.setText("Signed Out");
                    imageView.setImageResource(
			R.drawable.tw__composer_logo_blue);

                }
            }
        };
    }

    @Override
    public void onStart() {
        super.onStart();
        fbAuth.addAuthStateListener(authListener);
    }

    @Override
    public void onStop() {
        super.onStop();
        if (authListener != null) {
            fbAuth.removeAuthStateListener(authListener);
        }
    }
.
.
}
On detection of a change to the authentication state, the above listener code checks for the presence of a valid user account. Depending on whether a valid user is detected, the user interface is updated accordingly, including displaying the user’s Twitter profile image using the displayImage() method which now needs to be added to the class. Begin by adding import statements for the packages that will be needed by the image handling code:
package com.ebookfrenzy.twitterauth;
.
.
import android.graphics.Bitmap;
import android.graphics.BitmapFactory;
import android.net.Uri;
import android.os.AsyncTask;
.
.
import java.io.InputStream;
.
.
Next, add the usual code to download the user’s profile photo and display it on the ImageView object in the user interface layout:
void displayImage(Uri imageUrl) {
    new DownloadImageTask((ImageView) findViewById(R.id.profileImage))
            .execute(imageUrl.toString());
}

private class DownloadImageTask extends AsyncTask<String, Void, Bitmap> {
    ImageView bmImage;

    public DownloadImageTask(ImageView bmImage) {
        this.bmImage = bmImage;
    }

    protected Bitmap doInBackground(String... urls) {
        String urldisplay = urls[0];
        Bitmap bitmap = null;
        try {
            InputStream in = new java.net.URL(urldisplay).openStream();
            bitmap = BitmapFactory.decodeStream(in);
        } catch (Exception e) {
            e.printStackTrace();
        }
        return bitmap;
    }

    protected void onPostExecute(Bitmap result) {
        bmImage.setImageBitmap(result);
    }
}
With steps taken to detect authentication state changes, the next step is to use the credentials stored in the TwitterSession object to obtain a matching Firebase authentication credential, and then use that credential to sign the user in to the app.
Registering the User in Firebase
When the user completes a successful Twitter sign-in, the success() callback method assigned to the TwitterLoginButton instance is called and passed a TwitterSession object. This object contains the user’s Twitter authentication token and secret. Both of these items will need to be passed to the Firebase TwitterAuthProvider class in exchange for a corresponding Firebase AuthCredential instance. The AuthCredential object will then be used to create a Firebase authentication account if one does not already exist and sign the user in.
Begin by modifying the success() callback method to call a new method named exchangeTwitterToken() which takes as an argument a TwitterSession object:
.
.
        loginButton.setCallback(new Callback<TwitterSession>() {


            @Override
            public void success(Result<TwitterSession> result) {
                Log.d(TAG, "loginButton Callback: Success");
                exchangeTwitterToken(result.data);
            }

            @Override
            public void failure(TwitterException exception) {
                Log.d(TAG, "loginButton Callback: Failure " +
				exception.getLocalizedMessage());
            }
        });
.
.
With the call to the method added to the callback, the method must now also be added to the class, beginning with the task of importing some additional packages:
.
.
import android.widget.Toast;

import com.google.android.gms.tasks.OnCompleteListener;
import com.google.android.gms.tasks.Task;
import com.google.firebase.auth.AuthCredential;
import com.google.firebase.auth.AuthResult;
import com.google.firebase.auth.TwitterAuthProvider;
.
.
Next, add the exchangeTwitterToken() method so that it reads as follows:
private void exchangeTwitterToken(TwitterSession session) {

    AuthCredential credential = TwitterAuthProvider.getCredential(
            session.getAuthToken().token,
            session.getAuthToken().secret);

    fbAuth.signInWithCredential(credential)
       .addOnCompleteListener(this, new OnCompleteListener<AuthResult>() {
                @Override
                public void onComplete(@NonNull Task<AuthResult> task) {

                    if (!task.isSuccessful()) {
                        Log.w(TAG, "signInWithCredential",
					task.getException());
                        Toast.makeText(TwitterAuthActivity.this,
			    "Authentication failed.",
                                Toast.LENGTH_SHORT).show();
                    }
                }
            });
}
The code begins by generating a Firebase AuthCredential instance for the user by calling the getCredential() method of the TwitterAuthProvider class, passing through the user’s Twitter access token and secret as arguments. These credentials are then passed through to the signInWithCredential() method of the FirebaseAuth instance. A completion handler is then used to check whether the sign-in was successful and to report any failure that may have occurred.
A successful Firebase authentication sign-in will trigger a call to the authentication state listener and the user interface will be updated to reflect the change of status and to display the user’s display name and profile image.
Signing Out
When the user interface layout was designed earlier in this chapter, a Sign Out button was added and configured to call a method named signOut(). The next coding task in this project is to add this method to the TwitterAuthActivity.java file:
.
.
public void signOut(View view) {
    fbAuth.signOut();
}
Testing the Project
Open the Firebase console in a browser window, select the Authentication option in the left-hand navigation panel followed by the Users tab on the Authentication screen. If a user already exists for the Twitter account you intend to use for testing purposes, delete it from Firebase before proceeding.
Compile and run the app on a physical Android device or emulator and tap the Log in with Twitter button and take the appropriate steps to authenticate using a valid Twitter account. On signing in, the user interface should update to display the user’s profile image and Twitter name.
Return to the Firebase console, refresh the Users list and verify that the account has been created using the Twitter provider:
Figure 15-6
Click on the Log Out button within the app and verify the user interface updates accordingly.
As indicated by the blank entry in the email column for the Firebase user account in Figure 15-6 above, Twitter has not yet provided access to the email address associated with the user’s Twitter account. Additional steps are required to gain access to the email address of users when using Twitter log in.
Configuring Privacy and Terms of Service URLs
Before Twitter will allow email address information to be provided to the app, two additional steps are necessary within the Twitter Application Management console. First, both privacy and terms of service URLs must be provided for the app. With the app still selected in the management console, select the Settings tab and enter URLs into the Privacy Policy URL and Terms of Service URL fields as illustrated in Figure 15-7:
Figure 15-7
For the purposes of testing, it is acceptable to enter temporary placeholder URLs for these fields. Once the URLs have been entered, click on the Update Settings button to commit the changes.
Enabling Email Address Permission
With privacy and terms of service URLs configured, select the Permissions tab within the Twitter Application Management console, locate the Additional Permissions section, enable the Request email addresses from users option (Figure 15-8) and click on the Update Settings button.
Figure 15-8
With the app settings configured to enable email address requests, the final step before testing the project involves the addition of code to perform the request.
Requesting the User’s Email Address
The final task before testing the project is to add the code that performs the email address request during the authentication. This involves a call to the requestEmail() method of an instance of the TwitterAuthClient class. Add the code to perform this task within the exchangeTwitterToken() method located in the TwitterAuthActivity.java file as follows:
.
.
import com.twitter.sdk.android.core.identity.TwitterAuthClient;
.
.
private void exchangeTwitterToken(TwitterSession session) {

    TwitterAuthClient authClient = new TwitterAuthClient();
    authClient.requestEmail(session, new Callback<String>() {
        @Override
        public void success(Result<String> result) {
            Log.d(TAG, "EMAIL = " + result.data);
        }

        @Override
        public void failure(TwitterException exception) {
            // Do something on failure
        }
    });
.
.
}
The code creates an instance of the TwitterAuthClient class and calls the requestEmail() method on that instance, passing through the current user’s TwitterSession object as an argument. A callback handler is also assigned containing both success and failure callback methods. If the email request is successful, code has been added to output the email address to the logcat panel within the Android Studio Android Monitor tool window.
Testing Email Permission
Return to the Firebase console in a browser window, select the Authentication option in the left-hand navigation panel followed by the Users tab on the Authentication screen. If the user already exists for the Twitter account used previously for testing, delete it from Firebase before proceeding.
Compile and run the app and sign in using a Twitter account. After authenticating the app within the Twitter login activity, an additional screen (Figure 15-9) may appear seeking email access permission from the user:
Figure 15-9
Tap on the Allow button and verify that the email address associated with the Twitter account appears in the diagnostic output in the Android Monitor logcat panel. Assuming the account has an email address (some Twitter accounts may have only a telephone number) return to the Firebase console and refresh the list of users within the Authentication panel. The account information should now include the user’s Twitter email address:
Summary
The chapter has outlined the use of the Twitter SDK to allow users to create and sign into Firebase authentication accounts using Twitter accounts.
The TwitterLoginButton class provides a Twitter-branded button which launches the Twitter Log In activity. The results of this activity are then passed back to the app including the Twitter authentication token for the user’s Twitter account. This token is then exchanged for corresponding Firebase credentials. These credentials are used to register the user within Firebase and to allow the user to continue signing into the app using the Twitter Log In activity.
By default, the Twitter SDK does not provide the app with access to the user’s email address.
To access the user’s email address, the privacy and terms of services URLs need to be configured for the app within the Twitter Application Management console and the email permission request option enabled. Finally code needs to be added to the project to perform the request.


