Difference between revisions of "A WatchKit Settings Bundle Tutorial"
m (Text replacement - "<htmlet>ezoicbottom</htmlet>" to "") |
m (Text replacement - "<hr> <table border=" to "<htmlet>ezoicbottom</htmlet> <hr> <table border=") |
||
| Line 360: | Line 360: | ||
| + | <htmlet>ezoicbottom</htmlet> | ||
<hr> | <hr> | ||
<table border="0" cellspacing="0"> | <table border="0" cellspacing="0"> | ||
Revision as of 18:15, 11 May 2016
| Previous | Table of Contents | Next |
| Configuring Preferences with the WatchKit Settings Bundle | An Overview of WatchKit Glances |
| Purchase the fully updated watchOS 2/Swift 2 edition of this book in eBook ($12.99) or Print ($27.99) format watchOS 2 App Development Essentials Print and eBook (ePub/PDF/Kindle) editions contain 35 chapters. |
The objective of this chapter is to build upon the overview of the WatchKit settings bundle provided in the preceding chapter through the implementation of an example app. The chapter will cover the steps involved in adding a WatchKit settings bundle to an Xcode project, defining the preference controls and accessing and responding to those settings within the WatchKit app.
About the WatchKit Settings Bundle Example
The WatchKit app created within this chapter will consist of a scene containing a single Label interface object. The label will initially display text using the default font size and foreground color. A settings bundle will then be added to the project and configured to allow the user to control whether or not the label is visible and to adjust both the font size and foreground color. This will involve the use of toggle switch, group, slider and multi-value controls within the bundle settings properties list.
Creating the WatchKit Settings Bundle Project
Start Xcode and create a new iOS project. On the template screen choose the Application option located under iOS in the left hand panel and select Single View Application. Click Next, set the product name to SettingsBundle, enter your organization identifier and make sure that the Devices menu is set to Universal. Before clicking Next, change the Language menu to Swift. On the final screen, choose a location in which to store the project files and click on Create to proceed to the main Xcode project window.
Adding the WatchKit App Target
For the purposes of this example we will, once again, assume that the iOS app has already been implemented. The next step, therefore, is to add the WatchKit app target to the project. Within Xcode, select the File -> New -> Target… menu option. In the target template dialog, select the Apple Watch option listed beneath the iOS heading. In the main panel, select the WatchKit App icon and click on Next. On the subsequent screen turn off the Include Glance Scene and Include Notification Scene options before clicking on the Finish button.
As soon as the extension target has been created, a new panel will appear requesting permission to activate the new scheme for the extension target. Activate this scheme now by clicking on the Activate button in the request panel.
Designing the WatchKit App Scene
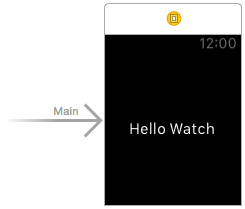
Within the Project Navigator panel, locate and select the Interface.storyboard file located under the SettingsBundle WatchKit App folder so that it loads into the Interface Builder environment. From the Object Library panel, drag and drop a Label interface object onto the scene canvas. Double-click on the new label and change the text so it reads “Hello Watch”. With the label still selected in the scene, display the Attributes Inspector panel and set both the Vertical and Horizontal position properties to Center.
Figure 17-1
Display the Assistant Editor and verify that it is displaying the InterfaceController.swift source file. Ctrl-click on the Label object and drag to a line immediately beneath the class declaration line in the Assistant Editor panel. Release the line and establish an outlet connection named titleLabel.
Adding the WatchKit Settings Bundle
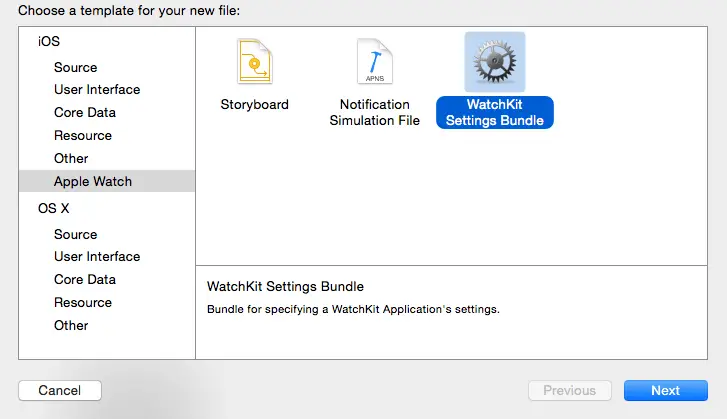
Add a WatchKit settings bundle to the project by selecting the New -> File… menu option. In the resulting panel, select the Apple Watch category in the side bar followed by WatchKit Settings Bundle in the main panel as shown in Figure 17-2:
Figure 17-2
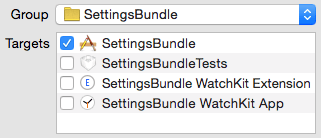
Click the Next button and on the following screen make sure that the Group menu is set to the SettingsBundle folder option and that SettingsBundle is enabled in the Targets section:
Figure 17-3
With the settings bundle configured, click on the Create button to add the settings bundle to the project. Within the Project Navigator panel, locate the settings bundle and select the Root.plist file so that it appears in the Property List Editor as illustrated in Figure 17-4:
Figure 17-4
If the list does not appear as shown above, Ctrl-click on the editor panel and select the Property List Type -> iPhone Settings plist option from the resulting menu to switch the editor into the correct mode.
By default, the property list file will contain a group, text field, toggle switch and slider. To view the current preference items, click on the right facing arrow to the left of the Preference Items heading to unfold the list of items:
Figure 17-5
For the purposes of this example we will start with an empty list of preference items. Select each of the items in turn, pressing the keyboard delete key to remove the item from the list.
Adding a Switch Control to the Settings Bundle
The first control to be added to the preferences list is a switch control. Select the Preference Items entry in the editor panel and click on the + button when it appears. In the resulting menu, select the Toggle Switch option as outlined in Figure 17-6:
Figure 17-6
With the sub-items for the newly added preference item unfolded and visible within the property list editor, set the Title value to “Show Title”, the Identifier to show_label_preference and the Default Value to YES:
Figure 17-7
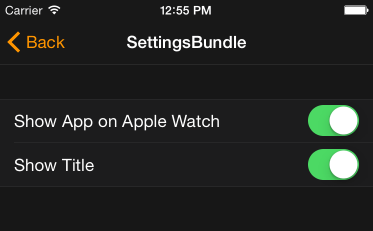
Select the SettingsBundle target from the Xcode toolbar and then run the iOS app to install the settings bundle on the device. Once the app is installed and running, stop the app and then navigate to and launch the Apple Watch app on the iPhone device or simulator. Within the Apple Watch app select the My Watch tab and scroll down to and select the SettingsBundle app from the list of installed WatchKit apps. The preferences screen should appear and include the new Toggle Switch control:
Figure 17-8
Adding a Slider Control to the Settings Bundle
The remaining controls will appear within a group section on the preferences screen. Begin by clicking on the down arrow to the left of the Item 0 entry so that the sub-items are folded and out of sight. Next, Ctrl-click on the Item 0 entry and select the Add Row menu option. Select the Group item type from the menu and configure the title value to read “Font and Color”:
Figure 17-9
Click on the down arrow on the Item 1 line to fold the sub-items and then Ctrl-click on the item, once again selecting the Add Row menu option but this time choosing Slider from the list of preference items types. Unfold the new item and set the Identifier field to font_preference, the Minimum value to 10, the Maximum value to 30 and the Default Value to 15.
Adding a Multi Value Control to the Settings Bundle
The multi-value control will provide the user with a choice of red, blue or green for the color of the text on the label in the WatchKit app. Add this item by folding the sub-items of Item 2, Ctrl-clicking on the item line and selecting the Add Row menu option. From the list of item types choose the Multi Value option. Edit the values for the new item so that the title reads “Foreground Color” and the identifier is set to color_preference.
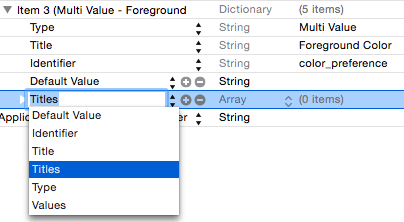
The multi value control requires a list of titles to display to the user together with a set of corresponding values. Add the Titles entry by selecting the Default Value line and clicking on the + button. From the resulting menu, select the Titles entry:
Figure 17-10
Unfold the new Titles entry (so that the arrow is pointing down) and click on the + button to add the first title to the list which will appear with a key of Item 0. Enter White into the value field for this item before clicking on the + button on the Item 0 line to add the next title. Enter Green as the value for this key. Repeat this step once more, this time setting the title text to Blue.
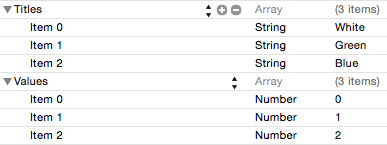
On completion of these steps the multi value section of the properties file should match Figure 17-11:
Figure 17-11
Each of the titles added to the multi-value control now needs to have a corresponding value. Select and fold the Titles section of the properties list so that the title sub-items are hidden. With the Titles line still selected, click on the + button and add a new item of type Values.
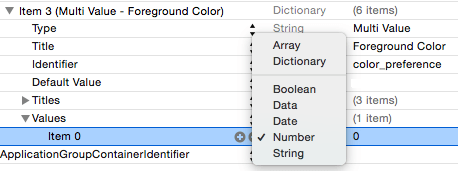
Select the Values line, unfold it and click on the + button to add a new value item to the array. The type of a value is set to String by default. This can be changed by clicking on the type field and selecting a different type from the resulting menu as shown in Figure 17-12:
Figure 17-12
Using this technique, change the value type for the new value from String to Number and set the value to 0.
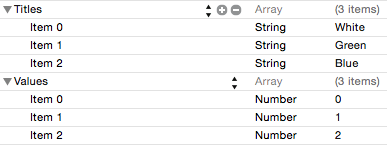
Repeat the above steps to add two more values, configured as numbers set to 1 and 2 respectively. Review the Titles and Values settings which should now resemble those configured in Figure 17-13:
Figure 17-13
The last task in this phase of the tutorial is to configure the default value setting for the multi-value control. Within the multi-value section of the list (listed as Item 3) locate the Default Value key, change the value type to Number and set the value to 0.
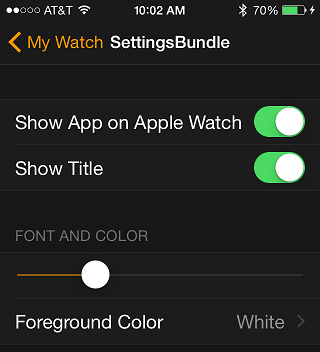
Compile and run the iOS app target and then use the Apple Watch app to test that the preference items are configured correctly. If the Apple Watch app launches directly into the SettingsBundle preferences page it may be necessary to use the Back button to return to the list of WatchKit apps and then reselect the SettingsBundle app in order to see the new configuration. The first screen should match Figure 17-14:
Figure 17-14
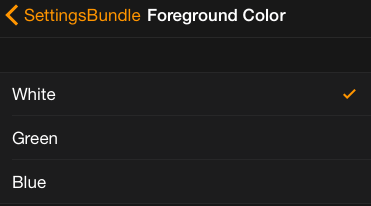
Selecting the Foreground Color control should display a second screen (Figure 17 15) listing the full range of color choices available for selection by the user:
Figure 17-15
Setting Up the App Group
The WatchKit settings bundle is packaged with the containing iOS app. This means that an app group is required if the WatchKit extension is to be able to access the preferences contained within the settings bundle.
Begin by selecting the SettingsBundle target located at the top of the Project Navigator panel and clicking on the Capabilities tab in the main panel. Within the capabilities panel, locate the App Groups section and switch the setting to the On position.
To add a new app group to your account, simply click on the + button and enter the new app group name, for example:
group.com.ebookfrenzy.SettingsBundle
Add the current app to the newly added app group by enabling the checkbox next to the group name.
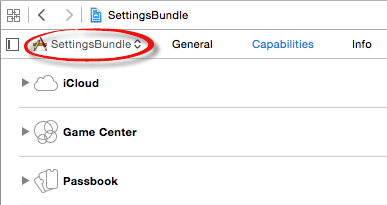
With the iOS app added to the app group, the WatchKit extension must also be added as a member of the same group in order to gain access to the shared container. To access the capability settings for the WatchKit extension, use the menu located in the top left-hand corner of the capabilities panel as indicated in Figure 17 16:
Figure 17-16
When clicked, this menu will present a list of targets contained within the current project as shown in Figure 17 16, one of which will be the SettingsBundle WatchKit Extension. Select this option and repeat the steps followed for the iOS app to enable membership in the same app group as that configured for the iOS app.
| Purchase the fully updated watchOS 2/Swift 2 edition of this book in eBook ($12.99) or Print ($27.99) format watchOS 2 App Development Essentials Print and eBook (ePub/PDF/Kindle) editions contain 35 chapters. |
Adding the App Group to the Settings Bundle
The final step in configuring the app group is to add the group container identifier to the settings bundle. This is achieved by selecting the Root.plist file from the settings bundle folder in the Project Navigator and entering the app group identifier into the value field of the ApplicationGroupContainerIdentifier key line:
Figure 17-17
Accessing Preference Settings from the WatchKit Extension
The intention in this example is for the preferences saved in the settings bundle to be applied to the user interface of the WatchKit app each time that the app launches on the Apple Watch device. This will require the addition of some code to the awakeWithContext method in the WatchKit extension InterfaceController.swift file. With this file loaded into the editing panel, locate and modify this method so that it reads as follows making sure to use the app group identifier you configured earlier in the chapter:
override func awakeWithContext(context: AnyObject?) {
    super.awakeWithContext(context)

    let defaults = NSUserDefaults(suiteName:
		"<YOUR APP GROUP ID HERE>")

    if let preference = defaults?.boolForKey("show_label_preference")
    {
        titleLabel.setHidden(!preference)
    }
}
This code gets the user default settings for the app group and extracts the Boolean value assigned to the show_label_preference key. This value is then inverted (since a true value from the settings bundle means the title should not be hidden) and used to control whether or not the title label is visible in the scene.
The next preference to be handled is the font size setting. Remaining within awakeWithContext, further modify the method so that it reads as follows:
override func awakeWithContext(context: AnyObject?) {
    super.awakeWithContext(context)

    let defaults = NSUserDefaults(suiteName:
		"<YOUR APP GROUP ID HERE>")


    if let preference = defaults?.boolForKey("show_label_preference")
    {
        titleLabel.setHidden(!preference)
    }

    let sliderVal = defaults?.floatForKey("font_preference")

    let fontSize = CGFloat(sliderVal!)

    var attrs = [NSFontAttributeName :
		UIFont.systemFontOfSize(fontSize)]

    var attributedString = NSAttributedString(string: "Hello Watch",
		attributes: attrs)

    titleLabel.setAttributedText(attributedString)
}
The font code begins by getting the current value of the slider in the settings bundle and converting it to a CGFloat value. It then creates a dictionary object consisting of a key represented by NSFontAttributesName and a UIFont object using the system font with the size set to the value defined by the slider.
If anything other than plain text with a pre-configured font is to be displayed on a WatchKit Label interface object it is necessary to use an NSAttributedString instance to do so. The NSAttributedString class allows text and a variety of attributes such as font settings to be combined within a single object. In the method code, an NSAttributedString object is created and initialized with the text to be displayed and the attributes dictionary containing the font setting. Finally, the attributed string object is set on the title label.
The last addition to the method is to add a switch statement based on the multi value preference selection to set the foreground color of the label text:
override func awakeWithContext(context: AnyObject?) {
    super.awakeWithContext(context)

    let defaults = NSUserDefaults(suiteName:
		"<YOUR APP GROUP ID HERE>")


    if let preference = defaults?.boolForKey("show_label_preference")
    {
        titleLabel.setHidden(!preference)
    }

    let sliderVal = defaults?.floatForKey("font_preference")

    let fontSize = CGFloat(sliderVal!)

    var attrs = [NSFontAttributeName :
		UIFont.systemFontOfSize(fontSize)]

    var attributedString = NSAttributedString(string: "Hello Watch",
		attributes: attrs)

    titleLabel.setAttributedText(attributedString)

    if let color = defaults?.integerForKey("color_preference") {
        switch color {
        case 0:
            titleLabel.setTextColor(UIColor.whiteColor())
        case 1:
            titleLabel.setTextColor(UIColor.greenColor())
        case 2:
            titleLabel.setTextColor(UIColor.blueColor())
        default:
            break
        }
    }
}
When the multi-value control was created it was configured to store integer values between 0 and 2 to indicate the color chosen by the user. The code added above uses a switch statement to set the text color on the label according to the integer retrieved from the bundle.
Registering the Default Preference Settings
As outlined in the previous chapter, the defaults value configured within the settings bundle properties file define only how the controls will appear when the preferences screen for the WatchKit app is displayed to the user. A preference value is not saved to the settings bundle until the user changes that setting in the preference screen. Default values must, therefore, be registered in the code when the main WatchKit app interface controller initializes. Edit the InterfaceController.swift file and implement the init method to register the default values for the preference settings:
override init() {

    let defaults = NSUserDefaults(suiteName:
		"group.com.ebookfrenzy.SettingsBundle")

    let defaultSettings = ["show_label_preference" : true,
            		     "font_preference" : 15,
            		     "color_preference" : 0]

    defaults?.registerDefaults(defaultSettings)
}
Adding the Companion Settings Icons
The last task before testing the project is to add the app icons that will appear within the Apple Watch app. The icons for this purpose are contained within the app_icons folder of the sample code download, available from the following URL:
http://www.ebookfrenzy.com/watchkit/app_icons.zip
To add the icons, begin by selecting the Image.xcassets entry listed under the SettingsBundle WatchKit App folder in the Project Navigator panel and selecting the AppIcon image set. Open a Finder window and locate the app_icons folder in the code samples. Once located, drag and drop the [email protected] icon file onto the 2x placeholder for the Companion Settings icons. Repeat this step to place the [email protected] file into the 3x placeholder so that the icon settings appear as shown in Figure 17 18:
Figure 17-18
Testing the Settings Bundle Project
Compile and run the iOS app so that the latest version of the settings bundle is installed. Change the run target in the Xcode toolbar to the Settings Bundle WatchKit Extension target, run the app on the watch device and note that the text appears with a white foreground.
Return to the iPhone, launch the Apple Watch app and navigate to the preferences screen. Note that SettingsBundle app icon appears in the list of WatchKit app:
Figure 17-19
Select the app to display the preferences screen, change the font size and color settings and then stop and restart the WatchKit app from the Xcode toolbar. This time the label should display the text using the new color and font size preferences. Repeat these steps once again, this time turning off the switch control to hide the label.
Summary
The tutorial in this chapter has produced a project designed to demonstrate the use of a WatchKit settings bundle to provide the user with the ability to configure the preferences for a WatchKit app using the iPhone Apple Watch app.
| Purchase the fully updated watchOS 2/Swift 2 edition of this book in eBook ($12.99) or Print ($27.99) format watchOS 2 App Development Essentials Print and eBook (ePub/PDF/Kindle) editions contain 35 chapters. |
| Previous | Table of Contents | Next |
| Configuring Preferences with the WatchKit Settings Bundle | An Overview of WatchKit Glances |
