Difference between revisions of "Logging into the CentOS 6 GNOME Desktop"
m (Text replacement - "<google>BUY_CENTOS6</google>" to "<htmlet>centos6</htmlet>") |
m (Text replacement - "<table border="0" cellspacing="0" width="100%">" to "<table border="0" cellspacing="0">") |
||
| Line 1: | Line 1: | ||
| − | <table border="0" cellspacing="0 | + | <table border="0" cellspacing="0"> |
<tr> | <tr> | ||
<td width="20%">[[Allocating a Windows Disk Partition to CentOS 6|Previous]]<td align="center">[[CentOS 6 Essentials|Table of Contents]]<td width="20%" align="right">[[Configuring CentOS 6 GNOME Screen Resolution and Multiple Monitors|Next]]</td> | <td width="20%">[[Allocating a Windows Disk Partition to CentOS 6|Previous]]<td align="center">[[CentOS 6 Essentials|Table of Contents]]<td width="20%" align="right">[[Configuring CentOS 6 GNOME Screen Resolution and Multiple Monitors|Next]]</td> | ||
| Line 42: | Line 42: | ||
<hr> | <hr> | ||
| − | <table border="0" cellspacing="0 | + | <table border="0" cellspacing="0"> |
<tr> | <tr> | ||
<td width="20%">[[Allocating a Windows Disk Partition to CentOS 6|Previous]]<td align="center">[[CentOS 6 Essentials|Table of Contents]]<td width="20%" align="right">[[Configuring CentOS 6 GNOME Screen Resolution and Multiple Monitors|Next]]</td> | <td width="20%">[[Allocating a Windows Disk Partition to CentOS 6|Previous]]<td align="center">[[CentOS 6 Essentials|Table of Contents]]<td width="20%" align="right">[[Configuring CentOS 6 GNOME Screen Resolution and Multiple Monitors|Next]]</td> | ||
Revision as of 14:41, 5 May 2016
| Previous | Table of Contents | Next |
| Allocating a Windows Disk Partition to CentOS 6 | Configuring CentOS 6 GNOME Screen Resolution and Multiple Monitors |
|
You are reading a sample chapter from the CentOS 6 Essentials Essentials book. Purchase a copy of the fully updated CentOS 8 edition in eBook ($24.99) or Print ($36.99) format CentOS 8 Essentials Print and eBook (ePub/PDF/Kindle) editions contain 31 chapters and over 260 pages. Learn more... |
The next few chapters are intended for those readers who are unfamiliar with the GNOME desktop environment. In these chapters, topics such as navigating and customizing the GNOME desktop will be covered in some detail. If you are already familiar with the GNOME desktop feel free to skip these chapters and move to more advanced topics later in the book.
Logging into the GNOME Desktop
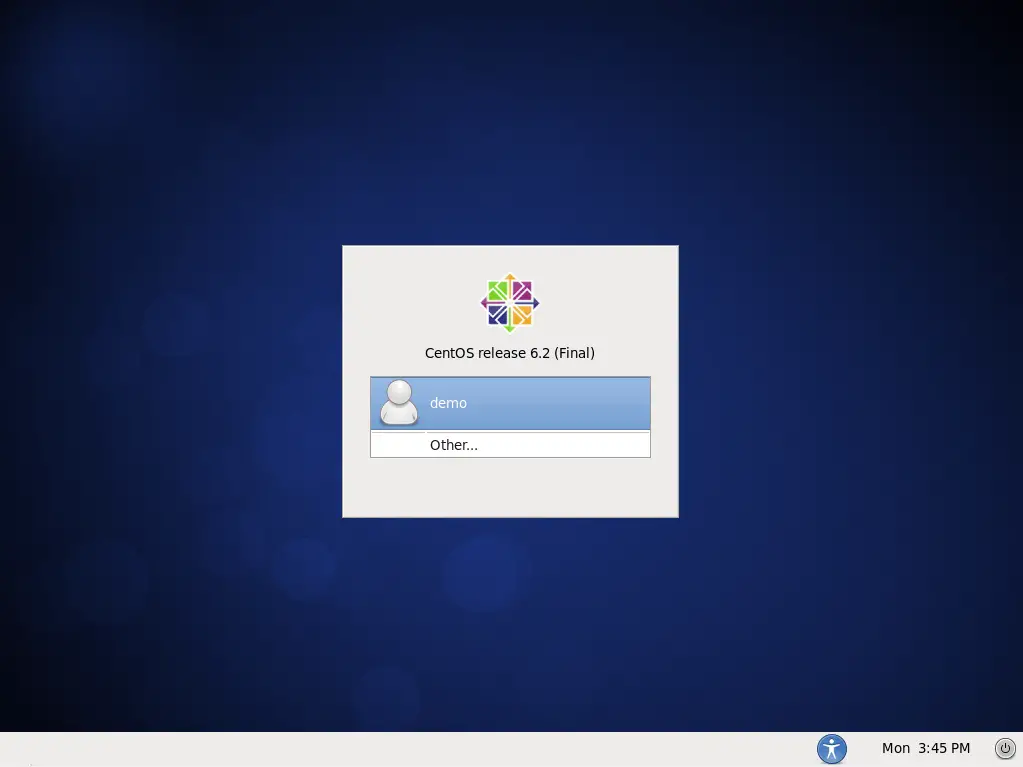
When you first boot from a CentOS 6 installation you will most likely be presented with a Login Screen similar to the one shown in the following figure (though the appearance and layout of the screen changes from one release of CentOS to the next):
This screen has a number of options and text fields that give the user some level of control over what happens next:
- User Icons - For each user with an account on the system, an icon will appear next to their login name. Clicking on this icon will begin the login process for that user and prompt for a password. If the user is not listed (for example the root user is not listed), the Other button may be clicked to manually enter the user name.
- Password: - This input field only appears after a user name has been selected from the list, or typed into the Username: field. Once the password has been entered, press the Enter key to initiate the login process.
The bottom of the screen contains a number of buttons. The first button allows accessibility options such as screen reader, magnification and keyboard settings to be configured. Next is a power switch. When clicked, the button displays a menu containing the following power related options:
- Restart - Reboots the system. If this option is selected the system will display a confirmation window verifying the system is to be restarted before doing so.
- Shut Down - Shuts the system down to its powered off state. As with the Reboot option, confirmation will be sought before the shutdown proceeds.
After a user has been selected, the status bar along the bottom of the screen will change to display language and keyboard layout options.
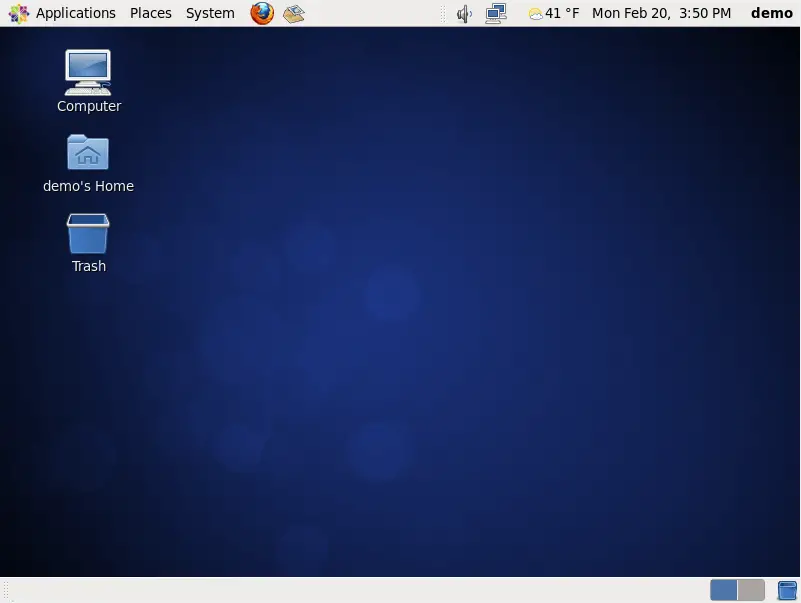
Once valid login credentials have been provided, CentOS 6 will initiate the login process and present the desktop. As with the login screen, the appearance of the desktop changes between CentOS releases, so do not be concerned if your desktop does not appear exactly as illustrated below:
Assuming you have now logged successfully into a CentOS 6 GNOME Desktop session, and have a screen in front of you similar to the one shown above we can begin to explore the desktop in more detail in A Guided Tour of the CentOS 6 GNOME Desktop.
|
You are reading a sample chapter from the CentOS 6 Essentials Essentials book. Purchase a copy of the fully updated CentOS 8 edition in eBook ($24.99) or Print ($36.99) format CentOS 8 Essentials Print and eBook (ePub/PDF/Kindle) editions contain 31 chapters and over 260 pages. Learn more... |
| Previous | Table of Contents | Next |
| Allocating a Windows Disk Partition to CentOS 6 | Configuring CentOS 6 GNOME Screen Resolution and Multiple Monitors |


