Difference between revisions of "Ad Blocker Detection Techniques"
(→Testing the Detector) |
(→Testing the Detector) |
||
| Line 145: | Line 145: | ||
| − | [[Image: | + | [[Image:wordpress_paste_footer_code1.png|Adding Ad Blocker Detection code within WordPress]] |
Figure 4-4 | Figure 4-4 | ||
Revision as of 17:44, 2 May 2016
Just about every strategy for dealing with ad blocking begins with identifying when it is happening. This involves adding to the pages of a website some JavaScript code designed to detect when changes have been made to the page content by an ad blocker.
This chapter will outline the ways in which ad blocker detection typically works before introducing two options for implementing this detection within the pages of a website.
How Ad Blocker Detection Works
As described in detail in the previous chapter, ad blockers work by blocking communication with the servers providing the ads, and by hiding the elements of web pages that contain advertising content. Ad blockers obtain information about what to block by referring to filter lists containing the addresses of all known ad servers and vast sequences of pattern matching rules.
Ad blocking detection works by placing so-called “bait content” within the pages of a website. Although invisible to the user (it might, for example, be a single pixel in size), this bait content is implemented so as to appear to ad blockers as advertising content. After the web page has finished loading, the detection code checks the properties of the bait content to ascertain whether it is still visible. If the bait content has been hidden, the detection code knows that an ad blocker is active.
An Example of Bait Content
The following web page element will, if encountered by an ad blocker, be treated as advertising content and hidden from view:
<div class="banner_ad"> </div>
In terms of the content displayed by the above element, all that this consists of is a single space character. What draws the attention of most ad blockers is the class name of “banner_ad” which can be found within most ad blocker blacklists. This can be verified by opening a browser window and loading the EasyList filter list used by a number of ad blocking extensions, the URL for which is as follows:
https://easylist-downloads.adblockplus.org/easylist.txt
Within the list, a search for banner_ad should list number of matches, more than one of which will be a perfect match for the bait content outlined above.
Detecting the Ad Blocker
The most basic of ad blocking detector code simply accesses the bait element and performs a range of tests to identify if the content is still visible. The following JavaScript code, for example, obtains a reference to the banner ad element before checking the height and width properties. If these are set to zero the function makes the reasonable assumption that an ad blocker has hidden the content:
<script src=
 "https://ajax.googleapis.com/ajax/libs/jquery/1.12.0/jquery.min.js">
</script>
<script>
(function() {

        var detector = function() {
            setTimeout(function() {

                if(!document.getElementsByClassName) return;
                var ads =
			document.getElementsByClassName('banner_ad'),
                    ad  = ads[ads.length - 1];

                if(!ad || ad.innerHTML.length == 0
				|| ad.clientHeight === 0) {
                    console.log('Ad Blocker Detected');
                } else {
                    console.log('No Ad Blocker');
                }
            }, 2000);
        }

        /* Add a page load listener */
        if(window.addEventListener) {
            window.addEventListener('load', detector, false);
        }
})();
</script>
Note that the above code listing includes the following lines of JavaScript:
if(window.addEventListener) {
     window.addEventListener('load', detector, false);
}
These lines of code configure the browser to call the “detector” function when the web page has finished loading. A closer inspection of the lines of JavaScript code within the detector function will reveal that the JavaScript setTimeout() function is used to ensure that the test of the banner ad properties takes place after a 2000 millisecond timeout. The purpose of this delay is to allow the ad blocker to complete its work before checking the status of the banner ad.
As currently implemented, the code simply outputs a message to the browser’s JavaScript console to indicate whether an ad blocker has been detected.
Testing the Detector
If you have access to the server on which your website is running, create a sample html file to test out the above detection code. For example:
<html>
<head>
<title>Detector Test Page</title>
</head>
<body>
<h1>Testing the Detector</h1>

<div class="banner_ad"> </div>
<script src=
"https://ajax.googleapis.com/ajax/libs/jquery/1.12.0/jquery.min.js">
</script>
<script>
(function() {

        var detector = function() {
            setTimeout(function() {

                if(!document.getElementsByClassName) return;
                var ads =
                        document.getElementsByClassName('banner_ad'),
                    ad  = ads[ads.length - 1];

                if(!ad || ad.innerHTML.length == 0
                                || ad.clientHeight === 0) {
                    console.log('Ad Blocker Detected');
                } else {
                    console.log('No Ad Blocker');
                }

            }, 2000);
        }

        /* Add a page load listener */
        if(window.addEventListener) {
            window.addEventListener('load', detector, false);
        }
})();
</script>
</body>
</html>
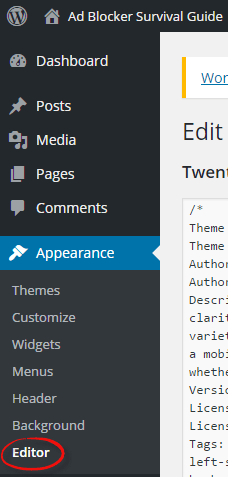
Alternatively, if you are using a WordPress installation select the Appearance option from the WordPress dashboard followed by the Editor entry as illustrated in Figure 4-1 below (note that these options are not available for sites hosted on WordPress.com):
Figure 4-1
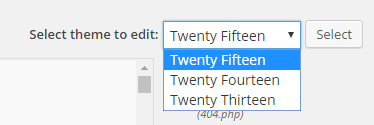
From the drop down menu in the upper right hand corner of the main panel, select the theme you are using for your website and click on the Select button:
Figure 4-2
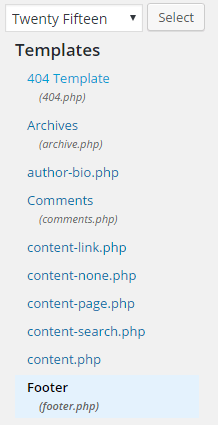
Next, select the Footer (footer.php) entry from the Templates list located on the right hand side of the page as shown in Figure 4-3:
Figure 4-3
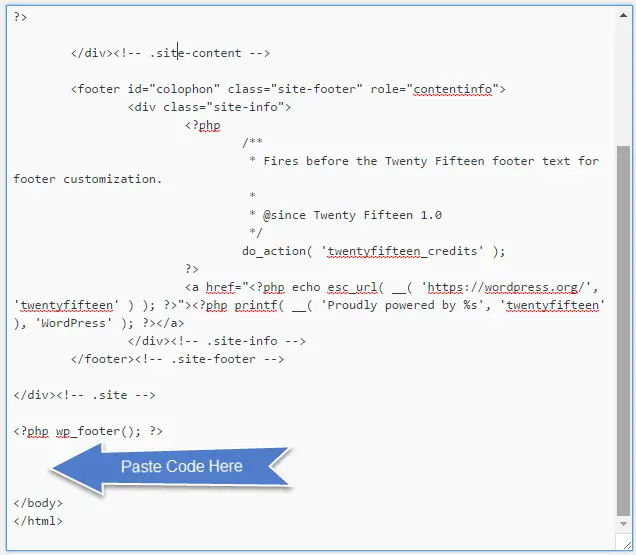
Within the code for the template, scroll down until the </body> tag comes into view and place the bait ad and detection JavaScript code immediately above it:
Figure 4-4
Once the code has been added, click on the Update File button. If the button is not visible or WordPress indicates the file cannot be saved, follow the steps on the following page to add write permission to the footer.php file:
https://codex.wordpress.org/Changing_File_Permissions
The path to the file for which permissions need to be changed will be as follows (where <theme name> is replaced by the name of the theme you are using on your site):
wp-content/themes/<theme name>/footer.php
If you are using another content management system such as Joomla! or Drupal, refer to the documentation for steps on embedding JavaScript code into the web pages of your site.
Once the detector code has been added, open a browser in which an ad blocker extension is installed and display the JavaScript console using the steps outlined in the chapter entitled An Overview of Ad Blocking Technology.
With the console displayed, load a web page containing the detector code while the ad blocker extension is disabled and verify that the “No Ad Blocker” message appears (keeping in mind that there will be a 2000 millisecond delay before the message appears). Enable the ad blocker, reload the page and check the console for the appearance of the “Ad Blocker Detected” message.
See it in Action:
http://www.techotopia.com/survival/detect.html
Using the BlockAdBlock Script
The above example provides a simple approach to detecting ad blockers and offers an insight into the way in which such detection typically works. A number of different detection scripts are also freely available for download from a variety of websites. Many of these are similar to the example outlined previously in this chapter. For a more robust and extensive detection option, the BlockAdBlock script is a well-regarded alternative that is widely used within the web publisher community. Details of this script and download instructions are available at the following URL:
https://github.com/sitexw/BlockAdBlock
To implement BlockAdBlock, download the blockadblock.js file from the above web page and install it onto your web server. Next, add the following to each web page for which detection is required:
<script src="/blockadblock.js"></script>

<script>
// Function called if AdBlock is not detected
function adBlockNotDetected() {
    console.log('Ad Blocker Detected');

}
// Function called if AdBlock is detected
function adBlockDetected() {
    console.log('No Ad Blocker');
}

// Recommended audit because AdBlock locks the file 'blockadblock.js'
// If the file is not called, the variable does not exist 'blockAdBlock'
// This means that AdBlock is present
if(typeof blockAdBlock === 'undefined') {
    adBlockDetected();
} else {
    blockAdBlock.onDetected(adBlockDetected);
    blockAdBlock.onNotDetected(adBlockNotDetected);
}
</script>
In addition to containing countermeasures to avoid itself being blocked by ad blockers, the BlockAdBlock script also removes the bait after detection and includes a range of configuration options not available with simpler scripts. Configuration options are available to output debug information to the JavaScript console, control whether the ad blocker detection check is performed automatically when the web page loads and configuration of the number of times the detection is performed and the duration between each attempt. The following code, for example, enables debugging output and disables detection at web page load time:
blockAdBlock.setOption({
    debug: true,
    checkOnLoad: false
});
If the checkOnLoad option is set to false, the detection can be triggered independently from anywhere within the web page via a call to the blockAdBlock.check() function as follows:
<script>
.
.

     blockAdBlock.check()
.
.
</script>
Summary
The first step in dealing with ad blocking involves identifying when it is taking place. This involves placing bait content (essentially a page element known to be identified as an advertisement by an ad blocker) and some JavaScript detection code. The web page is then configured to call the detection code a short time after the web page has loaded. The detection code inspects properties of the bait content to verify if it is still visible. If the bait is hidden then the presence of an ad blocker is assumed.


