Difference between revisions of "Creating an RHEL 5 KVM Virtual Machine"
| Line 100: | Line 100: | ||
From this point on, simply follow the operating installation instructions to install the guest OS in the KVM virtual machine. | From this point on, simply follow the operating installation instructions to install the guest OS in the KVM virtual machine. | ||
For information on administering a virtual system read [[Managing and Monitoring RHEL 5 based KVM Guest Systems]]. | For information on administering a virtual system read [[Managing and Monitoring RHEL 5 based KVM Guest Systems]]. | ||
| + | |||
| + | <google>BUY_RHEL5</google> | ||
| + | |||
| + | <hr> | ||
| + | <table border="0" cellspacing="0" width="100%"> | ||
| + | <tr> | ||
| + | <td width="20%">[[Creating an RHEL 5 KVM Networked Bridge Interface|Previous]]<td align="center">[[RHEL 5 Essentials|Table of Contents]]<td width="20%" align="right">[[Creating Xen and KVM RHEL 5 Virtual Machines from the Command-line (virt-install and virsh)|Next]]</td> | ||
| + | <tr> | ||
| + | <td width="20%">Creating an RHEL 5 KVM Networked Bridge Interface<td align="center"><td width="20%" align="right">Creating Xen and KVM RHEL 5 Virtual Machines from the Command-line (virt-install and virsh)</td> | ||
| + | </table> | ||
Revision as of 16:40, 11 August 2010
| Previous | Table of Contents | Next |
| Creating an RHEL 5 KVM Networked Bridge Interface | Creating Xen and KVM RHEL 5 Virtual Machines from the Command-line (virt-install and virsh) |
<google>BUY_RHEL5</google>
KVM based virtual machines can easily be configured on Red Hat Enterprise Linux 5 using either the virt-install command-line tool, or the virt-manager GUI tool. For the purposes of this chapter we will use the virt-manager tool to install Windows 7 as a KVM guest on RHEL using full virtualization.
The command-line approach to virtual machine creation will be covered in the next chapter entitled Installing an RHEL KVM Guest OS from the Command-line (virt-install).
Contents | ||
Starting the Virtual Machine Manager
Begin by launching virt-manager either by selecting the Applications -> System Tools -> Virtual Machine Manager menu option, or from the command-line in a terminal window by running virt-manager. If virt-manager fails to start with a message that reads “Unable to open connection to the libvirt management daemon” it will be necessary to open a terminal window (Applications -> System Tools -> Terminal) and run the following commands before attempting to start virt-manager once again:
su –
/sbin/service libvirtd start
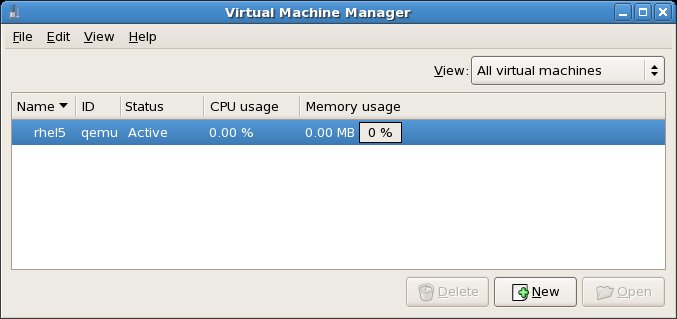
Once loaded, the virtual machine manager will prompt for the root password prior to displaying the following screen:
The main virt-manager screen lists the current virtual machines configured on the system. At this point there should only be one, the host system. By default the manager should be connected to the host. If it is not, connect to the host system by right clicking on the entry in the list and selecting Connect from the popup menu.
Creating the New RHEL 5 based KVM Virtual Machine
To create a new virtual system, ensure the host is selected in the list and click on the New button to display the first screen of the Create new virtual machine wizard. Read the information on the first screen then click on the Forward button to proceed. In the Name field on the next screen, enter a suitably descriptive name for the virtual system.
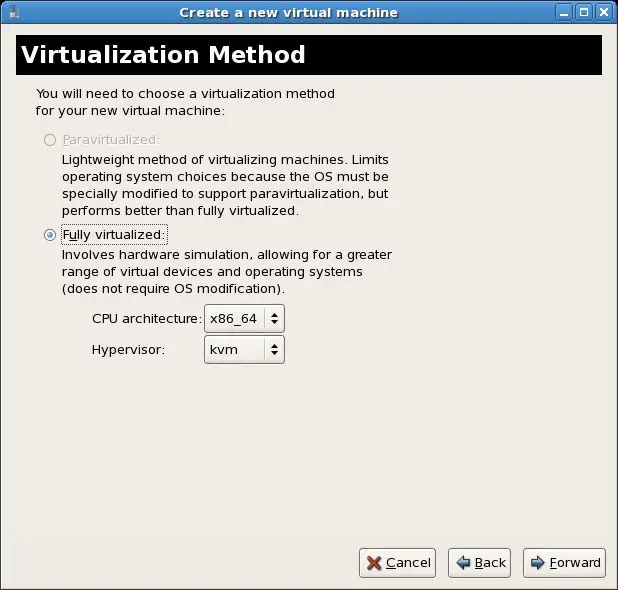
On the next screen, select the virtualization method to be used for the virtual machine. Since we plan to run Windows 7, an unmodified guest operating system, we must use full virtualization. If the full virtualization option is disabled, verify that the host system’s CPU has either Intel-VT or AMD-V support and that it is enabled in the BIOS. Also select KVM from the Hypervisor menu and the CPU architecture for the guest (i686 for 32-bit or x86_64 for 64-bit):
Note that if the KVM option is not available from the Hypervisor menu it may be that KVM support has not been installed correctly on the system. If your CPU lacks hardware virtualization support you can select the QEMU option. With QEMU your guest operating system will run inside QEMU based emulation and, as such, will not use the faster KVM based virtualization.
Configuring the Installation Method
On the next screen, select the installation method. Options supported include local media such as a CDROM, DVD or ISO image file, a network installation via HTTP, FTP or NFS or a PXE-based network boot installation. On this screen, also specify the operating system family and version of the guest. Unfortunately the current virt-install package does not include an option for Windows 7, though Windows Vista is a close enough match for the purposes of this tutorial
On the next screen, configure the settings corresponding the installation media selection made in the previous screen (CDROM device, path to ISO image, HTTP address etc) and click Forward to proceed.
Configuring the KVM Virtual Storage
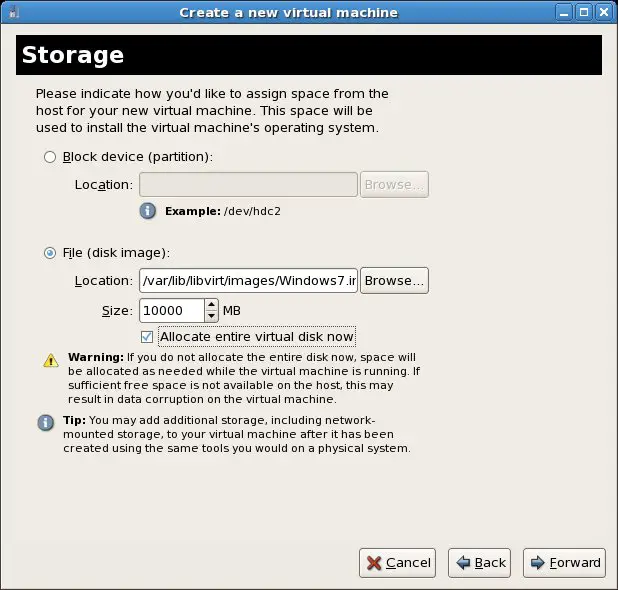
The guest will require disk space to store both operating system and user data files. The next screen of the installation wizard allows these storage options to be configured. The guest can be given an entire disk partition or an image file residing on the file system of the host to use as storage. In the case of the latter option, the size of the image file must be defined. This option can also be configured to allocate the entire disk space now or as it is needed. Deferred allocation has the advantage that the disk space will not be allocated until it is needed, though this may result in data loss if sufficient space is not available when it is required. There may also be occasional performance degradation as space is allocated on an as needed basis:
Once these settings are complete, click Forward to configure network settings for the guest operating system.
Configuring KVM Network Settings
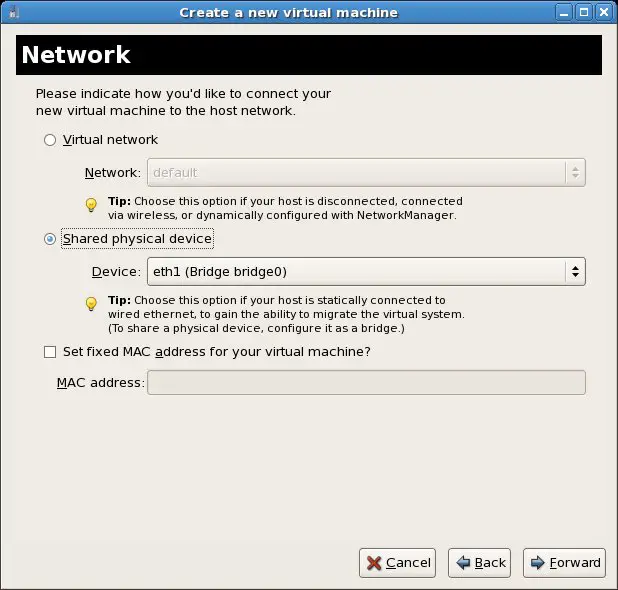
A number of options are available for providing network connectivity for a KVM based virtual machine. These topics were covered in Creating an RHEL 5 KVM Networked Bridge Interface. If the guest is to be connected to a virtual network within the host operating system with connectivity provided to the external network via Network Address Translation (NAT) then the Virtual network option should be selected. For the virtual machine to be connected directly to the external network by sharing a network adapter installed in the host then the Shared physical device option should be selected. Note that the shared device option requires that a network bridge already be configured on the host as outlined in the previous chapter:
If a specific MAC address is required for the virtual machine, select Set fixed MAC address for your virtual machine option and enter the required address into the text field before proceeding to the next screen.
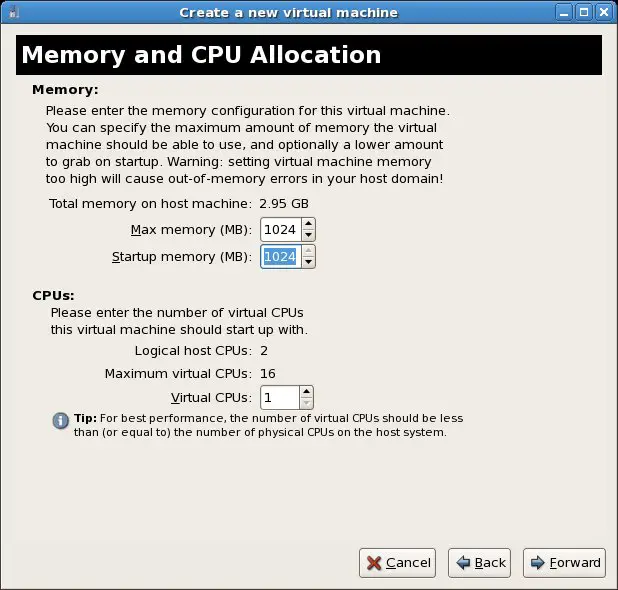
Configuring KVM Virtual Machine Memory and CPU Settings
The new virtual machine will need access to memory and CPU resources before it can be started. These settings are configured on the wizard’s Memory and CPU Allocation screen.
The optimal settings will depend on the number of CPUs and amount of physical memory present in the host and the requirements of other applications and virtual machines that will run in parallel with the new virtual machine. In terms of memory allocation, a startup amount may be specified along with the maximum memory that can be allocated during virtual machine runtime:
Ideally, the number of virtual CPUs should not exceed the number of physical CPUs installed in the host. Clicking the Forward button after configuring the memory and CPU settings will display a summary screen. Be sure to review the information to ensure it matches your expectations for the virtual machine prior to proceeding.
Starting the New KVM Virtual Machine
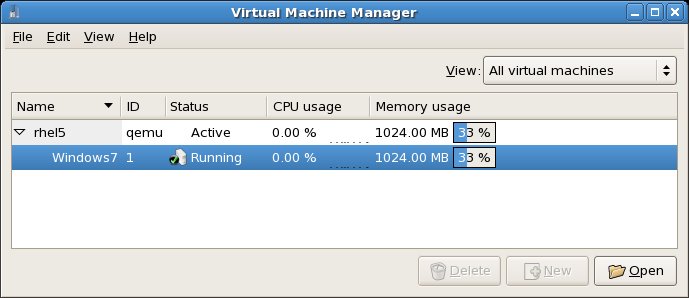
Click on the Finish button to begin the creation process. The virtualization manager will create the disk and configure the virtual machine before starting the system. The duration of this process will depend on a number of factors including the size of the disk assigned to the virtual machine, whether that disk is pre-allocated and the location of the installation media. Once the creation process completes, the new virtual machine will appear in the main virt-manager window with the status set to Running as illustrated in the following figure:
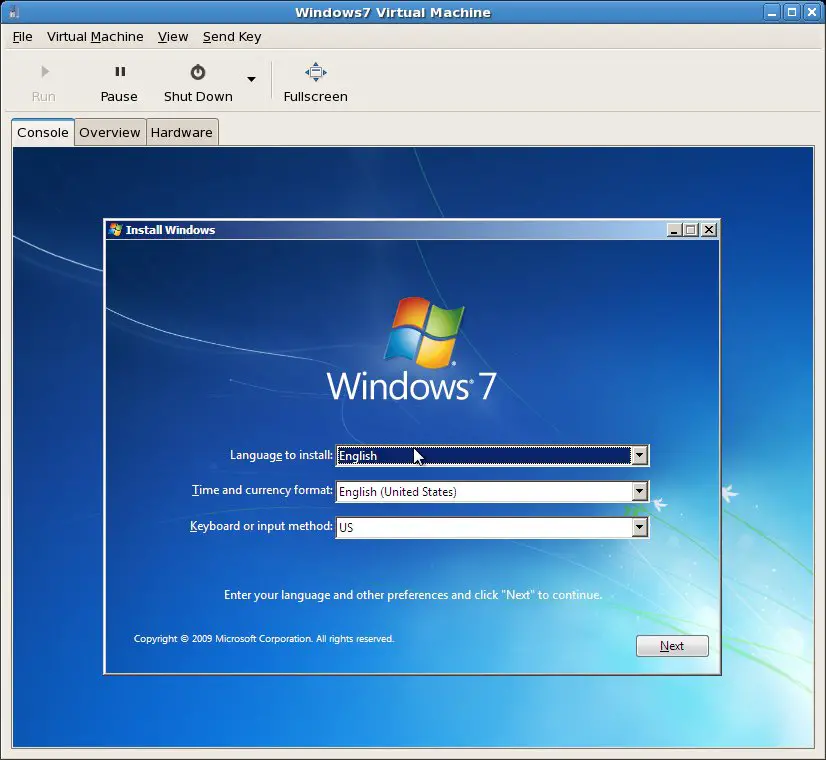
By default, the console for the virtual machine should appear in the virtual machine viewer window. To view the console of the running machine at any future time, ensure that it is selected in the virtual machine list and select the Open button from the bottom toolbar. The virtual machine viewer should be ready for the installation process to begin:
From this point on, simply follow the operating installation instructions to install the guest OS in the KVM virtual machine.
For information on administering a virtual system read Managing and Monitoring RHEL 5 based KVM Guest Systems.
<google>BUY_RHEL5</google>
| Previous | Table of Contents | Next |
| Creating an RHEL 5 KVM Networked Bridge Interface | Creating Xen and KVM RHEL 5 Virtual Machines from the Command-line (virt-install and virsh) |
