Difference between revisions of "Customizing the Ubuntu GNOME Desktop Panels"
m (Text replacement - "<google>ADSDAQBOX_FLOW</google>" to "<htmlet>adsdaqbox_flow</htmlet>") |
m (Text replacement - "<table border="0" cellspacing="0">" to "<table border="0" cellspacing="0" width="100%">") |
||
| (3 intermediate revisions by the same user not shown) | |||
| Line 9: | Line 9: | ||
| − | < | + | <htmlet>ubuntu11</htmlet> |
| Line 105: | Line 105: | ||
| − | < | + | <htmlet>ubuntu</htmlet> |
Latest revision as of 19:56, 27 October 2016
| Previous | Table of Contents | Next |
| Configuring the Ubuntu GNOME Desktop Background and Themes | Configuring Ubuntu Linux Printers |
This chapter provides an overview of the steps involved in customizing the various panels comprising the Ubuntu implementation of the GNOME desktop.
An Overview of the Ubuntu Panels
The bars across the top and bottom of the desktop are called panels. The top panel (shown below) contains the desktop menus, icons to launch commonly used applications such as the web browser and email client and other items such as the date and time and various status indicators.
The panel along the bottom of the desktop (shown below) contains button to hide and show the currently running applications, an area for switching between workspaces, a button to hide all currently visible application windows and an icon to open the trash can.
Although only two panels are configured by default you can add as many panels you you need to the desktop (although obviously there are limits on the amount of space on the desktop to accommodate the panels).
In this chapter we will cover various ways to customize these panels.
Changing Desktop Panel Properties
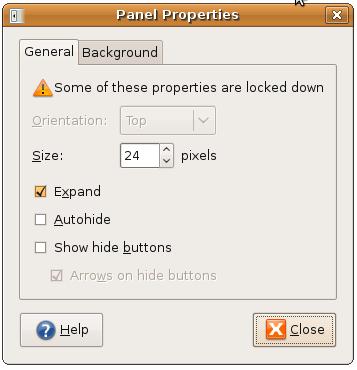
The properties of the desktop panels are controlled using the Panel Properties dialog. To access the properties for a particular panel move the mouse pointer over a blank section of the panel and click the right hand mouse button. In the resulting popup menu select the Properties menu option to invoke Panel Properties:
By default, the location of the top and bottom panels are locked preventing them from being moved. This fact is reflected by the Some of these properties are locked down message shown in the above dialog. To allow a locked panel to be moved close the panel properties dialog, right click on the panel again and select Allow panel to be moved. The panel may subsequently be locked by right clicking and selecting Lock Panel Position.
Once unlocked, the position of the panel on the desktop can be changed using the Orientation menu. The panel can be positioned at the top or bottom of the screen or positioned vertically on the left or right hand sides of the desktop.
The height of the panel may be adjusted using the Size property. Reduce the height of the panel to increase available desktop space.
By default the panel stretches to the width of the desktop. With the Expand property switched off the panel will appear only as wide as it needs to be to accommodate the items it contains.
Autohide causes the panel to be hidden until the mouse pointer moves to the side of the desktop where the panel is located, at which point the panel will appear.
The Show Hide Buttons option controls whether buttons are displayed at either end of the panel to enable the panel to be manually shown and hidden.
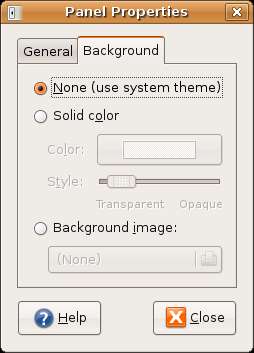
The Background tab of the Panel Properties dialog provides control over the background of the panel. The panel can be a specific color, the color dictated by the current theme, a user defined image or transparent to a specific degree:
Adding Items to a GNOME Destop Panel
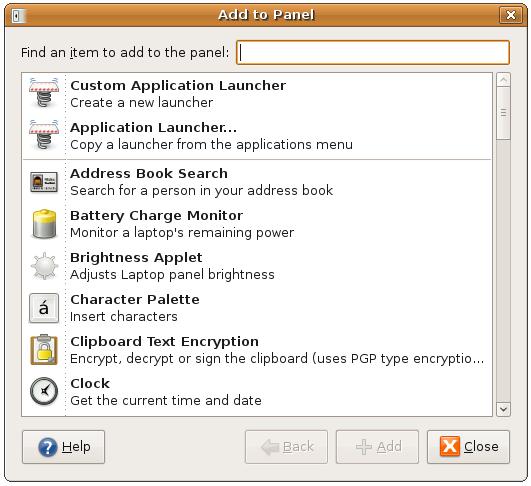
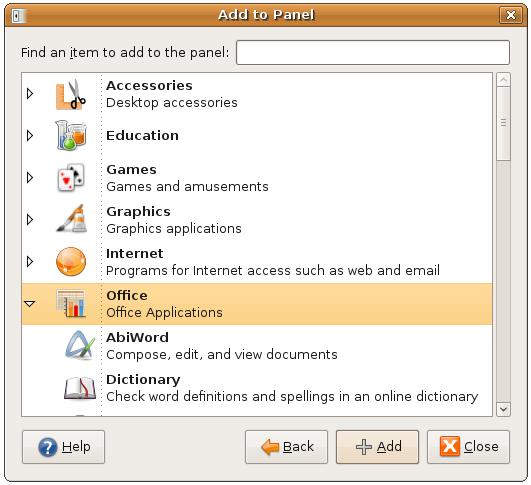
When Ubuntu Linux is installed, a number of items are added to the two default panels. Additional items, however, may be added to any panel. To add items to a panel simply click with the right mouse button over the panel to be configured and select the Add to Panel menu option. The Add to Panel dialog will then appear:
To add an item to the panel scroll through the list, select the item you are interested in and press the Add button. The following screenshot shows a panel with the system monitor and weather items added:
To edit the properties or preferences for a panel item move the mouse pointer over the item in the panel and click the right mouse button. Select either Properties or Preferences from the menu and the appropriate dialog will appear. For example, the Preferences panel for the Weather item allows various settings to be changed, such as the location and units for displaying temperature (Celsius or Fahrenheit). The system monitor can similarly be configured to also display system load, memory and network graphs.
To delete an item from a panel right click with the mouse on the item and select Remove from Panel.
If you find there is an application you frequently launch from the desktop Applications or System menus, these may also be added to a panel. To do so, launch the Add to Panel dialog as outlined above and click on the Application Launcher. The resulting dialog will list each menu item and all sub-menu items. If, for example, you wanted to be able to launch the OpenOffice Word Processor from the panel, simply click on the arrow next to Office in the Add to Panel dialog to unfold the list of Office applications. Select OpenOffice.org Word Processor and click on the Add button:
To move an item to a different location in a panel right click with the mouse of the item and select Move. Then use the mouse to drag and drop the item to a new location. Alternatively, click with either the middle mouse button, or the left and right mouse buttons and drag and drop the panel item to the new location.
To add a binary or application not currently available from the desktop menus simply select the Custom Application Launcher and specify the path to the application and provide a name. Click on the No icon button to select an icon to represent the item on the panel.
Changing the Number of Ubuntu Desktop Workspaces
The GNOME desktop supports multiple desktop workspaces (these are essentially individual screens which the user can switch between to avoid having to have all applications cluttered onto one screen). Switching between workspaces is achieved by clicking on the workspaces in the bottom desktop panel. The image below shows the panel from a desktop with two workspaces:
By default, Ubuntu configures two workspaces. To increase the number of workspaces right click with the mouse on the workspace control (as shown above) in the panel and select Preferences. Simply increase the Number of workspaces value to the desired number. The name of each workspace may be changed by double clicking on the default name in the list (Desk 1, Desk 2 etc) and typing in a new name.
Customizing the Desktop Menus
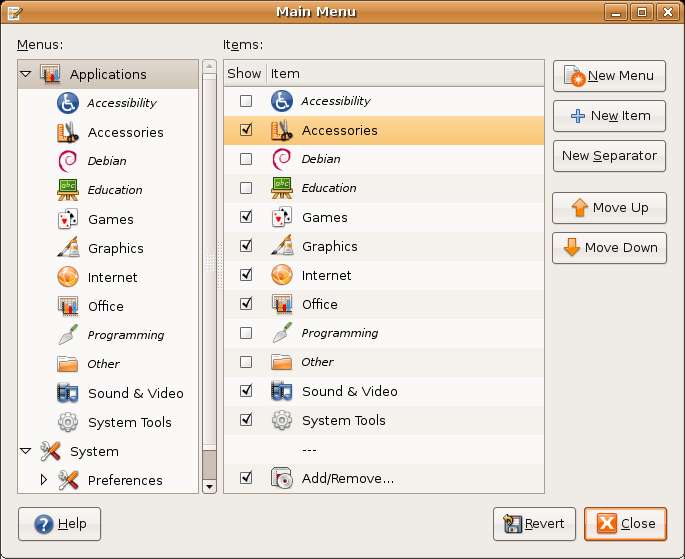
The desktop menus can be fully customized in terms of adding new menu items, adding new menus, and changing the order of items in the menu. To customize a menu right click over the menu name in the panel and select Edit menu.
Selecting an item from the list of menus will display the menu options for that menu. To modify the entries in the menu use the check boxes to activate or deactivate specific options. For example clicking on Accessories displays the items in the Accessories menu. Add new items using the Add Item button and specifying a name, path to the executable and an icon.
To move an item select the item in the list and use the Move up and Move down to change the position of the item in the menu.
Summary
On completion of this chapter the reader should have a good understanding of the steps involved in changing the Ubuntu GNOME desktop panels.
