Difference between revisions of "Repairing and Defragmenting Windows Server 2008 Disks"
(→Defragmenting Disks with Disk Defragmenter) |
m (Text replacement - "<table border="0" cellspacing="0"> " to "<table border="0" cellspacing="0" width="100%">") |
||
| (4 intermediate revisions by the same user not shown) | |||
| Line 1: | Line 1: | ||
| − | <table border="0" cellspacing="0" width="100%"> | + | <table border="0" cellspacing="0" width="100%"><tr> |
| − | <tr> | + | |
<td width="20%">[[Managing Windows Server 2008 Disk Quotas|Previous]]<td align="center">[[Windows Server 2008 Essentials|Table of Contents]]<td width="20%" align="right">[[Configuring Windows Server 2008 File Sharing|Next]]</td> | <td width="20%">[[Managing Windows Server 2008 Disk Quotas|Previous]]<td align="center">[[Windows Server 2008 Essentials|Table of Contents]]<td width="20%" align="right">[[Configuring Windows Server 2008 File Sharing|Next]]</td> | ||
<tr> | <tr> | ||
| Line 8: | Line 7: | ||
| − | < | + | <htmlet>win2008</htmlet> |
| Line 19: | Line 18: | ||
Once invoked, the initial Check Disk dialog will appear providing two options as illustrated below: | Once invoked, the initial Check Disk dialog will appear providing two options as illustrated below: | ||
| − | < | + | <htmlet>adsdaqbox_flow</htmlet> |
[[Image:windows_server_2008_check_disk.jpg|The Windows Server 2008 Disk Check Options]] | [[Image:windows_server_2008_check_disk.jpg|The Windows Server 2008 Disk Check Options]] | ||
| Line 251: | Line 250: | ||
| − | < | + | <htmlet>win2008</htmlet> |
Latest revision as of 20:12, 27 October 2016
| Previous | Table of Contents | Next |
| Managing Windows Server 2008 Disk Quotas | Configuring Windows Server 2008 File Sharing |
| Purchase and download the full PDF and ePub versions of this eBook only $9.99 |
The objective of this chapter of Windows Server 2008 Essentials is to cover the subject of checking, repairing and defragmenting FAT, FAT32 and NTFS file systems under Windows Server 2008 using both graphical and command-line tools.
Using Check Disk to Scan For and Fix File System Errors
The Check Disk tool can be used either to scan for and report errors on a file system, or to locate and fix errors. The graphical form of Check Disk can be invoked either from within Windows Explorer or the Disk Management tool. In either case, invoke the tool by right clicking on the drive in question, selecting Properties, clicking the Tools tab and pressing the Check Now... button.
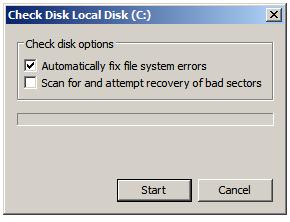
Once invoked, the initial Check Disk dialog will appear providing two options as illustrated below:

If neither of the options are selected when the Start button is pressed Check Disk will only report, but not attempt to fix errors. In order for Check Disk to repair errors and recover bad sectors during the scan the Automatically fix file system errors and Scan for and attempt recovery of bad sectors toggles must be selected respectively.
If the disk drive contains open files, Check Disk will be unable to fix errors located during the scan and will display a dialog warning you of this fact. This warning dialog will also provide the option to have the check run on the next system reboot (before any files are opened). This marks the disk as dirty forcing Check Disk execution at system startup. This setting may also be specified from the command prompt as follows:
fsutil dirty set e:
Volume - e: is now marked dirty
The current setting for a volume may be checked at any time using fsutil dirty query:
fsutil dirty query
Volume - e: is Dirty
Running Check Disk from the Command-prompt
The Check Disk process may also be initiated from the command prompt using the chkdsk command combined with the designator of the drive on which the scan is to be performed. In addition to performing the same functions as the graphical version of Check Disk, the command prompt version also provides more detailed disk analysis and repair reports.
The chkdsk utility accepts a number of command line options which govern the tasks performed during execution. These options are outlined in the following table:
| Option | Description |
|---|---|
| /F | Analyze the disk and fix any errors detected. |
| /B | Reevaluate clusters marked as bad on the volume. |
| /C | Do not check for cycles (a situation where a directory points to itself) within the folder structure. NTFS only. |
| /I | Perform a minimum check of indexes. NTFS only |
| /L[:Size] | Change the size of the transaction log file efault size is m default of 4096 KB. NTFS only. |
| /R | Analyze the disk and fix any errors, check for bad sectors and mark them as bad. |
| /V | List the full path of every file on the volume on FAT/FAT32. Displays messages related to fixing errors on NTFS volumes. |
| /X | Force the volume to dismount if currently mounted. |
To perform a disk analysis without correcting any errors, simply enter chkdsk at a command prompt together with the drive designator of the drive to be analyzed the following output is the result of running chkdsk on an NTFS volume:
C:\Windows\system32>chkdsk e:
The type of the file system is NTFS.
Volume label is New Volume.

WARNING!  F parameter not specified.
Running CHKDSK in read-only mode.

CHKDSK is verifying files (stage 1 of 3)...
  64 file records processed.
File verification completed.
  0 large file records processed.
  0 bad file records processed.
  0 EA records processed.
  0 reparse records processed.
CHKDSK is verifying indexes (stage 2 of 3)...
  90 index entries processed.
Index verification completed.
  0 unindexed files processed.
CHKDSK is verifying security descriptors (stage 3 of 3)...
  64 security descriptors processed.
Security descriptor verification completed.
  13 data files processed.
Windows has checked the file system and found no problems.

   8385535 KB total disk space.
    328864 KB in 9 files.
        16 KB in 15 indexes.
         0 KB in bad sectors.
     44715 KB in use by the system.
     43984 KB occupied by the log file.
   8011940 KB available on disk.

      4096 bytes in each allocation unit.
   2096383 total allocation units on disk.
   2002985 allocation units available on disk.
To perform error fixing, run chkdsk with the /F option. Alternatively the /R option will perform the same error fixing as /F but will also check for bad sectors. The /X option performs the same error corrections as /F but also dismounts the volume before doing so.
Defragmenting Disks with Disk Defragmenter
<google>WIN28BOX</google> Disk defragmentation occurs over time as files written to clusters spread over a wide area of a disk volume. This is the inevitable side effect of files being created and deleted over time and can ultimately result in degraded disk read/write performance.
As such it is considered good practice to regularly monitor, and when necessary, defragment disk volumes.
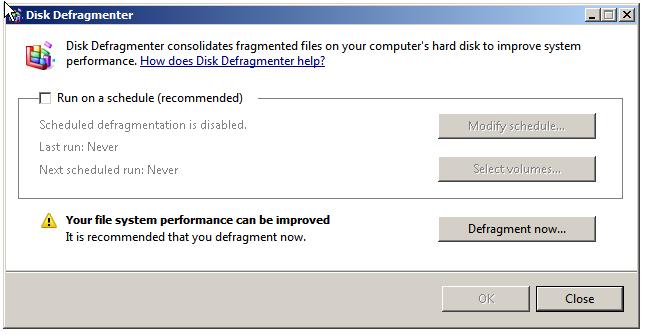
One method for performing this task is to use the Disk Defragmenter tool which is accessed by right clicking on a disk volume in Windows Explorer or the Disk Management interface in Computer Management and selecting Properties. In the properties dialog, select the Tools tab and click on Defragment Now.... This will display the initial screen of the Disk Defragmenter as illustrated in the following figure:
The tool will perform a scan of the selected volume and report whether a defragmentation is recommended (and in the above example it is recommended). Click on Defragment now... to initiate the defragmentation process. This will cause the drive selection dialog to appear. Select one or more disks to defragment from this dialog followed by OK to trigger the defragmentation process. As each selected drive is defragmented the progress will be displayed together with a button providing the option to cancel the process.
Automated Disk Defragmentation
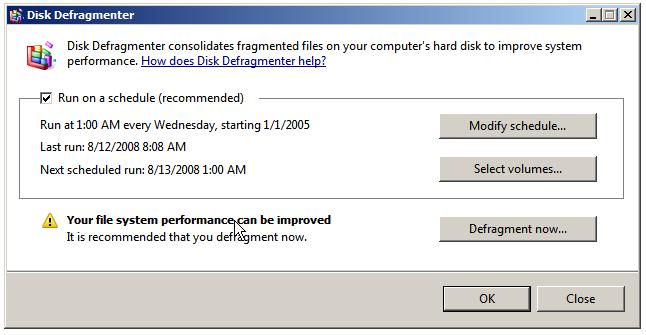
Windows Server 2008 also provides the option to automatically defragment disk drives as a background task. This is scheduled in the Disk Defragmenter tool which can be accessed either from within Windows Explorer or Disk Management as outlined above. Once invoked, automated disk defragmentation is configured by setting the Run on a schedule (recommended) toggle:
By default, automated defragmentation occurs at 1am every Wednesday. Once selected, the schedule may be configured by clicking on the Modify schedule... button where the frequency (daily, weekly, monthly), day and time may be specified:
To specify the volumes to be automatically defragmented, click on Modify volumes... and make the required volume selections.
Defragmenting Disks from the Command-line
Disk defragmentation may be analyzed and repaired from the command-prompt using the defrag command. This command supports a number of command-line options as described in the following table:
| Option | Description |
|---|---|
| -A | Perform an analysis of the specified volume. |
| -C | Defragment all disks. |
| -F | Force defragmentation of a volume even when low on space. |
| -R | Perform a partial defragmentation, consolidating fragments smaller than 64 MB (default). |
| -V | Set verbose mode for detailed output during analysis and/or defragmentation. |
| -W | Performs full defragmentation, consolidating all fragments regardless of fragment size. |
To perform an analysis of a volume, simply invoke defrag using the -A option together with the designator of the drive to be analyzed:
C:\Windows\system32>defrag e: -a
Windows Disk Defragmenter
Copyright (c) 2006 Microsoft Corp.

Analysis report for volume E: New Volume

    Volume size                         = 8.00 GB
    Free space                          = 7.93 GB
    Largest free space extent           = 4.00 GB
    Percent file fragmentation          = 0 %

    Note: On NTFS volumes, file fragments larger than 64MB are not included in the
 fragmentation statistics

    You do not need to defragment this volume.
A more detailed report can be obtained using the -A option in conjunction with -V, for example:
C:\Windows\system32>defrag e: -a -v
Windows Disk Defragmenter
Copyright (c) 2006 Microsoft Corp.

Analysis report for volume E: New Volume

    Volume size                         = 8.00 GB
    Cluster size                        = 4 KB
    Used space                          = 65 MB
    Free space                          = 7.93 GB
    Percent free space                  = 99 %

File fragmentation
    Percent file fragmentation          = 0 %
    Total movable files                 = 14
    Average file size                   = 4 MB
    Total fragmented files              = 1
    Total excess fragments              = 1
    Average fragments per file          = 1.12
    Total unmovable files               = 4

Free space fragmentation
    Free space                          = 7.93 GB
    Total free space extent             = 4
    Average free space per extent       = 1.98 GB
    Largest free space extent           = 4.00 GB

Folder fragmentation
    Total folders                       = 7
    Fragmented folders                  = 1
    Excess folder fragments             = 0

Master File Table (MFT) fragmentation
    Total MFT size                      = 64 KB
    MFT record count                    = 34
    Percent MFT in use                  = 53
    Total MFT fragments                 = 2

    Note: On NTFS volumes, file fragments larger than 64MB are not included in the
 fragmentation statistics

    You do not need to defragment this volume.
| Purchase and download the full PDF and ePub versions of this eBook only $9.99 |


