Difference between revisions of "Installing and Customizing RHEL 5 Desktop Themes"
(New page: One of the key advantages of Linux desktops in general is the fact that they can be customized to meet any particular preferences. In this chapter we will look at changing the Red Hat En...) |
(No difference)
|
Revision as of 19:01, 26 July 2010
One of the key advantages of Linux desktops in general is the fact that they can be customized to meet any particular preferences.
In this chapter we will look at changing the Red Hat Enterprise Linux 5 GNOME Desktop theme to change appearance of various aspects of the desktop user interface.
What is a Desktop Theme?
The theme of a desktop defines how various aspects of the desktop appear to the user. Each theme contains a number of different categories each of which defines how certain aspects of the desktop appear:
- Controls - Defines how items such as pushbuttons, toggles and sliders appear.
- Colors - Specifies the color scheme of windows, input boxes, selected items and tooltips. A different color is specified for each item.
- Window Border - The design style of the border surrounding each window on the desktop.
- Icons - Defines the design of icons that appear on the desktop (for example Folder, Trash and Computer icons).
- Pointer - Defines the size and style of the mouse pointer icon.
A number of different themes are installed by default with RHEL. In addition, a wide range of other themes are available for download. Further, a theme may be customized if you do not like a certain aspect of that particular theme.
Note that themes are not considered to be a system-wide setting. This means that changes made to the current theme affect only the currently logged in user. Other users will still see their preferred theme when they log in.
Changing the RHEL 5 Desktop Theme
Theme settings are configured from the Theme Preferences screen accessed from the System -> Preferences -> Theme menu option. Once invoked, the dialog will appear as shown in the following figure:
The RHEL Theme Preferences dialog
The current theme is the highlighted theme (in the above screen this is the Clearlooks theme). To change to a different theme simply select the desired theme from the list. The desktop will dynamically change to reflect the newly selected theme.
Downloading and Installing a Theme
Although RHEL 5 is installed with several different theme options, in reality this represents only a small subset of themes that are available online. A wide range of themes are available for download from http://art.gnome.org/themes.
The themes are downloadable by theme sub-category (i.e. Window Border, Icons etc). Let's start by installing a new Window Border theme. On the home page of the GNOME ART Themes web page click on the Window Borders link located beneath the Categories heading. This will filter the list of themes so that only Window Border themes are displayed. Scroll down the list and click on a theme that is not currently available on your RHEL 5 installation (for this example we will use the MetaGrip theme).
Download the theme to the desktop so that it appears as a desktop icon:
The new theme can be installed one of two ways. Either click and drag the theme package from the desktop to the Theme Preferences dialog to add the theme, or click on the Install Theme... button in Theme Preferences and navigate to the location where the theme is installed.
Once the theme has been added you will notice that it does not appear on the main screen of the Theme Preferences dialog. This is because this is a Window Border theme, not an entire desktop theme. It can, however, be used to create or customize a desktop theme package.
Creating a Custom RHEL Theme Package
Any theme may now be used to either customize an existing theme, or to create an entirely new desktop theme.
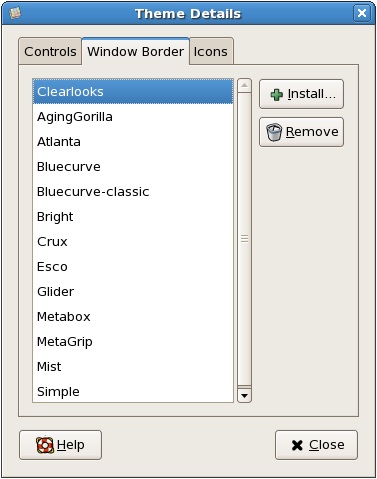
In this example we will create a custom theme which includes our new Window Border design. Scroll down the list of themes until you find a theme on which to base the new theme that we are going to create. Select this theme and click on the Theme details button. In the resulting Theme Details dialog select the Window Border tab so that the list of available window border themes appears:
Scroll up and down the list of themes until you find the new theme (in this case the MetaGrip theme). Select the theme and watch the desktop window borders change instantly to this new style. Spend some time changing some of the other theme settings such as text colors and icon and pointer styles. When you have a new theme that you are happy with simply close the Theme Details screen.
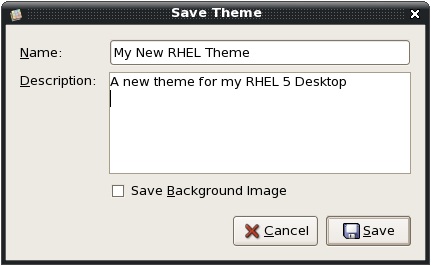
In the background the preferences tool has created a new theme named Custom theme which you should see at the top of the themes list in the main Theme Preferences window. Assuming this is a theme you would like to use again, the next step is to give the theme a name and save it. To achieve this make sure the Custom theme is selected and click on the Save Theme... button. When the Save Theme dialog appears, provide a name for your new theme and add comments if desired. You can also optionally include the current desktop background in the theme package by selecting the box next to the Save background image label:
Once the theme is saved it will appear in the list of available theme packages along with the standard RHEL desktop themes.
Summary
In this chapter we have looked in detail at selecting, installing and customizing CentOS desktop themes. In the next chapter we will look at Configuring RHEL 5 Desktop Fonts.


