Difference between revisions of "Testing Apps on the iPhone – Developer Certificates and Provisioning Profiles"
(→Installing an App onto a Device) |
(→Joining the iPhone Developer Program) |
||
| Line 12: | Line 12: | ||
Having completed the enrollment process, navigate to http://developer.apple.com and click on the Member Center link located near the top right hand corner of the screen. On the resulting page enter the Apple ID and password associated with your iPhone Developer Program membership to access the member center home page as illustrated in the following figure: | Having completed the enrollment process, navigate to http://developer.apple.com and click on the Member Center link located near the top right hand corner of the screen. On the resulting page enter the Apple ID and password associated with your iPhone Developer Program membership to access the member center home page as illustrated in the following figure: | ||
| + | |||
[[Image:iPhoneDevMemberCenter.png|The iPhone Developer Program Member Center]] | [[Image:iPhoneDevMemberCenter.png|The iPhone Developer Program Member Center]] | ||
| + | |||
Having gained access to the iPhone Developer Program the next step is to create and install a certificate on the Mac OS X system on which you are developing your iPhone apps. | Having gained access to the iPhone Developer Program the next step is to create and install a certificate on the Mac OS X system on which you are developing your iPhone apps. | ||
Revision as of 21:13, 11 March 2010
In the chapter entitled Creating a Simple iPhone App we were able to see an app that we had created running in the iPhone simulator bundled with the iPhone SDK. Whilst this is fine for most cases, in practice there are a number of areas that cannot be tested in the simulator. For example, no matter how hard you shake your computer (not something we actually recommend) or where in the world you move it to, neither the accelerometer nor GPS features will work within the simulator. If we really want to thoroughly test an application in the real world, therefore, then we need to install the app onto a physical iPhone device.
In order to achieve this there are a number of steps that must be performed. These include signing up to the iPhone Developer Program, generating and installing a developer certificate, creating an App ID and provisioning profile for your application, and registering the devices onto which you wish to directly install your apps for testing purposes. In the remainder of this chapter we will cover these steps in detail.
Joining the iPhone Developer Program
Being a member of the iPhone Developer Program should not be confused with being a registered iPhone developer. Being a registered iPhone developer only gives you the ability to download the iPhone SDK and access to additional developer related information. Membership of the iPhone Developer Program, however, allows you to set up certificates and provisioning profiles to test apps on physical devices and, ultimately, submit completed apps for possible acceptance into the Apple App Store.
Enrollment into this program currently costs $99 per year. It is also possible that your employer already has membership, in which case contact the program administrator in your company and ask them to send you an invitation to join. Once they have done this Apple will send you an email entitled You Have Been Invited to Join an Apple Developer Program containing a link to activate your membership. If you or your company is not already a program member, you can enroll online at:
http://developer.apple.com/programs/iphone/
Having completed the enrollment process, navigate to http://developer.apple.com and click on the Member Center link located near the top right hand corner of the screen. On the resulting page enter the Apple ID and password associated with your iPhone Developer Program membership to access the member center home page as illustrated in the following figure:
The iPhone Developer Program Member Center
Having gained access to the iPhone Developer Program the next step is to create and install a certificate on the Mac OS X system on which you are developing your iPhone apps.
Creating an iPhone Development Certificate Signing Request
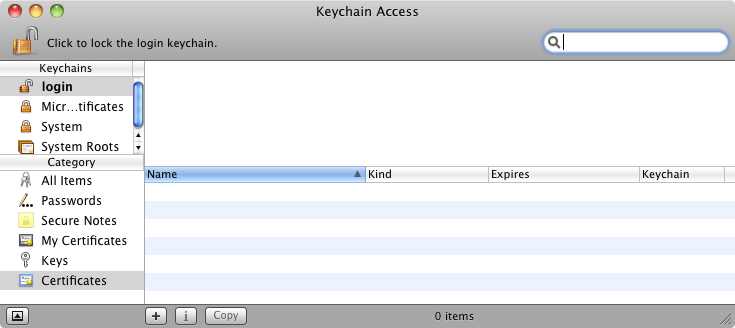
Any apps that are to be installed on an iPhone must first be signed using an iPhone Development Certificate. In order to generate a certificate the first step is to generate a Certificate Signing Request (CSR). Begin this process by opening the Keychain Access tool on your Mac system. This tool can be found in the Applications -> Utilities folder. Once launched, the Keychain Access main window will appear as follows:
Within the Keychain Access utility, perform the following steps:
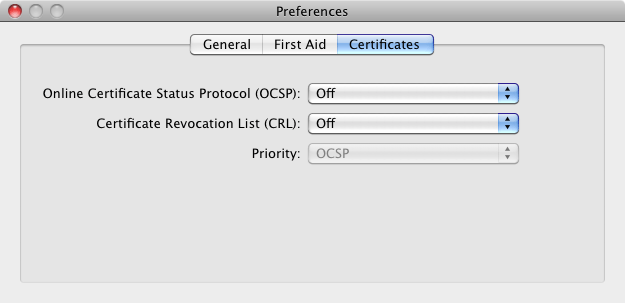
1. Select the Keychain Access -> Preferences menu and select Certificates in the resulting dialog:
2. Within the Preferences dialog make sure that the online Certificate Status Protocol (OCPS) and Certificate Revocation List (CRL) settings are both set to Off, then close the dialog.
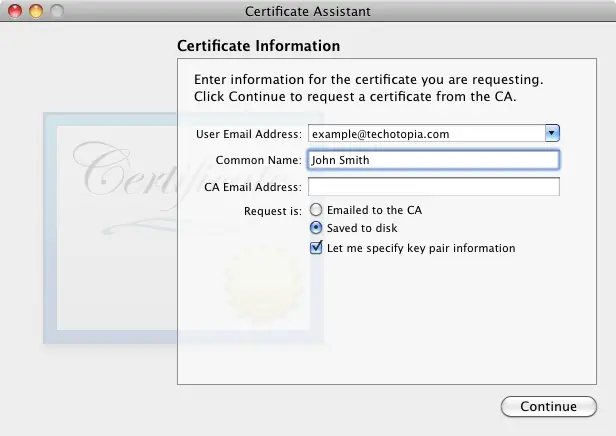
3. Select the Keychain Access -> Certificate Assistant -> Request a Certificate from a Certificate Authority… menu option and enter your email and name exactly as registered with the iPhone Developer Program. Leave the CA Email Address field blank and select the Saved to Disk and Let me specify key pair information options:
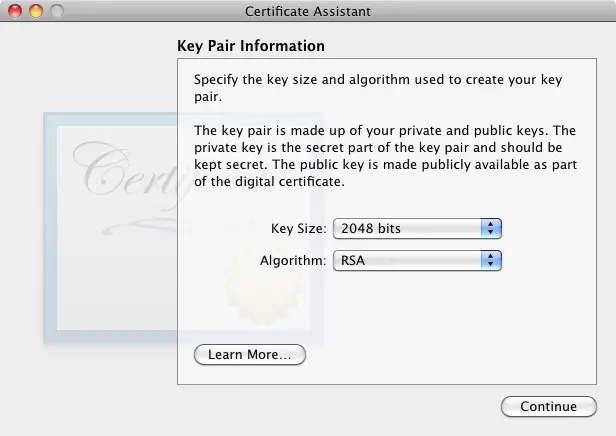
4. Clicking the Continue button will prompt for a file and location into which the CSR is to be saved. Either accept the default settings, or enter alternative information as desired at which point the Key Pair Information screen will appear as illustrated in the following figure:
5. Verify that the 2048 bits key size and RSA algorithm are selected before clicking on the Continue button. The certificate request will be created in the file previously specified and the Conclusion screen displayed. Click Done to dismiss the Certificate Assistant window.
Submitting the iPhone Development Certificate Signing Request
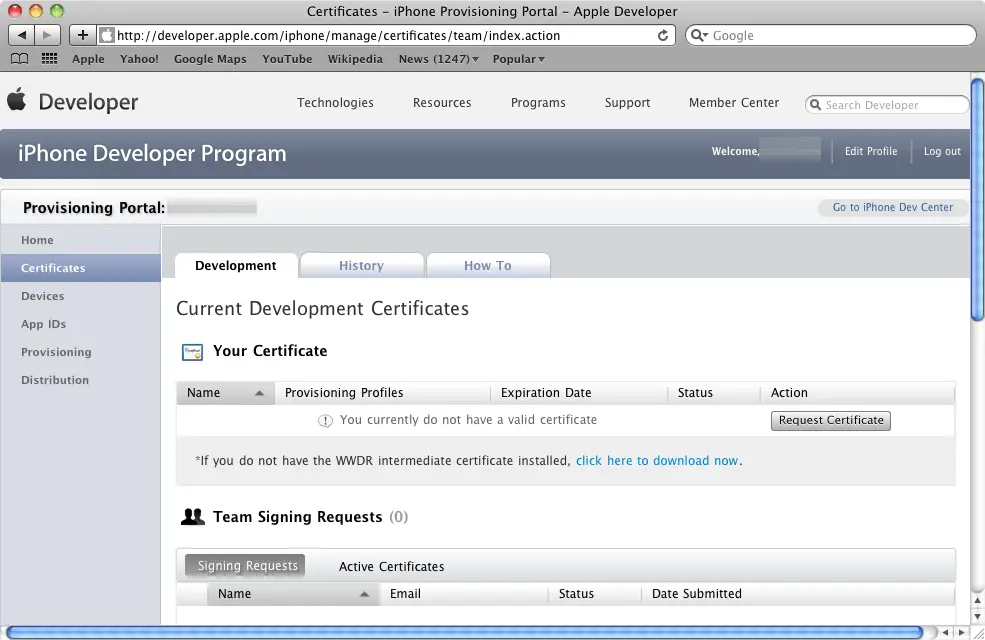
Having created the Certificate Signing Request (CSR) the next step is to submit it for approval. This is performed within the iPhone Provisioning Portal which is accessed from the Member Center of the Apple developer web site. Under Developer Program Resources on the main member center home page select iPhone Provisioning Portal. Within the portal, select the Certificates link located in the left hand panel to display the following page:
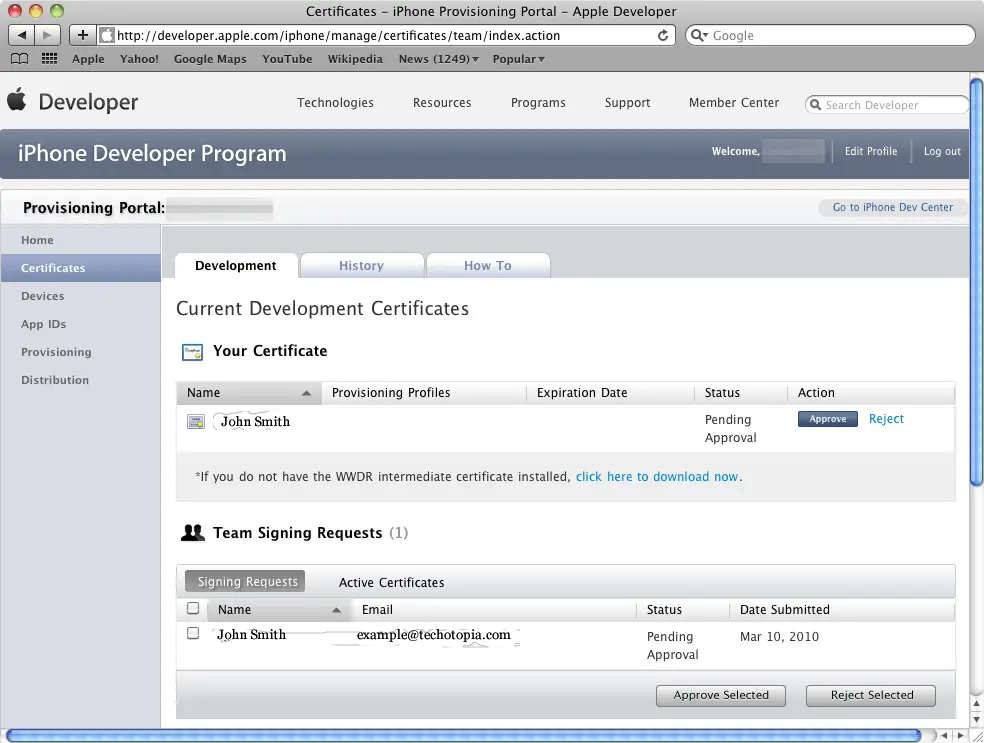
Click on the Request a Certificate button, scroll down to the bottom of the text under the heading Create an iPhone Development Certificate and click on the Choose File button. In the resulting file selection panel, navigate the certificate signing request file created in the previous section and click on Choose. Once your file selection is displayed next to the Choose File button, click on the Submit button located in the bottom right hand corner of the web page. At this point you will be returned to the main Certificates page where your certificate will be listed as Pending Approval:
If you are not the Team Admin, you will need to wait until that person approves your request. If, on the other hand, you are the administrator for the iPhone Developer Program membership you may approve your own certificate request by clicking on the Approve button located in the Action column of the Your Certificate table. Your certificate is now active and the table will refresh to include a button to Download the certificate.
Installing an iPhone Development Certificate
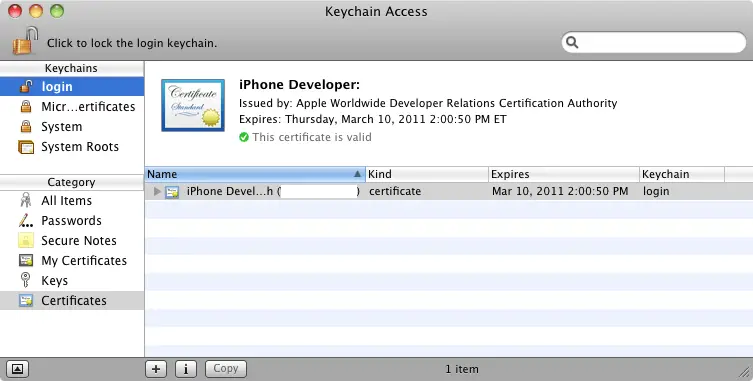
Once a certificate has been requested and approved it must be installed on the development system so that Xcode can access it and use it to sign any applications you develop. The first step in this process is to download the certificate from the iPhone Provisioning Portal by clicking on the Download button located on the certificates page outlined in the previous section. Once the file has downloaded, double click on it to load it into the Keychain Access tool. The certificate will then be listed together with a status (hopefully one that reads This certificate is valid):
Your certificate is now installed into your Keychain and you are ready to move on to the next step.
Assigning Devices
Once you have a development certificate installed, the next step is to specify which devices are to be used to test the apps you are developing. This is achieved by entering the Unique Device identifier (UDID) for each device into the Provisioning Portal. Note that Apple restricts developers to 100 devices per year.
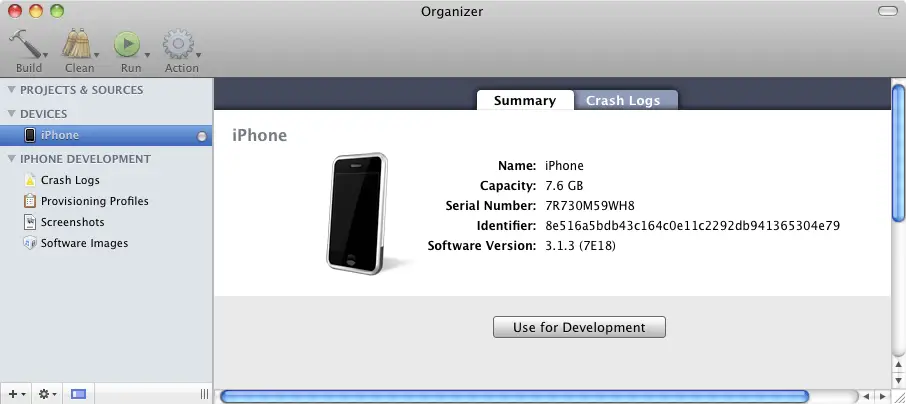
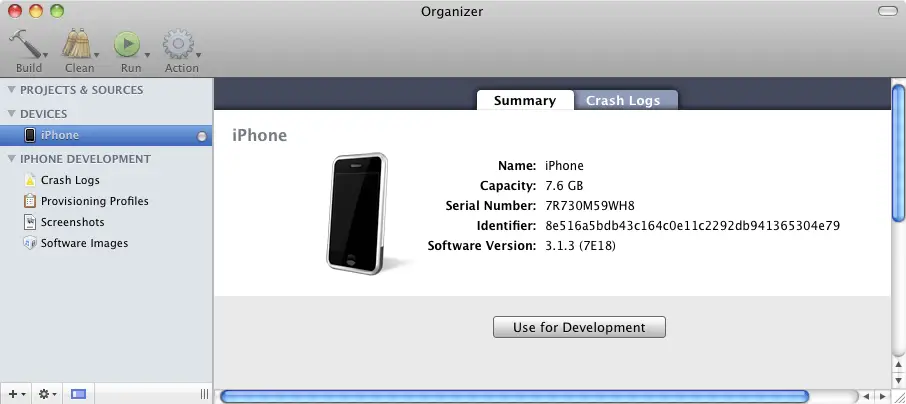
The UDID for a device may be obtained either via Xcode or iTunes. Begin by connecting the device your computer using the docking connector. Once Xcode has launched the Organizer screen will appear displaying summary information about the device (or may be opened by selecting Window -> Organizer). The UDID is listed next to the Identifier label as illustrated in the following figure:
Alternatively, launch iTunes, select the device in the left hand pane and review the Summary information page. One of the fields on this page will be labeled as Serial Number. Click with the mouse on this number and it will change to display the UDID.
Having identified the UDIDs of any devices you plan to use for app testing, select the Devices link located in the left hand panel of the iPhone Provisioning Portal, and click on Add Devices in the resulting page. On the Add Devices page enter a descriptive name for the device and the 40 character UDID:
In order to add more than one device at a time simply click on the “+” button to create more input fields. Once you have finished adding devices click on the Submit button. The newly added devices will now appear on the main Devices page of the portal.
Creating an App ID
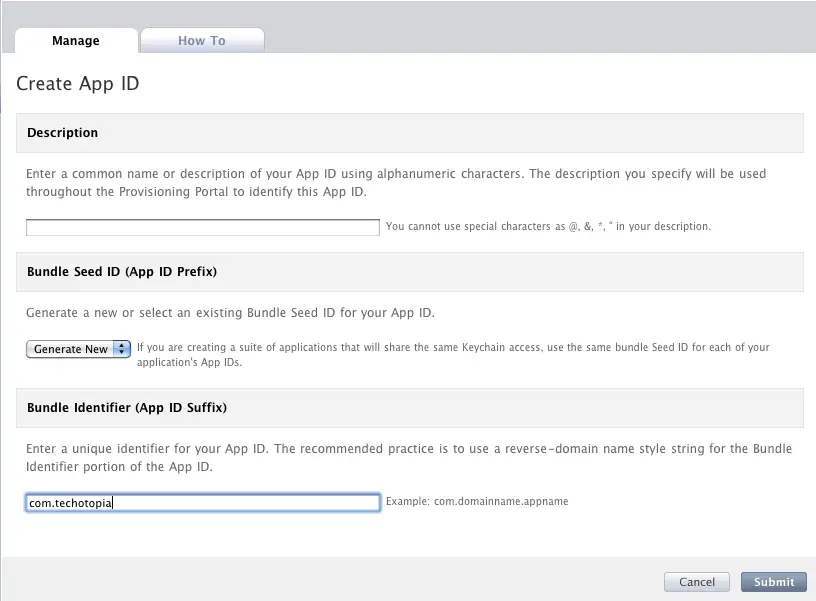
The next step in the process is to create an App ID for each app that you create. This ID allows your app to be uniquely identified within the Apple iPhone application infrastructure. To create an App ID, select the App IDs link in the provisioning portal and click on the New App ID button to display the Create App ID screen as illustrated below:
Enter a suitably descriptive name into the Description field and then make a Bundle Seed ID selection. If you have not created any previous Seed IDs then leave the default Generate New selection unchanged. If you have created a previous App ID and would like to use this for your new app, click on the menu and select the desired ID from the drop down list. Finally enter the Bundle Identifier. This is typically set to the reversed domain name of your company followed by the name of the app. For example, if you are developing an app called MyApp, and the URL for your company is www.mycompany.com then your Bundle identifier would be entered as:
com.mycompany.MyApp
If you would like to create an App ID that can be used for multiple apps then the wildcard character (*) can be substituted for the app name. For example:
com.mycompany.*
Having entered the required information, click on the Submit button to return to the main App ID page where your new ID will be listed.
Creating an iPhone Development Provisioning Profile
The Provisioning Profile is where much of what we have created so far in the chapter is pulled together. The provisioning profile defines which developer certificates are allowed to install an app on a device, which devices can be used and which apps can be installed. Once created, the provisioning profile must be installed on each device on which the designated app is to be installed. To create a provisioning profile, select the Provisioning link in the Provisioning Portal and click on the New profile button. In the resulting Create iPhone Provisioning Profile screen, perform the following tasks:
1. In the Profile Name field enter a suitably descriptive name for profile you are creating.
2. Set the check box next to each certificate to specify which developers are permitted to use this particular profile.
3. Select an App ID from the menu.
4. Select the devices onto which the app is permitted to be installed.
5. Click on the Submit button.
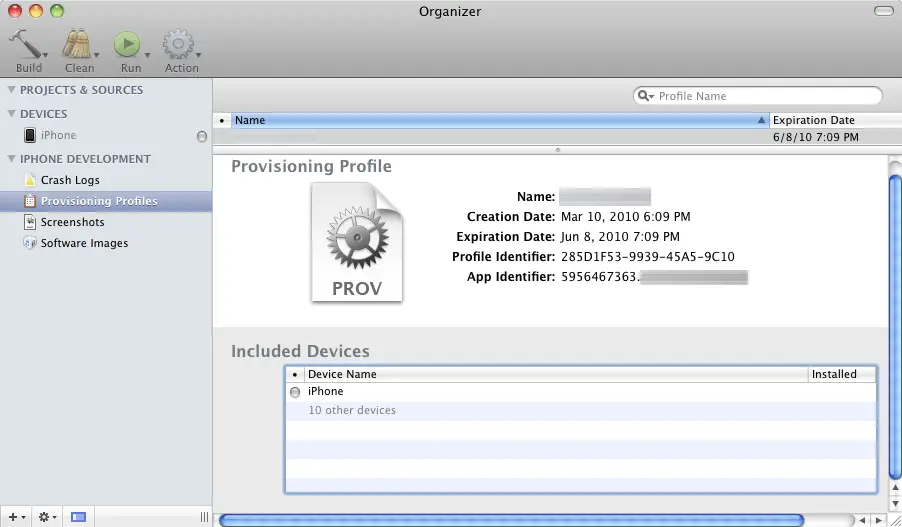
Now that the provisioning profile has been created, the next step is to download and install it. To do so, click on the Download button next to your new profile and save it to your local system (note that the file will have a .mobileprovision file name extension). Once saved, either drag and drop the file to the Xcode icon in the dock or into the Xcode Organizer window, which may be accessed using the Xcode Window -> Organizer menu option. Once the provisioning profile is installed, it should appear in the Organizer window as follows:
Selecting a Device for Development
If you take a look at the above figure you will notice that in the Included Devices section of the window it indicates that one out of the 11 devices configured within this provisional profile is currently connected to the system (the fact that it is connected is indicated by the small transparent ball next to the device). The fact that this indicator is not green also tells us that this device has not yet been selected for use during app development. To activate this device for development, select it from the left hand panel under the DEVICES sub-heading to display summary information:
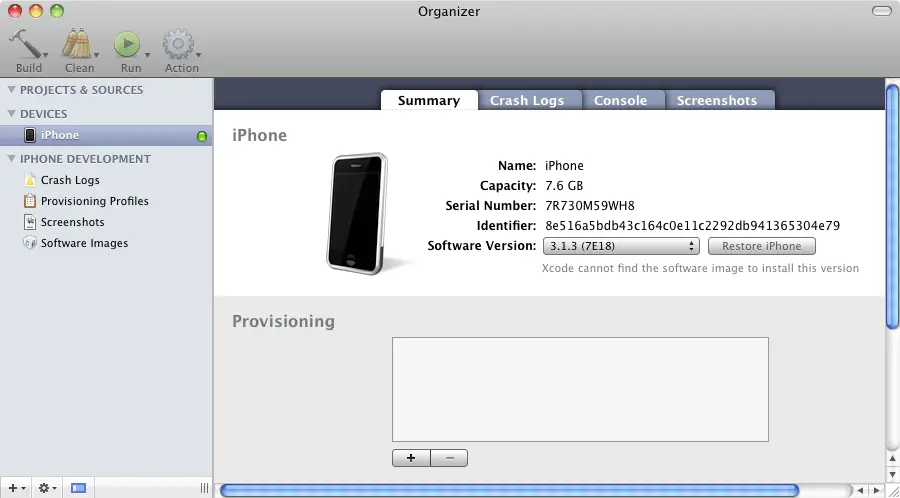
To enable the device for development testing, click on the Use for Development button and wait while Xcode connects to the device and gathers some information. Once the activation is complete, the indicator next to the device will change to green and the device summary information will update to provide information about the device and provisioning profiles that are available for use on the device:
Since we have not yet installed the provisioning profile we created earlier in the chapter onto the device, do so now by clicking on the “+” button and navigating to the .mobileprovision file that you downloaded from the iPhone Provisioning Portal earlier in this chapter.
Associating an App ID with an App
Before we can install our own app directly onto a device, we must first embed the App ID created in the iPhone Provisioning Portal and referenced in the provisioning profile into the app itself. To achieve this, right click on the app name located under Targets in the Groups and Files panel located on the left hand side of the Xcode main window and select Get Info from the resulting menu.
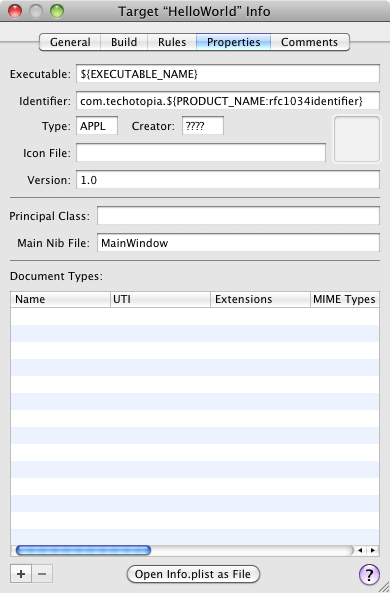
In the info window, selecting Properties will display the following window:
In the Identifier field enter the App ID you created in the iPhone Provisioning Portal. This can either be in the form of your reverse URL and app name (for example com.mycompany.HelloWorld) or you can have the product name substituted for you by entering com.mycompany.${PRODUCT_NAME:rfc1034indentifer} as illustrated in the above figure. Once the App ID has been configured the next step is to build the application and install it onto the iPhone or iPod Touch device.
Installing an App onto a Device
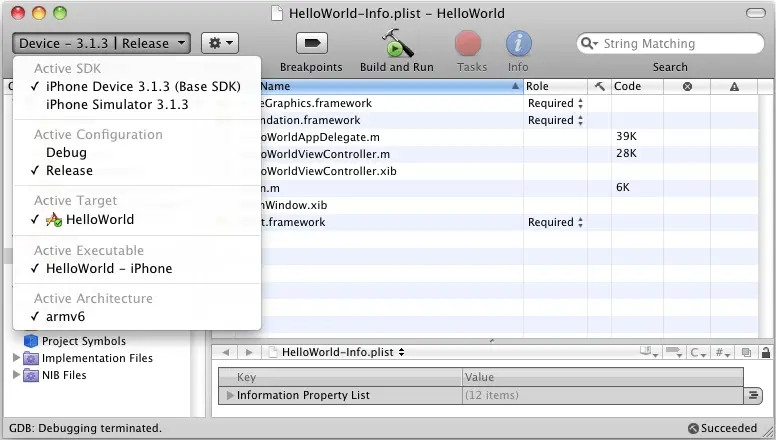
Located in the top left hand corner of the main Xcode window is drop down menu which, when clicked, provides menu of options to control the target run environment for the current app:
If the iPhone Simulator option is selected then the app will run within the simulated environment when it is built. To instruct Xcode to install and run the app on device itself, simply change this menu to the iPhone Device setting. Assuming the device is connected, click on the Build and Run button and watch the status updates at the bottom of the window as Xcode compiles the source code. Once the code is built, Xcode will need to sign the app using your developer certificate. If prompted with a message that reads “codesign wants to sign using key “<key name>” in your keychain select either Allow or Always Allow (if you do not wish to be prompted during future builds). Once signing is complete the status will change to “Installing <appname>.app on iPhone…”. After a few seconds the app will be installed and will automatically start running on the device where it may be tested in a real world environment.
