Difference between revisions of "An Android Studio App Links Tutorial"
(Created page with "<table border="0" cellspacing="0" width="100%"><tr> <td width="20%">Previous<td align="center">Android Studio Development Essentials...") |
(→The Database Schema) |
||
| Line 24: | Line 24: | ||
The goal of this chapter is to enhance the app to add support for app linking so that URLs can be used to display specific landmark records within the app. | The goal of this chapter is to enhance the app to add support for app linking so that URLs can be used to display specific landmark records within the app. | ||
| − | == | + | == The Database Schema == |
The data for the example app is contained within a file named landmarks.db located in the app -> assets –> databases folder of the project hierarchy. The database contains a single table named locations, the structure of which is outlined in Table 82-4: | The data for the example app is contained within a file named landmarks.db located in the app -> assets –> databases folder of the project hierarchy. The database contains a single table named locations, the structure of which is outlined in Table 82-4: | ||
| − | + | {| class="wikitable" | |
|- | |- | ||
! Column !! Type !! Description | ! Column !! Type !! Description | ||
Revision as of 21:25, 15 January 2019
| Previous | Table of Contents | Next |
| An Introduction to Android App Links | An Introduction to Android Instant Apps |
The goal of this chapter is to provide a practical demonstration of both Android app links and the Android Studio App Link Assistant.
This chapter will add app linking support to an existing Android app, allowing an activity to be launched via an app link URL. In addition to launching the activity, the content displayed will be specified within the path of the URL.
About the Example App
The project used in this chapter is named AppLinking and is a basic app designed to allow users to find out information about landmarks in London. The app uses a SQLite database accessed through a standard Android content provider class. The app is provided with an existing database containing a set of records for some popular tourist attractions in London. In addition to the existing database entries, the app also lets the user add and delete landmark descriptions.
In its current form, the app allows the existing records to be searched and new records to be added and deleted.
The project consists of two activities named AppLinkingActivity and LandmarkActivity. AppLinkingActivity is the main activity launched at app startup. This activity allows the user to enter search criteria and to add additional records to the database. When a search locates a matching record, LandmarkActivity launches and displays the information for the related landmark.
The goal of this chapter is to enhance the app to add support for app linking so that URLs can be used to display specific landmark records within the app.
The Database Schema
The data for the example app is contained within a file named landmarks.db located in the app -> assets –> databases folder of the project hierarchy. The database contains a single table named locations, the structure of which is outlined in Table 82-4:
| Column | Type | Description |
|---|---|---|
| _id | String | The primary index, this column contains string values that uniquely identify the landmarks in the database. |
| title | String | The name of the landmark (e.g. London Bridge). |
| description | String | A description of the landmark. |
| personal | Boolean | Indicates whether the record is personal or public. This value is set to true for all records added by the user. Existing records provided with the database are set to false. |
Loading and Running the Project
The project is contained within the AppLinking folder of the sample source code download archive located at the following URL:
https://www.ebookfrenzy.com/web/androidstudio32/index.php
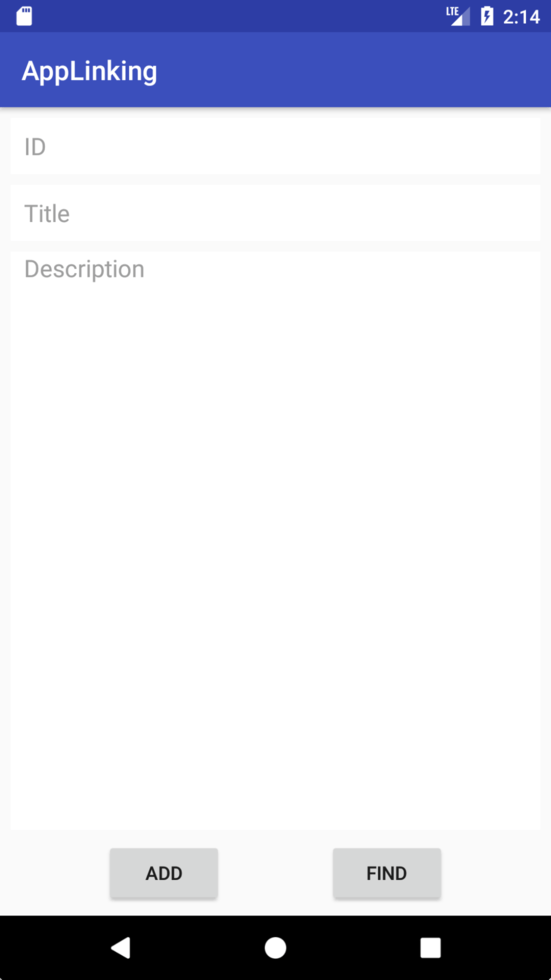
Having located the folder, open it within Android Studio and run the app on a device or emulator. Once the app is launched, the screen illustrated in Figure 82-1 below will appear:
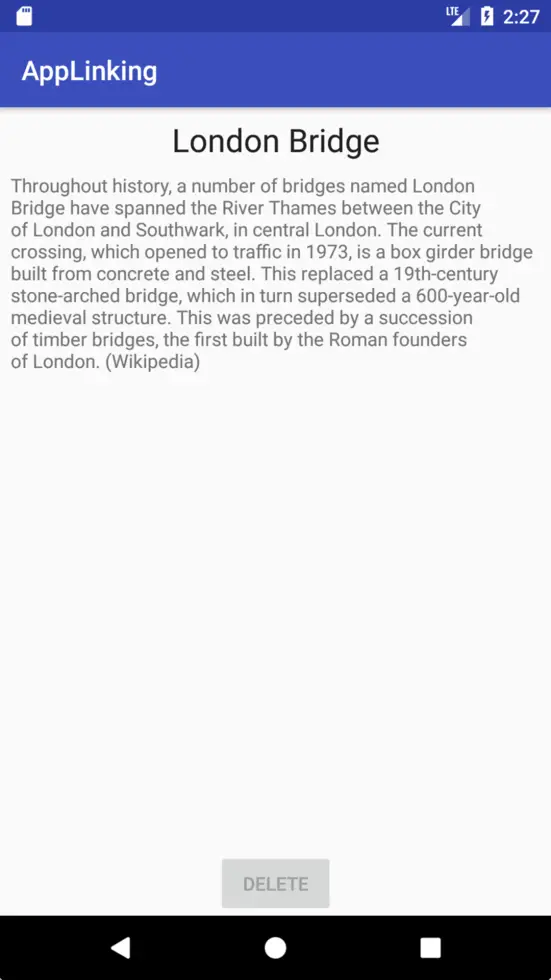
As currently implemented, landmarks are located using the ID for the location. The default database configuration currently contains two records referenced by the IDs “londonbridge” and “toweroflondon”. Test the search feature by entering londonbridge into the ID field and clicking the Find button. When a matching record is found, the second activity (LandmarkActivity) is launched and passed information about the record to be displayed. This information takes the form of extra data added to the Intent object. This information is used by LandmarkActivity to extract the record from the database and display it to the user using the screen shown in Figure 82-2.
Adding the URL Mapping
Now that the app has been loaded into Android Studio and tested, the project is ready for the addition of app link support. The objective is for the LandmarkActivity screen to launch and display information in response to an app link click. This is achieved by mapping a URL to LandmarkActivity. For this example, the format of the URL will be as follows:
http://<website domain>/landmarks/<landmarkId>
When all of the steps have been completed, the following URL should, for example, cause the app to display information for the Tower of London:
http://www.yourdomain.com/landmarks/toweroflondon
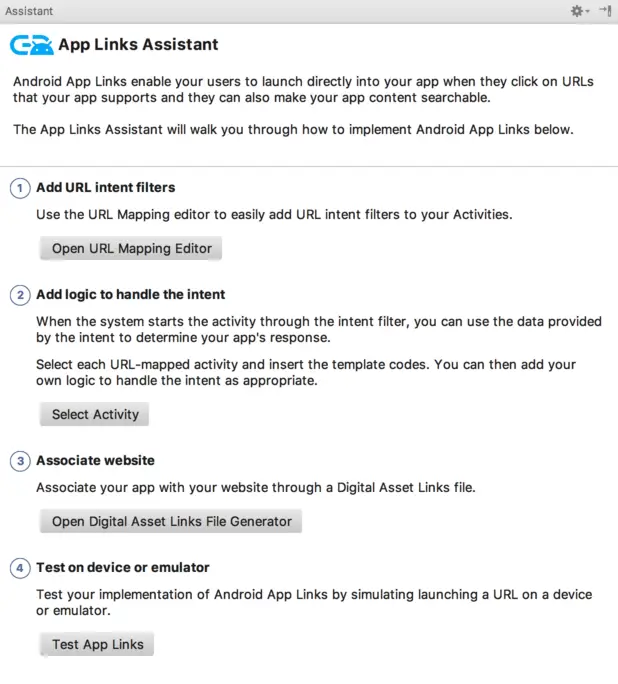
To add a URL mapping to the project, begin by opening the App Links Assistant using the Tools -> App Links Assistant menu option. Once open, the assistant should appear as shown in Figure 82-3:
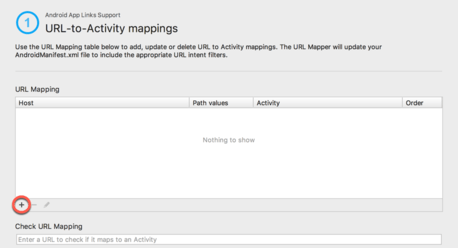
Click on the Open URL Mapping Editor button to begin mapping a URL to an activity. Within the mapping screen, click on the ‘+’ button (highlighted in Figure 82-4) to add a new URL:
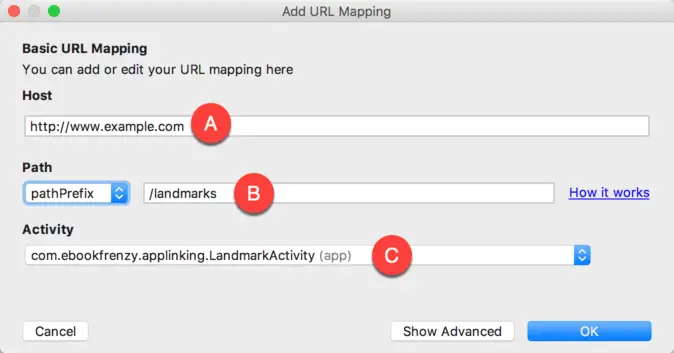
In the Host field of the Add URL Mapping dialog, enter either the domain name for your website or http://www.example.com if you do not have one.
The Path field (marked A in Figure 82-5 below) is where the path component of the URL is declared. The path must be prefixed with / so enter /landmarks into this field.
The Path menu (B) provides the following three path matching options:
- path – The URL must match the path component of the URL exactly in order to launch the activity. If the path is set to /landmarks, for example, http://www.example.com/landmarks will be considered a match. A URL of http://www.example.com/landmarks/londonbridge, however, will not be considered a match.
- pathPrefix – The specified path is only considered as the prefix. Additional path components may be included after the /landmarks component (for example http://www.example.com/landmarks/londonbridge will still be considered a match).
- pathPattern – Allows the path to be specified using pattern matching in the form of basic regular expressions and wildcards, for example landmarks/*/[l-L]ondon/*
Since the path in this example is a prefix to the landmark ID component, select the pathPrefix menu option.
Finally, use the Activity menu (C) to select LandmarkActivity as the activity to be launched in response to the app link:
After completing the settings in the dialog, click on the OK button to commit the changes. Check that the URL is correctly formatted and assigned to the appropriate activity by entering the following URL into the Check URL Mapping field of the mapping screen (where <your domain> is set to the domain specified in the Host field above) :
http://<your domain>/landmarks/toweroflondon
If the mapping is configured correctly, LandmarkActivity will be listed as the mapped activity:
The latest version of Android requires that App Links be declared for both HTTP and HTTPS protocols, even if only one is being used. Before proceeding to the next step, therefore, repeat the above steps to add the HTTPS version of the URL to the list.
The next step will also be performed in the URL mapping screen of the App Links Assistant, so leave the screen selected.
Adding the Intent Filter
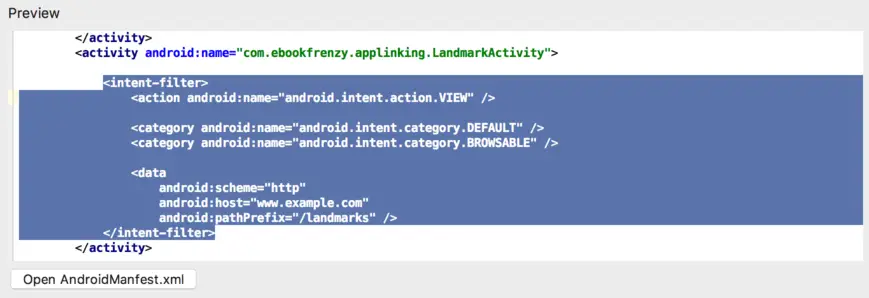
As explained in the previous chapter, an intent filter is needed to allow the target activity to be launched in response to an app link click. In fact, when the URL mapping was added, the intent filter was automatically added to the project manifest file. With the URL mapping selected in the App Links Assistant URL mapping list, scroll down the screen until the intent filter Preview section comes into view. The preview should contain the modified AndroidManifest.xml file with the newly added intent filters included:
Adding Intent Handling Code
The steps taken so far ensure that the correct activity is launched in response to an appropriately formatted app link URL. The next step is to handle the intent within the LandmarkActivity class so that the correct record is extracted from the database and displayed to the user. Before making any changes to the code within the LandmarkActivity.java file, it is worthwhile reviewing some areas of the existing code. Open the LandmarkActivity.java file in the code editor and locate the onCreate() and handleIntent() methods which should currently read as follows:
@Override
protected void onCreate(Bundle savedInstanceState) {
    super.onCreate(savedInstanceState);
    setContentView(R.layout.activity_landmark);

    titleText = (TextView) findViewById(R.id.titleText);
    descriptionText = (TextView) findViewById(R.id.descriptionText);
    deleteButton = (Button) findViewById(R.id.deleteButton);

    handleIntent(getIntent());
}

private void handleIntent(Intent intent) {
    String landmarkId =
       intent.getStringExtra(AppLinkingActivity.LANDMARK_ID);
    displayLandmark(landmarkId);
}
In its current form, the code is expecting to find the landmark ID within the extra data of the Intent bundle. Since the activity can now also be launched by an app link, this code needs to be changed to handle both scenarios. Begin by deleting the call to handleIntent() in the onCreate() method:
@Override
protected void onCreate(Bundle savedInstanceState) {
    super.onCreate(savedInstanceState);
    setContentView(R.layout.activity_landmark);

    titleText = (TextView) findViewById(R.id.titleText);
    descriptionText = (TextView) findViewById(R.id.descriptionText);
    deleteButton = (Button) findViewById(R.id.deleteButton);

    handleIntent(getIntent());
}
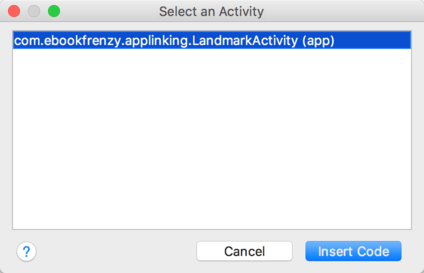
To add the initial app link intent handling code, return to the App Links Assistant panel and click on the Select Activity button listed under step 2. Within the activity selection dialog, select the LandmarkActivity entry before clicking on the Insert Code button:
Return to the LandmarkActivity.java file and note that the following code has been inserted into the onCreate() method:
// ATTENTION: This was auto-generated to handle app links.
Intent appLinkIntent = getIntent();
String appLinkAction = appLinkIntent.getAction();
Uri appLinkData = appLinkIntent.getData();
This code accesses the Intent object and extracts both the Action string and Uri. If the activity launch is the result of an app link, the action string will be set to android.intent.action.VIEW which matches the action declared in the intent filter added to the manifest file. If, on the other hand, the activity was launched by the standard intent launching code in the findLandmark() method of the main activity, the action string will be null. By checking the value assigned to the action string, code can be written to identify the way in which the activity was launched and take appropriate action:
.
.
import android.net.Uri;
.
.
@Override
protected void onCreate(Bundle savedInstanceState) {
    super.onCreate(savedInstanceState);
    setContentView(R.layout.activity_landmark);
.
.
.
    // ATTENTION: This was auto-generated to handle app links.
    Intent appLinkIntent = getIntent();
    String appLinkAction = appLinkIntent.getAction();
    Uri appLinkData = appLinkIntent.getData();

    String landmarkId = appLinkData.getLastPathSegment();

    if (landmarkId != null) {
        displayLandmark(landmarkId);
    }
}
All that remains is to add some additional code to the method to identify the last component in the app link URL path, and to use that as the landmark ID when querying the database:
@Override
protected void onCreate(Bundle savedInstanceState) {
    super.onCreate(savedInstanceState);
    setContentView(R.layout.activity_landmark);

    titleText = (TextView) findViewById(R.id.titleText);
    descriptionText = (TextView) findViewById(R.id.descriptionText);
    deleteButton = (Button) findViewById(R.id.deleteButton);

    // ATTENTION: This was auto-generated to handle app links.
    Intent appLinkIntent = getIntent();
    String appLinkAction = appLinkIntent.getAction();
    Uri appLinkData = appLinkIntent.getData();

    if (appLinkAction != null) {

        if (appLinkAction.equals("android.intent.action.VIEW")) {
            String landmarkId = appLinkData.getLastPathSegment();

            if (landmarkId != null) {
                Log.i(TAG, "landmarkId = " + landmarkId);
                displayLandmark(landmarkId);
            }
        }
    } else {
        handleIntent(appLinkIntent);
    }
}
If the action string is not null, a check is made to verify that it is set to android.intent.action.VIEW before extracting the last component of the Uri path. This component is then used as the landmark ID when making the database query. If, on the other hand, the action string is null, the existing handleIntent() method is called to extract the ID from the intent data.
An alternative option to identifying the way in which the activity has been launched is to modify the findLandmark() method located in the AppLinkingActivity.java file so that it also triggers the launch using a View intent action:
public void findLandmark(View view) {

    if (!idText.getText().equals("")) {
        Landmark landmark =
              dbHandler.findLandmark(idText.getText().toString());

        if (landmark != null) {
            Uri uri = Uri.parse("http://<your_domain>/landmarks/"
                                          + landmark.getID());
            Intent intent = new Intent(Intent.ACTION_VIEW, uri);
            startActivity(intent);
        } else {
            titleText.setText("No Match");
        }
    }
}
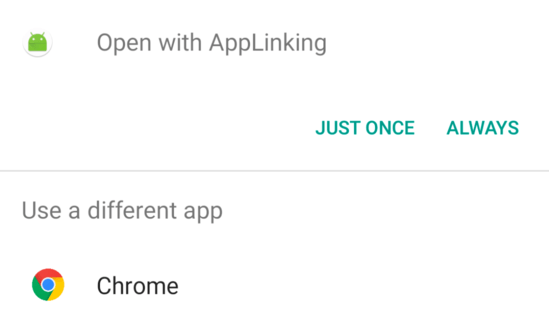
This technique has the advantage that code does not need to be written to identify how the activity was launched, but also has the disadvantage that it may trigger the activity selection panel illustrated in Figure 82-10 below unless the app link is associated with a web site.
Testing the App Link
Test that the intent handling works by returning to the App Links Assistant panel and clicking on the Test App Links button. When prompted for a URL to test, enter the URL (using the domain referenced in the app link mapping) for the londonbridge landmark ID before clicking on the Run Test button:
Select a suitable device or emulator as the deployment target and verify that the landmark screen appears populated with the London Bridge information. Before the activity appears, it is likely that Android will display a panel (Figure 82-10) within which a choice needs to be made as to how the app link is to be handled:
Until the app link has been associated with a web site, Android will display this selection panel every time the activity is launched using a View intent action unless the user selects the Always option.
Associating an App Link with a Web Site
As outlined in the previous chapter, an app link may be associated with a web site by creating a Digital Asset Links file and installing it on the web site. Although the steps to generate this file will be covered in this chapter, it will only be possible to test these instructions using your own app (with a unique application ID) and if you have access to an https based web server onto which the assets file can be installed.
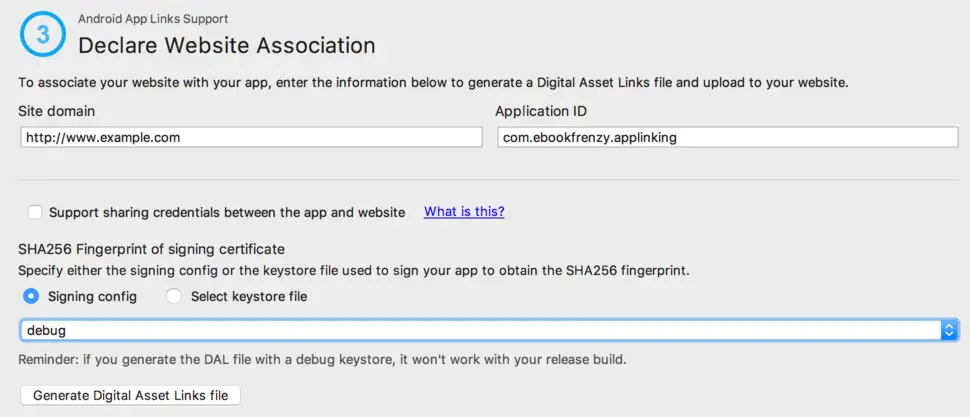
To generate the Digital Asset Links file, display the App Links Assistant and click on the Open Digital Asset Links File Generator button. This will display the panel shown in Figure 82-11:
Enter the URL of the site onto which the assets file is to be uploaded and verify that the application ID matches the package name. Choose either a keystore file containing the SHA signing key for your project, or use the menu to select either the release or debug signing configuration as used by Android Studio, keeping in mind that the debug key will need to be replaced by the release key before you publish your app to the Google Play store.
If your app uses either Google Sign-In or other supported sign-in providers to authenticate users together with Google’s Smart Lock feature for storing passwords, selecting the Support sharing credentials between app and website option will allow users to store sign-in credentials for use when signing in on both platforms.
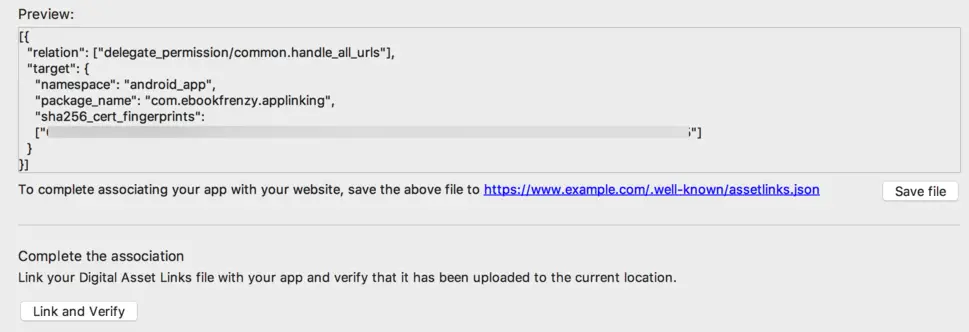
Once the assets file has been configured, click on the Generate Digital Asset Link File button to preview and save the file:
Once the file has been saved, upload it to the path specified beneath the preview panel in the above figure and click on the Link and Verify button to complete the process.
After the Digital Assets Link file has been linked and verified, Android should no longer display the selection panel before launching the landmark activity.
Summary
This chapter has demonstrated the steps involved in implementing App Link support within an Android app project. Areas covered in this chapter include the use of the App Link Assistant in Android Studio, App Link URL mapping, intent filters, handling website association using Digital Asset File entries and App Link testing.
| Previous | Table of Contents | Next |
| An Introduction to Android App Links | An Introduction to Android Instant Apps |


