Difference between revisions of "Implementing Android 6 Scene Transitions – A Tutorial"
m (Text replacement - "<google>ADSDAQBOX_FLOW</google>" to "<htmlet>adsdaqbox_flow</htmlet>") |
m (Text replacement - "<table border="0" cellspacing="0">" to "<table border="0" cellspacing="0" width="100%">") |
||
| (5 intermediate revisions by the same user not shown) | |||
| Line 347: | Line 347: | ||
| + | |||
| + | <htmlet>ezoicbottom</htmlet> | ||
<hr> | <hr> | ||
<table border="0" cellspacing="0" width="100%"> | <table border="0" cellspacing="0" width="100%"> | ||
Latest revision as of 19:58, 27 October 2016
| Previous | Table of Contents | Next |
| An Android 6 Transition Tutorial using beginDelayedTransition | Working with the Floating Action Button and Snackbar |
This chapter will build on the theory outlined in the chapter entitled Animating User Interfaces with the Android 6 Transitions Framework by working through the creation of a project designed to demonstrate transitioning from one scene to another using the Android Transition framework.
An Overview of the Scene Transition Project
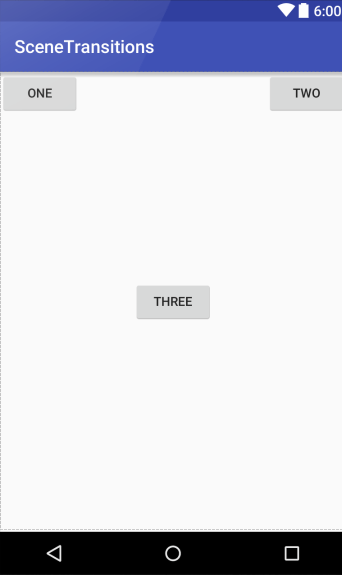
The application created in this chapter will consist of two scenes, each represented by an XML layout resource file. A transition will then be used to animate the changes from one scene to another. The first scene will consist of three button views. The second scene will contain two of the buttons from the first scene positioned at different locations on the screen. The third button will be absent from the second scene. Once the transition has been implemented, movement of the first two buttons will be animated with a bounce effect. The third button will gently fade into view as the application transitions back to the first scene from the second.
Creating the Android Studio SceneTransitions Project
Create a new project in Android Studio, entering SceneTransitions into the Application name field and ebookfrenzy.com as the Company Domain setting before clicking on the Next button. On the form factors screen, enable the Phone and Tablet option and set the minimum SDK setting to API 19: Android 4.4 (KitKat). Continue to proceed through the screens, requesting the creation of an empty activity named SceneTransitionsActivity with a corresponding layout file named activity_scene_transitions.
Identifying and Preparing the Root Container
When working with transitions it is important to identify the root container for the scenes. This is essentially the parent layout container into which the scenes are going to be displayed. When the project was created, Android Studio created a layout resource file in the app -> res -> layout folder named activity_scene_transitions.xml and containing a single RelativeLayout container and TextView. When the application is launched, this is the first layout that will be displayed to the user on the device screen and for the purposes of this example, the RelativeLayout container within this layout will act as the root container for the two scenes.
Begin by locating the activity_scene_transitions.xml layout resource file and loading it into the Android Studio Designer tool. Switch to Design mode if necessary, select the “Hello World!” TextView object and delete it from the layout using the keyboard delete key. Double click on the layout background and in the resulting panel change the view’s ID property to rootContainer.
Designing the First Scene
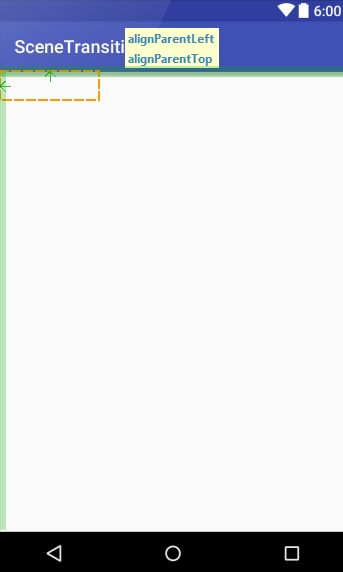
When the newly created layout file has loaded into the Designer tool drag a Button view from the Widgets section of the palette onto the layout canvas and position it in the top left hand corner of the layout view so that the alignParentLeft and alignParentTop properties are displayed as illustrated in Figure 29 1. Drop the Button view at this position, double click on it and change the text property to “One”. Select the light bulb icon, click on the I18N message and extract the string to a resource named one_string.
Figure 29-1
Drag a second Button view from the palette and position it in the top right hand corner of the layout view so that the alignParentRight and alignParentTop properties are displayed before dropping the view into place. Repeating the steps for the first button, assign text that reads “Two” to the button and extract it into a string resource named and two_string.
Drag a third Button view and position it so that it is centered both horizontally and vertically within the layout, this time configuring a string resource named three_string that reads “Three”.
On completion of the above steps, the layout for the first scene should resemble that shown in Figure 29-2:
Figure 29-2
Switch the Designer tool to Text mode to directly edit the XML resources for the layout. Verify that the XML matches that listed below before adding the onClick properties to the first and second buttons. These methods will be implemented later to trigger the transitions from one scene to another:
<?xml version="1.0" encoding="utf-8"?>

<RelativeLayout xmlns:android="http://schemas.android.com/apk/res/android"
    android:layout_width="match_parent" android:layout_height="match_parent">

    <Button
        android:layout_width="wrap_content"
        android:layout_height="wrap_content"
        android:text="@string/one_string"
        android:id="@+id/button"
        android:layout_alignParentTop="true"
        android:layout_alignParentLeft="true"
        android:layout_alignParentStart="true"
        android:onClick="goToScene2" />

    <Button
        android:layout_width="wrap_content"
        android:layout_height="wrap_content"
        android:text="@string/two_string"
        android:id="@+id/button2"
        android:layout_alignParentTop="true"
        android:layout_alignParentRight="true"
        android:layout_alignParentEnd="true"
        android:onClick="goToScene1" />

    <Button
        android:layout_width="wrap_content"
        android:layout_height="wrap_content"
        android:text="@string/three_string"
        android:id="@+id/button3"
        android:layout_centerVertical="true"
        android:layout_centerHorizontal="true" />

</RelativeLayout>
Designing the Second Scene
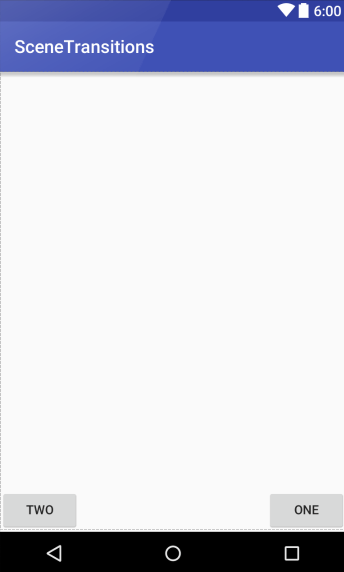
The second scene is simply a modified version of the first scene. The first and second buttons will still be present but will be located in the bottom right and left hand corners of the layout respectively. The third button, on the other hand, will no longer be present in the second scene.
For the purposes of avoiding duplicated effort, the layout file for the second scene will be created by copying and modifying the scene1_layout.xml file. Within the Project tool window, locate the app -> res -> layout -> scene1_layout.xml file, right-click on it and select the Copy menu option. Right-click on the layout folder, this time selecting the Paste menu option and change the name of the file to scene2_layout.xml when prompted to do so.
Figure 29-3
Switch Designer to Text mode and verify that the XML matches that listed below:
<?xml version="1.0" encoding="utf-8"?>

<RelativeLayout xmlns:android="http://schemas.android.com/apk/res/android"
    android:layout_width="match_parent" android:layout_height="match_parent">

    <Button
        android:layout_width="wrap_content"
        android:layout_height="wrap_content"
        android:text="@string/one_string"
        android:id="@+id/button"
        android:onClick="goToScene2"
        android:layout_alignParentBottom="true"
        android:layout_alignParentRight="true"
        android:layout_alignParentEnd="true" />

    <Button
        android:layout_width="wrap_content"
        android:layout_height="wrap_content"
        android:text="@string/two_string"
        android:id="@+id/button2"
        android:onClick="goToScene1"
        android:layout_alignParentBottom="true"
        android:layout_alignParentLeft="true"
        android:layout_alignParentStart="true" />

</RelativeLayout>
Entering the First Scene
If the application were to be run now, only the blank layout represented by the activity_scene_transitions.xml file would be displayed. Some code must, therefore, be added to the onCreate() method located in the SceneTransitionsActivity.java file so that the first scene is presented when the activity is created. This can be achieved as follows:
package com.ebookfrenzy.scenetransitions;

import android.support.v7.app.AppCompatActivity;
import android.os.Bundle;
import android.transition.Scene;
import android.transition.Transition;
import android.transition.TransitionManager;
import android.view.ViewGroup;
import android.view.View;

public class SceneTransitionsActivity extends AppCompatActivity {

    ViewGroup rootContainer;
    Scene scene1;

    @Override
    protected void onCreate(Bundle savedInstanceState) {
        super.onCreate(savedInstanceState);
        setContentView(R.layout.activity_scene_transitions);

        rootContainer =
                (ViewGroup) findViewById(R.id.rootContainer);

        scene1 = Scene.getSceneForLayout(rootContainer,
                R.layout.scene1_layout, this);

        scene1.enter();
    }
.
.
}
The code added to the activity class declares some variables in which to store references to the root container and first scene and obtains a reference to the root container view. The getSceneForLayout() method of the Scene class is then used to create a scene from the layout contained in the scene1_layout.xml file to convert that layout into a scene. The scene is then entered via the enter() method call so that it is displayed to the user.
Compile and run the application at this point and verify that scene 1 is displayed after the application has launched.
Loading Scene 2
Before implementing the transition between the first and second scene it is first necessary to add some code to load the layout from the scene2_layout.xml file into a Scene instance. Remaining in the SceneTransitionsActivity.java file, therefore, add this code as follows:
public class SceneTransitionsActivity extends AppCompatActivity {

    ViewGroup rootContainer;
    Scene scene1;
    Scene scene2;

    @Override
    protected void onCreate(Bundle savedInstanceState) {
        super.onCreate(savedInstanceState);
        setContentView(R.layout.activity_scene_transitions);

        rootContainer =
                (ViewGroup) findViewById(R.id.rootContainer);

        scene1 = Scene.getSceneForLayout(rootContainer,
                R.layout.scene1_layout, this);

        scene2 = Scene.getSceneForLayout(rootContainer,
                R.layout.scene2_layout, this);

        scene1.enter();
    }
.
.
}
Implementing the Transitions
The first and second buttons have been configured to call methods named goToScene2 and goToScene1 respectively when selected. As the method names suggest, it is the responsibility of these methods to trigger the transitions between the two scenes. Add these two methods within the SceneTransitionsActivity.java file so that they read as follows:
public void goToScene2 (View view)
{
	TransitionManager.go(scene2);
}

public void goToScene1 (View view)
{
	TransitionManager.go(scene1);
}
Run the application and note that selecting the first two buttons causes the layout to switch between the two scenes. Since we have yet to configure any transitions, these layout changes are not yet animated.
Adding the Transition File
All of the transition effects for this project will be implemented within a single transition XML resource file. As outlined in the chapter entitled Animating User Interfaces with the Android Transitions Framework, transition resource files must be placed in the app -> res -> transition folder of the project. Begin, therefore, by right-clicking on the res folder in the Project tool window and selecting the New -> Directory menu option. In the resulting dialog, name the new folder transition and click on the OK button. Right-click on the new transition folder, this time selecting the New -> File option and name the new file transition.xml.
With the newly created transition.xml file selected and loaded into the editing panel, add the following XML content to add a transition set that enables the change bounds transition animation with a duration attribute setting:
<?xml version="1.0" encoding="utf-8"?>

<transitionSet
  xmlns:android="http://schemas.android.com/apk/res/android">

    <changeBounds
        android:duration="2000">
    </changeBounds>

</transitionSet>
Loading and Using the Transition Set
Although a transition resource file has been created and populated with a change bounds transition, this will have no effect until some code is added to load the transitions into a TransitionManager instance and reference it in the scene changes. The changes to achieve this are as follows:
package com.ebookfrenzy.scenetransitions;

import android.support.v7.app.AppCompatActivity;
import android.os.Bundle;
import android.transition.Scene;
import android.transition.Transition;
import android.transition.TransitionInflater;
import android.transition.TransitionManager;
import android.view.ViewGroup;
import android.view.View;

public class SceneTransitionsActivity extends AppCompatActivity {

	ViewGroup rootContainer;
	Scene scene1;
	Scene scene2;
	Transition transitionMgr;

	@Override
	protected void onCreate(Bundle savedInstanceState) {
		super.onCreate(savedInstanceState);
		setContentView(R.layout.activity_scene_transitions);

		rootContainer =
                     (ViewGroup) findViewById(R.id.rootContainer);

		transitionMgr = TransitionInflater.from(this)
			    .inflateTransition(R.transition.transition);

		scene1 = Scene.getSceneForLayout(rootContainer,
                R.layout.scene1_layout, this);

		scene2 = Scene.getSceneForLayout(rootContainer,
                R.layout.scene2_layout, this);

		scene1.enter();
	}

	public void goToScene2 (View view)
	{
		TransitionManager.go(scene2, transitionMgr);
	}

	public void goToScene1 (View view)
	{
		TransitionManager.go(scene1, transitionMgr);
	}
.
.
}
Configuring Additional Transitions
With the transition file integrated into the project, any number of additional transitions may be added to the file without the need to make any further changes to the Java source code of the activity. Take, for example, the following changes to the transition.xml file to add a bounce interpolator to the change bounds transition, introduce a fade-in transition targeted at the third button and to change the transitions such that they are performed sequentially:
<?xml version="1.0" encoding="utf-8"?>

<transitionSet
  xmlns:android="http://schemas.android.com/apk/res/android"
  android:transitionOrdering="sequential" >


       <fade
         android:duration="2000"
         android:fadingMode="fade_in">

         <targets>
            <target android:targetId="@id/button3" />
         </targets>
      </fade>


    <changeBounds
        android:duration="2000"
        android:interpolator="@android:anim/bounce_interpolator">
    </changeBounds>
</transitionSet>
Buttons one and two will now bounce on arriving at the end destinations and button three will gently fade back into view when transitioning to scene 1 from scene 2.
Take some time to experiment with different transitions and interpolators by making changes to the transition.xml file and re-running the application.
Summary
Scene based transitions provide a flexible approach to animating user interface layout changes within an Android application. This chapter has demonstrated the steps involved in animating the transition between the scenes represented by two layout resource files. In addition, the example also used a transition XML resource file to configure the transition animation effects between the two scenes.
| Previous | Table of Contents | Next |
| An Android 6 Transition Tutorial using beginDelayedTransition | Working with the Floating Action Button and Snackbar |


