Difference between revisions of "Managing Fedora Linux Users and Groups"
(New page: During the installation of Fedora Linux, the installer prompted for information to create a single user account for the system. The fact that Linux is free, tends to make us forget that it...) |
|||
| Line 11: | Line 11: | ||
To add a new user to your Fedora Linux system using the ''User settings'' tool select ''System'' desktop menu and choose ''Users and Groups'' from the ''Administration'' sub-menu. A dialog similar to the one shown below will appear: | To add a new user to your Fedora Linux system using the ''User settings'' tool select ''System'' desktop menu and choose ''Users and Groups'' from the ''Administration'' sub-menu. A dialog similar to the one shown below will appear: | ||
| − | [[Image:fedora_linux_user_settings. | + | [[Image:fedora_linux_user_settings.png|Fedora Linux User Settings Dialog]] |
To add a new user, click on the ''Add User'' button. The ''New user account'' dialog will subsequently appear ready to be filled in with data relating to the new user, such as username, real name, password and contact information: | To add a new user, click on the ''Add User'' button. The ''New user account'' dialog will subsequently appear ready to be filled in with data relating to the new user, such as username, real name, password and contact information: | ||
Revision as of 15:44, 20 August 2007
During the installation of Fedora Linux, the installer prompted for information to create a single user account for the system. The fact that Linux is free, tends to make us forget that it is actually an enterprise class, multi-user and multi-tasking operating system. In order to use the full power of Fedora Linux, therefore, it is likely that more than one user will need to be given access to the system. Each user should have their own user account login, password, home directory and privileges.
Users are further divided into groups for the purposes of easier administration and those groups can have different levels of privileges. For example, you may have a group of users who work in the Accounting department. In such an environment you may wish to create an accounts group and assign all the Accounting department to that group.
In this chapter we will cover the steps to add, remove and manage users and groups on a Fedora Linux system.
Adding a User to an Ubuntu Linux System
There are two methods for adding new users to a system, one way is using the graphical User Settings tool and the other is to use the adduser command-line tool. In this section we will look at both approaches.
To add a new user to your Fedora Linux system using the User settings tool select System desktop menu and choose Users and Groups from the Administration sub-menu. A dialog similar to the one shown below will appear:
Fedora Linux User Settings Dialog
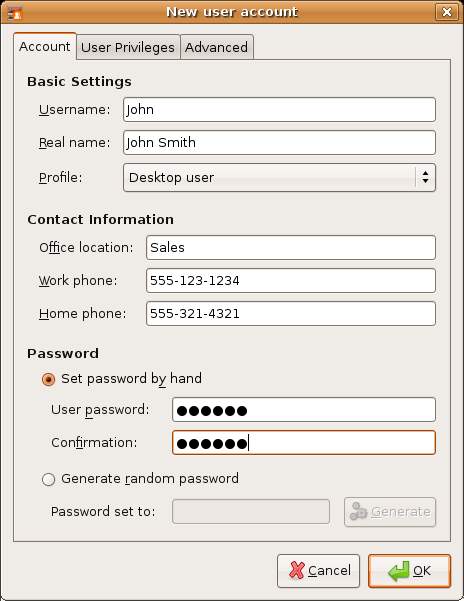
To add a new user, click on the Add User button. The New user account dialog will subsequently appear ready to be filled in with data relating to the new user, such as username, real name, password and contact information:
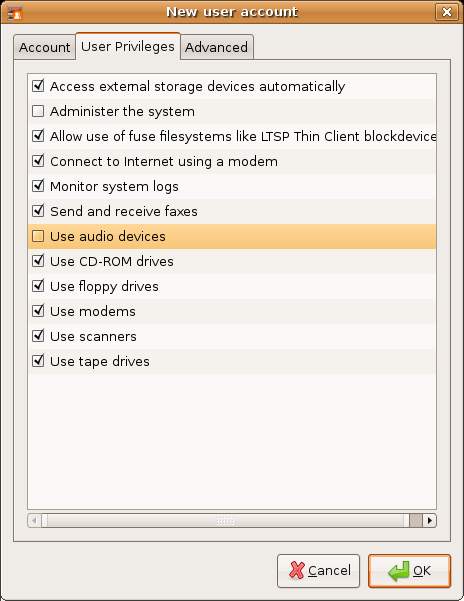
To define the privileges for this new user select the Privileges tab of the New user account dialog to display the privileges screen:
De-select any privileges you do not wish the new user to have. In particular you will want to ensure the user does not have Administration privilege unless the user is a trusted system administrator. The other privileges are usually considered to be safe for the typical user.
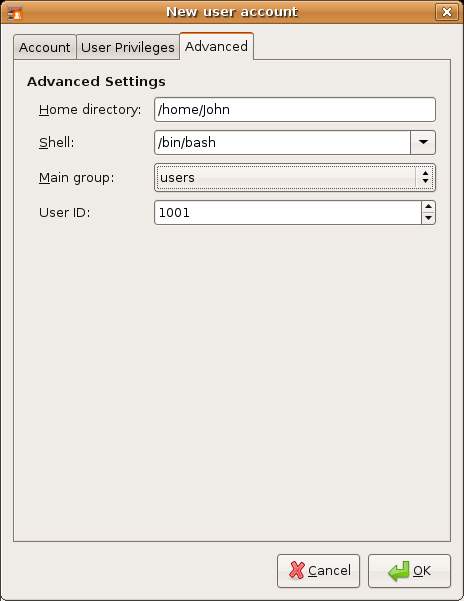
The final screen on the Add user dialog allows Advanced settings to be defined. These include such issues as the home directory of the user (traditionally /usr/username), tyhe type of shell that is presented as the command line in a terminal window (Bash is usually the default and there is no reason to change this unless you specifically need a different shell), the group to which the user belongs and the user ID. Use the drop down group menu to change the user's group membership to a different group:
Once the new user is configured, click on the OK button to add the new user. Once added the new user should appear in the list of users in the settings dialog and it should be possible to login in using the username and password specified.
As mentioned above it is also possible to add new users from the command-line. To do so, start a terminal window session and at the command prompt enter a command similar to:
sudo adduser --home /home/john john
The above command will prompt for a password for the account and optional contact information. Once the information has been gathered adduser creates the new account and the /home/john home directory. adduser provides a number of different options which can be learned from the man page:
man adduser
Editing the Properties of a User
The properties of a user may be changed using the same User settings dialog used to add a user as outlined above. Select the System desktop menu and choose Users and Groups from the Administration sub-menu to launch the User settings dialog. To make changes to the user properties select the user from the list and click on Properties. Work the various screens in the Account Properties for the selected user and click on the OK button to apply the changes
Deleting a User from an Ubuntu Linux System
An existing user may be deleted using the same User settings dialog used to add a user as outlined above. Select the System desktop menu and choose Users and Groups from the Administration sub-menu to launch the User settings dialog.
Select the user to be deleted and click on Delete. A confirmation dialog will appear. If you wish to proceed click on Delete.
Note that the deletion process will remove the account but leave the user's home directory intact. This will need to be deleted manually if it, and any files therein, are no longer required.
A user account may also be deleted from command-line using the deluser utility:
sudo deluser john
It is also possible to remove the user's home directory as part of the deletion process:
sudo deluser --remove-home john
Alternatively all files owned by the user, including those in the user's home directory may be removed as follows:
sudo deluser --remove-all-files john
The files in the user's home directory can also be backed up to another location before the directory is deleted using --backup-to command-line option together with the path to the backup directory:
sudo deluser --backup-to /oldusers/backups/john --remove-home john
Adding a New Group to an Ubuntu Linux System
All users are members of one or more groups. As an administrator it makes sense to organize users into logical groups. For example all sales people might belong to a sales group, whilst accounting staff might belong to the accounts group and so on. New groups are added either using the Users settings graphical tool, or by using the addgroup command-line tool. In this section we will look at both methods.
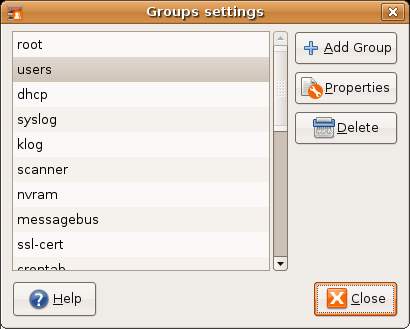
To access the User settings dialog select the desktop System menu and choose Users and Groups from the Administration sub-menu. To administer the group settings click on the Manage Groups button. The Group settings dialog will appear, listing all the groups available on the system:
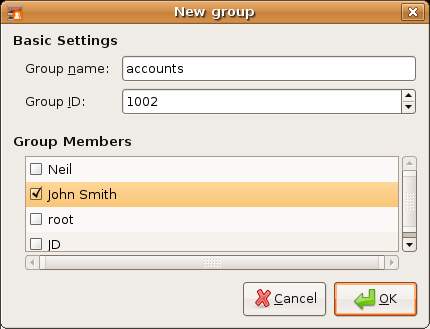
To add a new group click on the Add Group and enter the name of the group you wish to add. Add the users that should belong to this group by checking the box next to each user name in the list. For example the following screenshot shows user John Smith being added to the new accounts group:
Click on OK to add the new group to the system.
Modifying an Ubuntu Linux Group
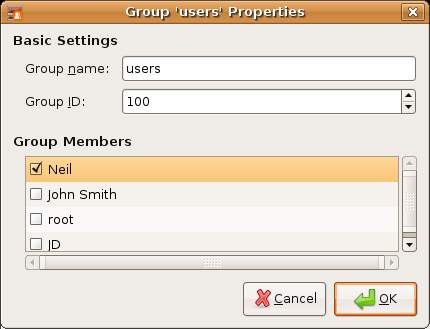
To modify an Ubuntu Linux group select the group to modify from the list of groups in the Group settings dialog (as outlined above) and click on Properties. The resulting Group properties dialog (shown below) allows basic settings such as the group ID, group name and group members to be changed.
To add a group from the command line, use the addgroup utility. For example:
sudo addgroup accounts
To add an existing user to an existing group:
sudo adduser john accounts
== Deleting a Group from an Ubuntu Linux System
A group may be deleted from a system using the delgroup utility:
sudo delgroup accounts
Note that if the group to be deleted is the primary group for any user it cannot be deleted. A group can be deleted only if it is empty using the following command:
sudo delgroup --only-if-empty accounts
To remove a user from membership of a group use the following command syntax:
sudo deluser john accounts
