Difference between revisions of "An Example iOS 6 iPhone Camera Application"
(→Building and Running the Application) |
m (Text replacement - "<table border="0" cellspacing="0">" to "<table border="0" cellspacing="0" width="100%">") |
||
| (10 intermediate revisions by the same user not shown) | |||
| Line 8: | Line 8: | ||
| − | < | + | <htmlet>ios9_upgrade</htmlet> |
| Line 32: | Line 32: | ||
| − | [[Image:]] | + | <htmlet>adsdaqbox_flow</htmlet> |
| + | [[Image:iphone_ios_6_camera_ui.png|The user interface of an iPhone iOS 6 Camera App]] | ||
Figure 66-1 | Figure 66-1 | ||
| Line 193: | Line 194: | ||
| − | < | + | <htmlet>ios9_upgrade</htmlet> |
| + | |||
| + | <htmlet>ezoicbottom</htmlet> | ||
<hr> | <hr> | ||
<table border="0" cellspacing="0" width="100%"> | <table border="0" cellspacing="0" width="100%"> | ||
Latest revision as of 19:56, 27 October 2016
| Previous | Table of Contents | Next |
| Accessing the iPhone Camera and Photo Library | Video Playback from within an iOS 6 iPhone Application |
Learn SwiftUI and take your iOS Development to the Next Level |
In the chapter entitled Accessing the iPhone Camera and Photo Library (iOS 6) we looked in some detail at the steps necessary to provide access to the iPhone camera and photo libraries in an iOS 6 application. The purpose of this chapter is to build on this knowledge by working through an example iPhone application designed to access the device’s camera and photo libraries.
An Overview of the Application
The application user interface for this example will consist of an image view and a toolbar containing two buttons. When touched by the user, the first button will display the camera to the user and allow a photograph to be taken which will subsequently be displayed in the image view. The second button will provide access to the camera roll where the user may select an existing photo image. In the case of a new image taken with the camera, this will be saved to the camera roll.
Since we will be covering the playback of video in the next chapter (Video Playback from within an iOS 6 iPhone Application) the camera roll and camera will be restricted to still images in this example. The addition of video support to this application is left as an exercise for the reader.
Creating the Camera Project
Begin the project by launching Xcode and creating a new iPhone iOS application project named Camera using the Single View Application template with the Storyboard and Automatic Reference Counting options enabled.
Adding Framework Support
The application developed in this chapter relies on the MobileCoreServices framework. This framework must be added to the project by selecting the product target entry from the project navigator panel (the top item named Camera) and clicking on the Build Phases tab in the main panel. In the Link Binary with Libraries section click on the ‘+’ button, select the MobileCoreServices.framework entry from the resulting panel and click on the Add button.
Designing the User Interface
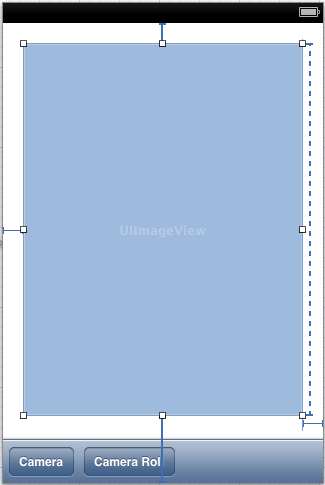
The next step in this tutorial is to design the user interface. This is a very simple user interface consisting of an image view, a toolbar and two bar buttons items. Select the MainStoryboard.storyboard file and drag and drop components from the Library window (View -> Utilities -> Show Object Library) onto the view. Position and size the components and set the text on the bar button items so that the user interface resembles Figure 66-1.

Figure 66-1
In terms of auto layout constraints, note that the priority of the height constraint on the image view has been reduced (represented by the dotted line) so that the image view will resize depending on the screen size of the iOS device on which the application is running. A vertical space constraint has also been placed on the bottom of the image view to the superview. Finally, the bottom edge of the toolbar has been constrained with a vertical space of zero with the bottom edge of the superview.
With the image view object selected, display the Attributes Inspector and change the Mode setting listed under View to Aspect Fill. This will ensure that the aspect ratio of the images displayed does not get distorted in the image view.
Next, display the Size Inspector and change the Vertical Content Hugging priority of the image view to 1000. This will prevent the image view from growing vertically and obscuring the toolbar when displaying large images.
Select the image view object in the view canvas, display the Assistant Editor panel and verify that the editor is displaying the contents of the CameraViewController.h file. Ctrl-click on the image view object and drag to a position just below the @interface line in the Assistant Editor. Release the line, and in the resulting connection dialog, establish an outlet connection named imageView.
With the Assistant Editor visible, establish action connections for the two buttons to methods named useCamera and useCameraRoll respectively (keeping mind that it may be necessary to click twice on each button to select it since the first click will typically select the toolbar parent object).
Finally, select the CameraViewController.h file and modify it further to add import and delegate protocol declarations together with a boolean property declaration that will be required later in the chapter:
#import <UIKit/UIKit.h>
#import <MobileCoreServices/MobileCoreServices.h>

@interface CameraViewController : UIViewController
<UIImagePickerControllerDelegate,
         UINavigationControllerDelegate>

@property BOOL newMedia;
@property (strong, nonatomic) IBOutlet UIImageView *imageView;
- (IBAction)useCamera:(id)sender;
- (IBAction)useCameraRoll:(id)sender;
@end
Implementing the Action Methods
The useCamera and useCameraRoll action methods now need to be implemented. The useCamera method first needs to check that the device on which the application is running has a camera. It then needs to create a UIImagePickerController instance, assign the cameraViewController as the delegate for the object and define the media source as the camera. Since we do not plan on handling videos the supported media types property is set to images only. Finally, the camera interface will be displayed. The last task is to set the newMedia flag to YES to indicate that the image is new and is not an existing image from the camera roll. Bringing all these requirements together gives us the following useCamera method:
- (void) useCamera:(id)sender
{
    if ([UIImagePickerController isSourceTypeAvailable:
           UIImagePickerControllerSourceTypeCamera])
    {
           UIImagePickerController *imagePicker =
             [[UIImagePickerController alloc] init];
           imagePicker.delegate = self;
           imagePicker.sourceType =
             UIImagePickerControllerSourceTypeCamera;
           imagePicker.mediaTypes = @[(NSString *) kUTTypeImage];
           imagePicker.allowsEditing = NO;
           [self presentViewController:imagePicker
             animated:YES completion:nil];
           _newMedia = YES;
     }
}
.
.
@end
The useCameraRoll method is remarkably similar to the previous method with the exception that the source of the image is declared to be UIImagePickerControllerSourceTypePhotoLibrary and the newMedia flag is set to NO (since the photo is already in the library we don’t need to save it again):
- (void) useCameraRoll:(id)sender
{
    if ([UIImagePickerController isSourceTypeAvailable:
          UIImagePickerControllerSourceTypeSavedPhotosAlbum])
    {
       UIImagePickerController *imagePicker =
           [[UIImagePickerController alloc] init];
       imagePicker.delegate = self;
       imagePicker.sourceType =
           UIImagePickerControllerSourceTypePhotoLibrary;
        imagePicker.mediaTypes = @[(NSString *) kUTTypeImage];
       imagePicker.allowsEditing = NO;
       [self presentViewController:imagePicker
           animated:YES completion:nil];
       _newMedia = NO;
    }
}
Writing the Delegate Methods
As described in Accessing the iPhone Camera and Photo Library (iOS 6), in order to fully implement an instance of the image picker controller delegate protocol it is necessary to implement some delegate methods. The most important method is didFinishPickingMediaWithInfo which is called when the user has finished taking or selecting an image. The code for this method in our example reads as follows:
#pragma mark -
#pragma mark UIImagePickerControllerDelegate

-(void)imagePickerController:(UIImagePickerController *)picker
didFinishPickingMediaWithInfo:(NSDictionary *)info
{
   NSString *mediaType = info[UIImagePickerControllerMediaType];

   [self dismissViewControllerAnimated:YES completion:nil];

    if ([mediaType isEqualToString:(NSString *)kUTTypeImage]) {
        UIImage *image = info[UIImagePickerControllerOriginalImage];

        _imageView.image = image;
        if (_newMedia)
            UIImageWriteToSavedPhotosAlbum(image,
               self,
               @selector(image:finishedSavingWithError:contextInfo:),
               nil);
        }
        else if ([mediaType isEqualToString:(NSString *)kUTTypeMovie])
        {
                // Code here to support video if enabled
        }
}

-(void)image:(UIImage *)image
finishedSavingWithError:(NSError *)error
contextInfo:(void *)contextInfo
{
   if (error) {
        UIAlertView *alert = [[UIAlertView alloc]
           initWithTitle: @"Save failed"
           message: @"Failed to save image"
           delegate: nil
           cancelButtonTitle:@"OK"
           otherButtonTitles:nil];
        [alert show];
   }
}
The code in this delegate method dismisses the image picker view and identifies the type of media passed from the image picker controller. If it is an image it is displayed on the view image object of the user interface. If this is a new image it is saved to the camera roll. The finishedSavingWithError method is configured to be called when the save operation is complete. If an error occurred it is reported to the user via an alert box.
It is also necessary to implement the imagePickerControllerDidCancel delegate method which is called if the user cancels the image picker session without taking a picture or making an image selection. In most cases all this method needs to do is dismiss the image picker:
-(void)imagePickerControllerDidCancel:(UIImagePickerController *)picker
{
   [self dismissViewControllerAnimated:YES completion:nil];
}
Building and Running the Application
In order to experience the full functionality of this application it will be necessary to install it on a physical iPhone or iPod Touch device with a camera. Steps on performing this are covered in Testing iOS 6 Apps on the iPhone – Developer Certificates and Provisioning Profiles.
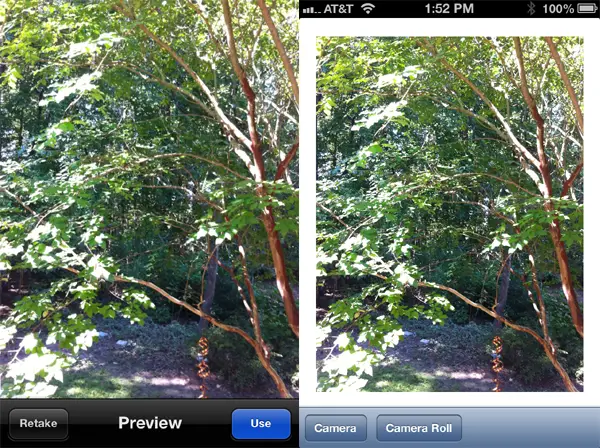
Assuming certificates and provisioning are configured, click on the Run button to launch the application. Once application loads, select the Camera button to launch the camera interface.
Figure 66-2
Once the picture has been taken and selected for use in the application, it will appear in the image view object of our application user interface.
Selecting the Camera Roll button will provide access to the camera roll and photo stream on the device where an image selection can be made:
Figure 66-3
Learn SwiftUI and take your iOS Development to the Next Level |
| Previous | Table of Contents | Next |
| Accessing the iPhone Camera and Photo Library | Video Playback from within an iOS 6 iPhone Application |


