Difference between revisions of "Integrating iAds into an iOS 7 App"
m (Text replacement - "<htmlet>ezoicbottom</htmlet>" to "") |
m (Text replacement - "<hr> <table border=" to "<htmlet>ezoicbottom</htmlet> <hr> <table border=") |
||
| Line 358: | Line 358: | ||
| + | <htmlet>ezoicbottom</htmlet> | ||
<hr> | <hr> | ||
<table border="0" cellspacing="0"> | <table border="0" cellspacing="0"> | ||
Revision as of 18:14, 11 May 2016
| Previous | Table of Contents | Next |
| An iOS 7 Sprite Kit Particle Emitter Tutorial | iOS 7 Multitasking, Background Transfer Service and Fetching |
Learn SwiftUI and take your iOS Development to the Next Level |
In the first 11 months of business, Apple’s iTunes App Store reached 1 billion downloads. This actually turned out to be something of a slow start, and in the following year and a half the total number of downloads grew to 10 billion. Clearly this spectacular market growth would not have been possible without the availability of hundreds of thousands of high quality applications available to iOS users in the App Store. Whilst some of these apps may have been developed by those with altruistic motives, it is most likely that the majority of the companies and individuals that invested the time and effort in creating apps did so in order to make money.
In terms of revenue generation options, the iTunes App Store eco-system provides a number of options. Perhaps the most obvious source of revenue for app developers involves charging the user an upfront fee for the application. Another option involves a concept referred to as “in-app purchase” whereby a user buys something from within the installed and running application. This typically takes the form of virtual goods (a packet of seeds in a farming simulation or a faster car in a racing game) or premium content such as access to specific articles in a news application. Yet another option involves the inclusion of advertisements in the application. It is, of course, also common to generate revenue from a mixture of these three options.
The subject of this chapter involves the use of advertising, specifically using Apple’s iAds system to incorporate adverts into an iOS 7 based applications.
iOS Advertising Options
In the early days of the iOS application market, the dominant advertising network was provided by a company called AdMob. AdMob provided an SDK that enabled developers to incorporate AdMob sourced adverts into their iOS applications. In the early days AdMob came under some criticism for the quality of the ads that were served (which mostly took the form of ads for other iOS applications). Eyeing AdMob’s dominance with envy and concern, both Apple and Google began negotiations to purchase the mobile advertising company. After lengthy discussions, very few details of which were ever made public, AdMob was acquired by Google.
Having lost out on the AdMob acquisition, Apple quickly moved to purchase another mobile advertising network named Quattro Wireless. Part of the attraction of Quattro Wireless was the fact that the company handled mobile advertising for a number of major companies enabling Apple to target premium advertising with iAds. Apple eventually closed down the Quattro Wireless advertising network and used it as the basis for the iAds program which is now built into the iOS SDK ready for any developer to generate advertising revenue from premium quality adverts.
Preparing to Run iAds within an Application
In order to receive revenue from iAds advertising that you place in your applications it is important to accept the iAd Network terms and conditions. This is achieved by logging into the iTunes Connect portal at itunesconnect.apple.com using your Apple ID, clicking on the Contracts, Tax and Banking link and following the instructions to set up the agreements and to enter the necessary tax and banking information.
Later, once the application is live in the App Store, return to iTunes Connect and click on the Grow Your Business With iAd link to review the revenue generating performance of the ads in your application.
iAd Advertisement Formats
With the introduction of iOS 7, the iAds platform now supports four different advertising formats consisting of banner, interstitial, medium rectangle and pre-roll video, each of which can be implemented within an iOS application using just a few lines of code.
Banner Ads
Banner ads are supported on both iPhone and iPad based applications and are intended to appear at the bottom of the device display while an application view is visible to the user. When a banner ad is tapped, a full screen advert appears until dismissed by the user. For as long as the banner is visible and the device has internet connectivity, the banner will cycle through different ads.
All that is required to make a banner ad appear on a view is to set the canDisplayBannerAds property of the corresponding view controller to YES. For example:
- (void)viewDidLoad
{
    [super viewDidLoad];
    self.canDisplayBannerAds = YES;
}
When this property is enabled, iAds will rename the view property of the view controller to originalContentView and request a banner ad from the iAds ad server. In the event that an ad is available from the iAds inventory, the originalContentView will be resized to make space for the banner and the banner will be displayed.
Banner ads may be disabled at anytime by turning off the canDisplayBannerAds property:
self.canDisplayBannerAds = NO;
As previously described, when the user taps on a banner a full screen advert will appear obscuring the current view. This advert will remain on the screen until dismissed by the user. Depending on the type of application, it may be necessary to take action when the banner is tapped. If the app is playing a video, for example, it would be prudent to pause playback while the view is obscured by the ad and subsequently resume once the user dismisses the ad. Such functionality can be achieved by implementing the viewWillDisappear and viewWillAppear delegate methods within the view controller code. These methods will then be called when the ad appears and disappears respectively:
-(void)viewWillDisappear:(BOOL)animated
{
    // View is about to be obscured by an advert.
    //Pause activities if necessary
}

-(void)viewWillAppear:(BOOL)animated
{
    // Advert has been dismissed. Resume paused activities
}
Interstitial Ads
Interstitial adverts occupy the full device display and are primarily intended to be displayed when a user transitions from one screen to another within an application. When a transition is taking place from one view controller to another, interstitial ad display can be enabled by setting the interstitialPresentationPolicy property of the destination view controller. When using storyboards this is best performed within the prepareForSegue method which is called immediately before the transition takes place. Interstitial display can be configured to be automatic or manual. The following code, for example, implements automatic interstitial advertising for a transition using the prepareForSegue method:
- (void)prepareForSegue:(UIStoryboardSegue *)segue sender:(id)sender
{
    UIViewController *destination = [segue destinationViewController];

    destination.interstitialPresentationPolicy =
                 ADInterstitialPresentationPolicyAutomatic;
}
The following code, on the other hand, demonstrates how to manually display an interstitial ad:
destination.interstitialPresentationPolicy =
             ADInterstitialPresentationPolicyManual;

[destination requestInterstitialAdPresentation];
When using interstitial ads, it is recommended that the application be given an opportunity in advance of the transition to make ad requests to the iAds system. This prevents any delays when the time comes to display the ad during the transition. This can be achieved by making a call to the prepareInterstitialAds method of the UIViewController class. An ideal place to perform this task is within the didFinishLaunchingWithOptions method of the application delegate class, for example:
- (BOOL)application:(UIApplication *)application didFinishLaunchingWithOptions:(NSDictionary *)launchOptions
{
    [UIViewController prepareInterstitialAds];
    return YES;
}
Medium Rectangle Ads
The medium rectangle ad is presented to the user in the form of a 300x250 pixel rectangle. This ad format is designed to be used within the content of a view and is only available for iPad based iOS applications. Medium rectangle ads are represented by instances of the AdBannerView class which must be assigned a delegate that conforms to the <ADBannerViewDelegate> protocol. These delegate methods are called to notify the application of whether or not an ad is ready to be displayed. It is the responsibility of these methods to position, display and hide the ad within the view as needed. For as long as the banner is visible and the device has internet connectivity, the banner will cycle through different ads.
The following code, for example, creates a medium rectangle ad instance and assigned the current class as the delegate:
_rectangleAdView = [[ADBannerView alloc]
         initWithAdType:ADAdTypeMediumRectangle];

_rectangleAdView.delegate = self;
When an ad is ready to be displayed, the bannerViewDidLoadAd method of the delegate will be called, the responsibility of which is to display the ad within the current view. For example:
- (void) bannerViewDidLoadAd:(ADBannerView *)banner
{
    [self.view addSubview:banner];
    [self.view layoutIfNeeded];
}
Note that the above code does not attempt to position the ad rectangle. In a real world application code will need to be added so that the ad appears in the appropriate location on the view.
The rectangle ad will rotate through different ads as long as inventory is available. In the event that an ad is not available, or the device loses connectivity, the didFailToReceiveAdWithError: delegate method will be called so that the advert can be removed from the view until another ad is available to be displayed:
- (void) bannerView:(ADBannerView *)banner didFailToReceiveAdWithError:(NSError *)error
{
    [banner removeFromSuperview];
    [self.view layoutIfNeeded];
}
As with the banner ad format, a full screen advertisement will be displayed in the event that the user taps on the rectangle ad. Once again, the viewWillDisappear and viewWillAppear delegate methods may be used to pause and resume the application if appropriate.
Pre-Roll Video Ads
For applications that make use of the iOS MediaPlayer framework to play videos, this feature allows advertisement videos to be played before the actual video is played to the user. This simply involves calling the playPrerollAdWithCompletionHandler method of the media player instance. A completion handler is then called so that the playback of the actual video can be initiated when the ad has finished running. For example:
NSURL *url = [NSURL URLWithString:
    @"http://www.ebookfrenzy.com/ios_book/movie/movie.mov"];

_moviePlayer =  [[MPMoviePlayerController alloc]
           initWithContentURL:url];

[self.view addSubview:_moviePlayer.view];

[_moviePlayer setFullscreen:YES animated:YES];

[moviePlayer playPrerollAdWithCompletionHandler:^(NSError *error) {
	[moviePlayer play];
}];
As with the interstitial ad format, Apple recommends preparing the application for pre-roll video ads at application launch time:
[- (BOOL)application:(UIApplication *)application didFinishLaunchingWithOptions:(NSDictionary *)launchOptions
{
    [MPMoviePlayerController preparePrerollAds];
    return YES;
}
Creating an Example iAds Application
In the remainder of this chapter we will work step by step through the creation of a simple iOS 7 application that includes banner, interstitial and rectangle based iAd advertisements. Begin this tutorial by launching Xcode and creating a new iOS application project named iAdDemo using the Single View Application template. Since the project will make use of the medium rectangle ad format, the Devices menu will need to be set to iPad.
Adding the iAds Framework to the Xcode Project
Once the new project has been created, the first step is to make sure the iAds framework is included in the project. Failure to add this framework will result in compilation and linking errors when building the application.
To add the iAds framework, select the iAdDemo target located at the top of the project navigator panel. In the center pane, select the Build Phases tab and unfold the Link Binary With Libraries panel. Click on the ‘+’ button to display a list of existing frameworks, locate and select iAd.framework and click the Add button. The iAd.framework will now appear in the frameworks list along with the other frameworks already included in the project.
Learn SwiftUI and take your iOS Development to the Next Level |
Enabling Banner Ads
To enable banner ads, begin by selecting the iAdDemoViewController.h file and importing the <iAd/iAd.h> file:
#import <UIKit/UIKit.h>
#import <iAd/iAd.h>

@interface iAdDemoViewController : UIViewController

@end
Next, edit the iAdDemoViewController.m and modify the viewDidLoad method to enable banner ads on the view controller class:
#import "iAdDemoViewController.h"

@interface iAdDemoViewController ()

@end

@implementation iAdDemoViewController

- (void)viewDidLoad
{
    [super viewDidLoad];
    self.canDisplayBannerAds = YES;
}
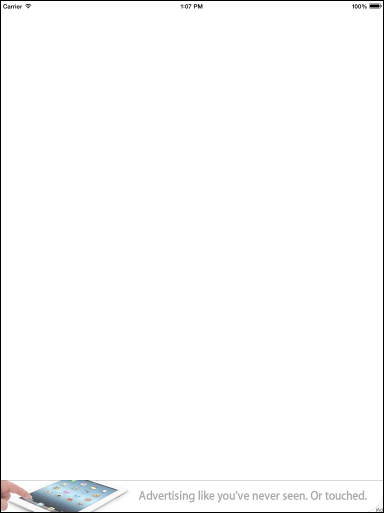
Run the application to verify that a banner ad appears along the bottom edge of the view as illustrated in Figure 60-1:
Figure 60-1
When the banner appears, tap on it to see the full screen advertisement, then close the advert to revert to the application.
Adding a Medium Rectangle Ad
To add the medium rectangle, begin by selecting the iAdDemoViewController.h file and modifying it to reflect the fact that this class will now be implementing the <ADBannerViewDelegate> protocol and to declare a reference to an ADBannerView instance:
#import <UIKit/UIKit.h>
#import <iAd/iAd.h>

@interface iAdDemoViewController : UIViewController
    <ADBannerViewDelegate>
@property (strong, nonatomic) ADBannerView *rectangleAdView;
@end
Return to the viewDidLoad method in the iAdDemoViewController.m file and add code to create the ad instance and to designate the view controller as the delegate:
- (void)viewDidLoad
{
    [super viewDidLoad];
    self.canDisplayBannerAds = YES;
    _rectangleAdView = [[ADBannerView alloc]
          initWithAdType:ADAdTypeMediumRectangle];

    _rectangleAdView.delegate = self;
}
Next, implement the delegate methods to add and remove the ad rectangle from the view:
-(void)bannerViewDidLoadAd:(ADBannerView *)banner
{
    [self.view addSubview:banner];
    [self.view layoutIfNeeded];
}

-(void)bannerView:(ADBannerView *)banner didFailToReceiveAdWithError:(NSError *)error
{
    [banner removeFromSuperview];
    [self.view layoutIfNeeded];
}
Compile and run the application, at which point the medium rectangle ad should appear in the top left hand corner of the display as shown in Figure 60-2:
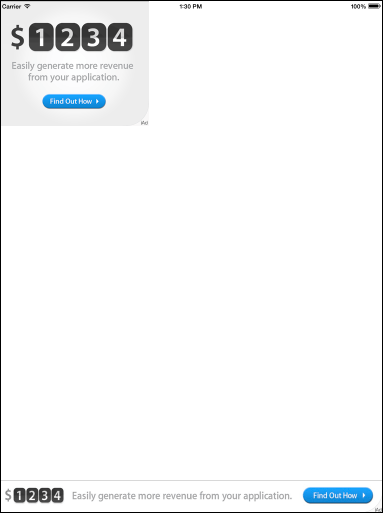
Figure 60-2
Implementing an Interstitial Ad
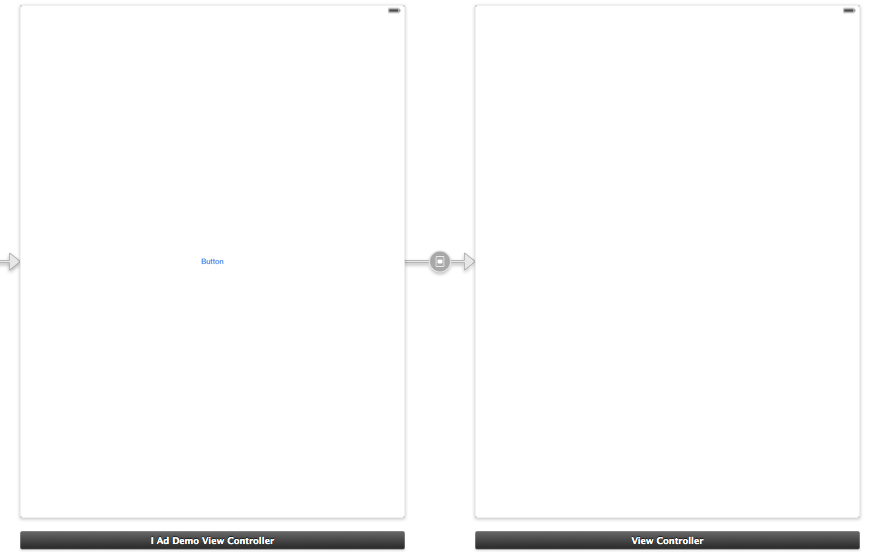
The first step in demonstrating interstitial ads in action is to add a second scene to the storyboard and implement a segue to that scene from the first scene. Begin by selecting the Main.storyboard file and dragging and dropping a new View Controller instance from the Object Library so that it is positioned to the right of the existing view controller scene.
Next, drag and drop a Button view onto the center of the first view controller scene. Ctrl-click on this button and drag the resulting line to the second view controller scene. Release the line and select the modal option from the resulting menu.
On completion of these settings, the storyboard should resemble that of Figure 60-3:
Figure 60-3
In order to avoid any delay in loading the ad artwork, prepare the application for interstitial ads by modifying the iAdsDemoAppDelegate.m file to import the <iAd/iAd.h> file and to perform the preparation method call:
#import "iAdDemoAppDelegate.h"
#import <iAd/iAd.h>

@implementation iAdDemoAppDelegate

- (BOOL)application:(UIApplication *)application didFinishLaunchingWithOptions:(NSDictionary *)launchOptions
{
    [UIViewController prepareInterstitialAds];
    return YES;
}
The last task is to add the prepareForSegue method to the iAdDemoViewController.m file to enable automatic interstitial ads for the transition to the destination view controller:
- (void)prepareForSegue:(UIStoryboardSegue *)segue sender:(id)sender
{
    UIViewController *destination = [segue destinationViewController];

    destination.interstitialPresentationPolicy =
         ADInterstitialPresentationPolicyAutomatic;
}
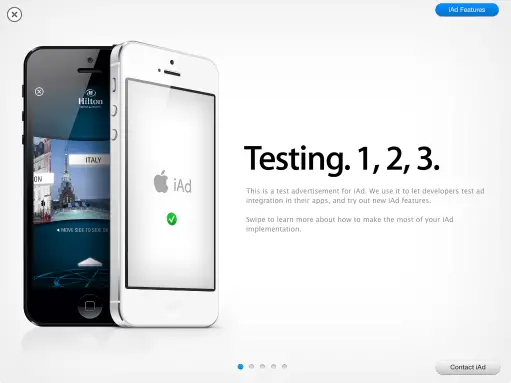
Compile and run the application and, once loaded, tap on the button to transition to the second scene at which point the interstitial ad should appear (Figure 60-4):
Figure 60-4
Configuring iAds Test Settings
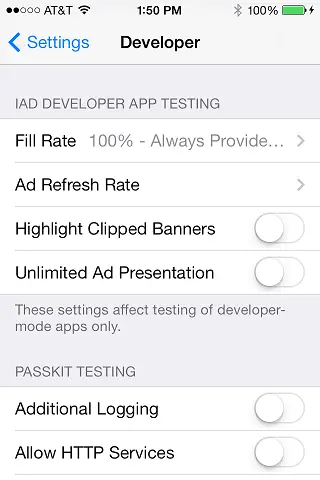
In the real world, there will be situations where an ad is not available to be displayed to the user. This might be because Apple does not have a suitable ad available in its inventory, or simply because the device does not have an internet connection and cannot connect to the Apple ad server. It is important, therefore, to test that the application gracefully handles such situations. In recognition of this fact, iOS provides a mechanism for simulating the absence of ad inventory (otherwise known as the ad fill rate) while testing an application. These settings are accessible via the Developer section of the Settings app on the device. Settings are available to adjust the ad refresh rate and also, as illustrated in Figure 60-5, the fill rate.
In the event that the ad does not appear, keep in mind that it can take a while for the Ad to arrive from the server. If no ad appears after about a minute, it may be worth accessing the Developer settings on the device and changing the fill rate to 100%.
Figure 60-5
Other options provided on this settings screen include the ability to adjust the frequency with which the ads refresh during testing and a mode to highlight ads that are clipped by other views within the user interface.
Going Live with iAds
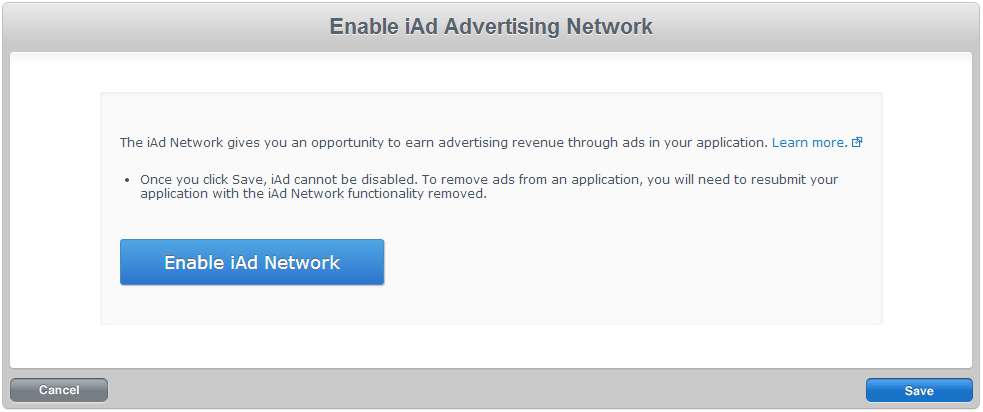
When your application is complete and ready to be uploaded to the App Store, it is important that the app is enabled for the iAd network before it is submitted. This is achieved within the iTunes Connect portal. Details for configuring an application for the App Store are covered in the chapter entitled Preparing and Submitting an iOS 7 Application to the App Store. Once the app has been registered in the iTunes Connect, select it from the Manage Your Apps page, click on the Set Up iAd Network button followed by the Enable iAd Network button on the resulting page as shown in Figure 60-6:
Figure 60-6
Once enabled, click on the Save button to commit the change.
Summary
There are a variety of methods for generating revenue from an iOS application. Perhaps one of the more obvious solutions, aside from charging an upfront fee for the application, is to integrate advertising into the user interface. The iAds framework provides an easy to use mechanism for the integration of advertisements sourced from Apple’s iAds inventory. This chapter has covered the basics of the iAds framework and worked through the creation of an example application.
Learn SwiftUI and take your iOS Development to the Next Level |
| Previous | Table of Contents | Next |
| An iOS 7 Sprite Kit Particle Emitter Tutorial | iOS 7 Multitasking, Background Transfer Service and Fetching |


