Difference between revisions of "A watchOS 2 WatchKit Context Menu Tutorial"
m (Text replacement - "<table border="0" cellspacing="0" width="100%">" to "<table border="0" cellspacing="0">") |
m (Text replacement - "<hr> <table border="0" cellspacing="0"> <tr>" to "<!-- Ezoic - BottomOfPage - bottom_of_page --> <div id="ezoic-pub-ad-placeholder-114"></div> <!-- End Ezoic - BottomOfPage - bottom_of_page --> <hr> <table border="0" cellspacing="0"> <tr>") |
||
| Line 202: | Line 202: | ||
| + | <!-- Ezoic - BottomOfPage - bottom_of_page --> | ||
| + | <div id="ezoic-pub-ad-placeholder-114"></div> | ||
| + | <!-- End Ezoic - BottomOfPage - bottom_of_page --> | ||
<hr> | <hr> | ||
<table border="0" cellspacing="0"> | <table border="0" cellspacing="0"> | ||
Revision as of 19:37, 10 May 2016
| Previous | Table of Contents | Next |
| A watchOS 2 WatchKit Glance Tutorial | Working with Images in WatchKit and watchOS 2 |
| Purchase the full edition of this watchOS 2 App Development Essentials book in eBook ($12.99) or Print ($27.99) format watchOS 2 App Development Essentials Print and eBook (ePub/PDF/Kindle) editions contain 35 chapters. |
The Apple Watch display includes touch based technology known as Force Touch. A Force Touch event is triggered when the user presses on the screen with slightly more pressure than would be needed to register a tap gesture. When a Force Touch gesture is detected while a WatchKit app is running a context menu will appear if one has been configured.
This chapter will provide an overview of context menus before working through a tutorial involving the use of context menus in a sample WatchKit app.
An Overview of WatchKit Context Menus
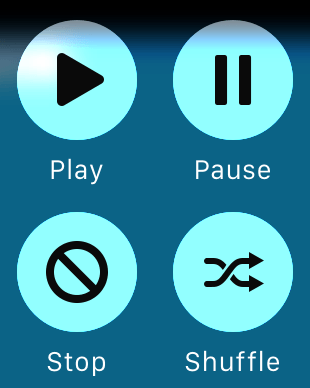
As previously outlined, a context menu appears when the user presses down on the watch display while an app is running. Each storyboard scene within a WatchKit app can have associated with it one context menu. Each context menu can contain up to four menu items (also referred to as actions), each of which is represented by a menu icon. Figure 16-1, for example, shows a context menu containing four menu items:
Figure 16-1
In practical terms, a context menu is actually an instance of the WKInterfaceMenu class while the menu items are represented by instances of the WKInterfaceMenuItem class. Menu items may be added to a context menu within the Interface Builder environment, or added dynamically at runtime from within the code of an interface controller instance. Menu items added dynamically may also be removed at runtime though the same is not true of those added using Interface Builder.
Each menu item needs to be connected to an action method within the interface controller class and will be called when the user taps that item. A tap performed outside any of the menu items dismisses the context menu and returns the user to the app scene.
Designing Menu Item Images
The icons displayed on menu items may be custom designed or selected from a list of pre-designed icons available from within Xcode. In terms of designing your own menu images some strict rules must be followed.
Each menu item image must be in PNG format and appears as a semi-opaque white circle. Opaque areas of the graphic in the center of the circle always appear in black, with transparent areas allowing the background scene to show through.
For the 38mm Apple Watch the canvas size of the menu image must be 70x70 pixels and for the 42mm device 80x80 pixels.
The background of the image must be fully transparent and must not contain the white circle (this is added automatically by WatchKit). When using a painting or graphic design tool, colors are defined by mixing red, green and blue (RGB) to make other colors. The level of transparency of an RGB-based color is defined by a fourth control referred to as the “Alpha channel” (which combines with RGB to create RGBA). This means that when designing a WatchKit menu image the RGBA alpha channel must be set to zero for the image background so that it is fully transparent. The visible area of the image, on the other hand, is defined by any graphic content that is not entirely transparent.
A sufficient margin must exist between the visible graphic and the outer edge of the white circle. Apple recommends that the non-transparent graphic content of the image not exceed 46x46 pixels and 54x54 pixels for the 38mm and 42mm Apple Watch models respectively. This, however, is only a guideline and it appears that the pre-designed images provided with Xcode use a more generous margin.
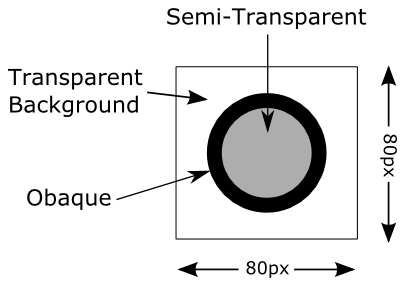
Figure 16-2 shows a graphical depiction of a menu image consisting of an opaque circle with a semi-transparent center designed for the 42mm Apple Watch:
Figure 16-2
Creating a Context Menu in Interface Builder
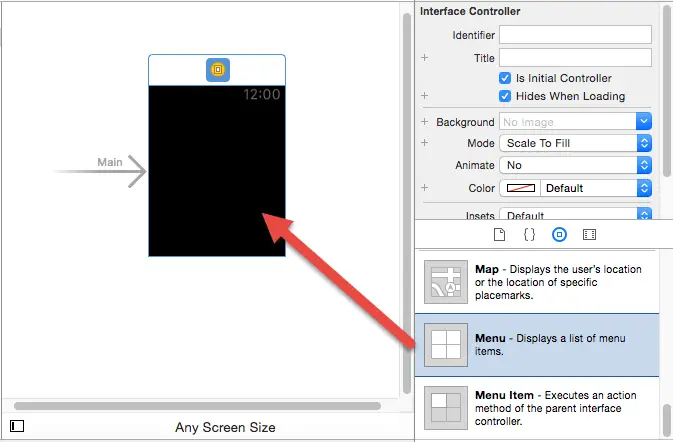
To add a context menu to a scene in an Interface Builder storyboard simply locate the Menu object in the Object Library panel and drag and drop it onto the scene canvas as outlined in Figure 16-3 below:
Figure 16-3
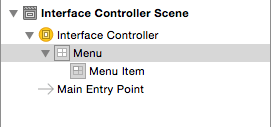
Once the menu has been added to the interface controller scene it will not be visible within the scene layout. The only evidence of the presence of the menu can be found in the Document Outline panel (Figure 16 4). As shown in the figure, the menu includes one default menu item when added to a scene:
Figure 16-4
Additional menu items are added to the menu by dragging Menu Item objects from the Object Library onto the Menu entry in the Document Outline panel.
Action method connections are established by displaying the Assistant Editor panel, Ctrl-clicking and dragging from a menu item to an appropriate position in the interface controller source file and following the usual steps to establish an action connection.
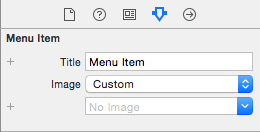
Select a menu item from the outline panel and display the Attributes Inspector panel (Figure 16 5) to configure the appearance of the menu item.
Figure 16-5
The title attribute specifies the text that appears beneath the menu item image circle. If the image menu is set to Custom, an image meeting the Apple style guidelines will need to be added to the image assets catalog of the WatchKit App folder in the Project Navigator panel and then selected from the drop down menu located beneath the Image menu.
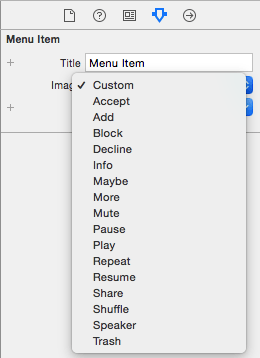
To select a pre-defined image, simply click on the Image menu and make a selection:
Figure 16-6
Adding and Removing Menu Items in Code
If a context menu has been added to a WatchKit storyboard scene, additional menu items may be added dynamically within the code of the interface controller using the following interface controller methods:
- addMenuItemWithImage – Takes as parameters a UIImage object containing the image to be displayed, the title string to display beneath the image and a reference to the method to be called when the item is selected.
- addMenuItemWithImageNamed – This method is used when the image to be displayed is already included in the WatchKit app resources. The method takes as parameters the name of the image file stored on the Apple Watch device, the title string to be displayed beneath the image and a reference to the method to be called when the item is selected.
- addMenuItemWithIcon – Allows one of the pre-designed template icons to be specified for the menu item image. In addition to the icon reference, this method also requires the title string to be displayed beneath the image and a reference to the method to be called when the item is selected.
When calling the addMenuItemWithIcon method, the icon options are defined within the WKMenuItemIcon enumeration and may be referenced as follows:
WKMenuItemIcon.Accept
WKMenuItemIcon.Add
WKMenuItemIcon.Block
WKMenuItemIcon.Decline
WKMenuItemIcon.Info
WKMenuItemIcon.Maybe
WKMenuItemIcon.More
WKMenuItemIcon.Mute
WKMenuItemIcon.Pause
WKMenuItemIcon.Play
WKMenuItemIcon.Repeat
WKMenuItemIcon.Resume
WKMenuItemIcon.Share
WKMenuItemIcon.Shuffle
WKMenuItemIcon.Speaker
WKMenuItemIcon.Trash
The following code, for example, adds a menu item to a context menu using the “Pause” template icon configured to call an action method named pauseSelected:
addMenuItemWithItemIcon(WKMenuItemIcon.Pause, title: "Pause",
			action: "pauseSelected")
All of the menu items added from within the interface controller code may be removed via a call to the clearAllMenuItems method of the interface controller object. Any menu items added to the storyboard scene using Interface Builder are unaffected by this method call.
| Purchase the full edition of this watchOS 2 App Development Essentials book in eBook ($12.99) or Print ($27.99) format watchOS 2 App Development Essentials Print and eBook (ePub/PDF/Kindle) editions contain 35 chapters. |
Creating the Context Menu Example Project
Start Xcode and create a new iOS project. On the template screen choose the Application option located under watchOS in the left hand panel and select iOS App with WatchKit App. Click Next, set the product name to ContextMenu, enter your organization identifier and make sure that the Devices menu is set to Universal. Before clicking Next, change the Language menu to Swift and switch off all of the Include options. On the final screen, choose a location in which to store the project files and click on Create to proceed to the main Xcode project window.
Designing the WatchKit App User Interface
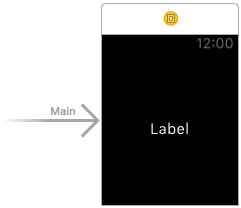
When the project is complete, the WatchKit app will include a user interface comprising four menu items. When a menu item is selected, the text displayed on a Label object in the main scene will change to reflect the selected option. Select the Interface.storyboard file in the Project Navigator panel and drag and drop a Label interface object from the Object Library onto the main storyboard scene. With the newly added Label object selected, display the Attributes Inspector panel and change the Horizontal and Vertical Alignment properties to Center at which point the scene should match Figure 16-7:
Figure 16-7
Display the Assistant Editor and verify that it is displaying the content of the InterfaceController.swift file. Ctrl-click on the Label object in the scene and drag the resulting line to a position immediately beneath the class declaration line in the Assistant Editor panel. Release the line and establish an outlet connection named statusLabel.
Designing the Context Menu
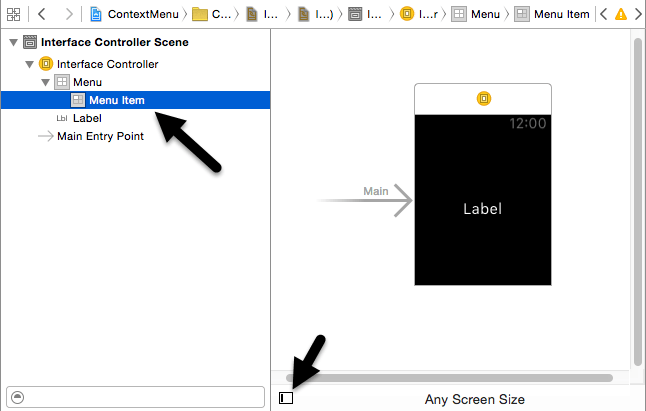
Remaining within the Interface.storyboard file, drag a Menu object from the Object Library and drop it onto the main scene as previously illustrated in Figure 16-3. Display the Document Outline panel using the button in the bottom left hand corner of the Interface Builder panel (indicated in Figure 16 8) and select the first Menu Item located beneath the Menu entry:
Figure 16-8
Display the Attributes Inspector and change the Image menu setting to Play and enter Play into the Title field.
Drag and drop three more Menu Item objects from the Object Library onto the Menu entry in the Document Outline panel, changing the Image property in the Attributes Inspector for each one to Pause, Block and Shuffle respectively. While configuring images, change the Title field for each Menu Item to Pause, Stop and Shuffle.
Establishing the Action Connections
Display the Assistant Editor, Ctrl-click on the uppermost Menu Item entry in the Document Outline panel and drag the line to a position beneath the willActivate method in the editor panel. Release the line and establish an action connection to a method named playSelected.
Repeat these steps for the remaining three Menu Items, connecting them to action methods named pauseSelected, stopSelected and shuffleSelected.
Next, edit the InterfaceController.swift file and implement the code in the four action method stubs to read as follows:
@IBAction func playSelected() {
    statusLabel.setText("Play")
}

@IBAction func pauseSelected() {
    statusLabel.setText("Pause")
}

@IBAction func stopSelected() {
    statusLabel.setText("Stop")
}

@IBAction func shuffleSelected() {
    statusLabel.setText("Shuffle")
}
Testing the Context Menu App
Compile and run the WatchKit app and when the app is running, press firmly on the device screen to invoke the context menu (to perform a deep press on the Watch Simulator, select the Hardware -> Force Touch Pressure -> Deep Press menu option, click on the screen then switch back to Shallow Press mode ). The context menu should appear as illustrated in Figure 16-9:
Figure 16-9
Selecting a menu item from the menu should dismiss the context menu and change the text on the Label object in the main scene to match the menu item selection.
Summary
The Force Touch technology built into the display of the Apple Watch is able to differentiate between a tap and a more forceful pressing motion on the device screen. When a force touch is detected by the device when an app is running the context menu associated with the current scene will be displayed. Each scene within a WatchKit app can have a single context menu, each of which can present up to four menu items available for selection by the user. Each menu item consists of an image and a title.
| Purchase the full edition of this watchOS 2 App Development Essentials book in eBook ($12.99) or Print ($27.99) format watchOS 2 App Development Essentials Print and eBook (ePub/PDF/Kindle) editions contain 35 chapters. |
| Previous | Table of Contents | Next |
| A watchOS 2 WatchKit Glance Tutorial | Working with Images in WatchKit and watchOS 2 |
