Difference between revisions of "Managing and Monitoring CentOS based Xen Guest Systems"
m (Text replacement - "<google>BUY_CENTOS_BOTTOM</google>" to "<htmlet>centos5</htmlet>") |
m (Text replacement - "<table border="0" cellspacing="0" width="100%">" to "<table border="0" cellspacing="0">") |
||
| Line 1: | Line 1: | ||
| − | <table border="0" cellspacing="0 | + | <table border="0" cellspacing="0"> |
<tr> | <tr> | ||
<td width="20%">[[Using Xen Full Virtualization to Run Windows on CentOS|Previous]]<td align="center">[[CentOS Essentials|Table of Contents]]<td width="20%" align="right">[[Configuring a New CentOS Xen Virtual Network|Next]]</td> | <td width="20%">[[Using Xen Full Virtualization to Run Windows on CentOS|Previous]]<td align="center">[[CentOS Essentials|Table of Contents]]<td width="20%" align="right">[[Configuring a New CentOS Xen Virtual Network|Next]]</td> | ||
| Line 92: | Line 92: | ||
<hr> | <hr> | ||
| − | <table border="0" cellspacing="0 | + | <table border="0" cellspacing="0"> |
<tr> | <tr> | ||
<td width="20%">[[Using Xen Full Virtualization to Run Windows on CentOS|Previous]]<td align="center">[[CentOS Essentials|Table of Contents]]<td width="20%" align="right">[[Configuring a New CentOS Xen Virtual Network|Next]]</td> | <td width="20%">[[Using Xen Full Virtualization to Run Windows on CentOS|Previous]]<td align="center">[[CentOS Essentials|Table of Contents]]<td width="20%" align="right">[[Configuring a New CentOS Xen Virtual Network|Next]]</td> | ||
Revision as of 14:44, 5 May 2016
| Previous | Table of Contents | Next |
| Using Xen Full Virtualization to Run Windows on CentOS | Configuring a New CentOS Xen Virtual Network |
|
You are reading a sample chapter from the CentOS 5 Essentials Essentials book. Purchase a copy of the fully updated CentOS 8 edition in eBook ($24.99) or Print ($36.99) format CentOS 8 Essentials Print and eBook (ePub/PDF/Kindle) editions contain 31 chapters and over 260 pages. Learn more... |
In the previous chapters we focused primarily on the steps necessary to configure the CentOS operating system to act as a Xen host system and created, installed and run a both full and para-virtualized guest operating systems.
In this chapter we will move on to explore the use of the virt-manager tool to manage the Xen guest operating systems.
Starting and Stopping Xen Guest Systems
When a Xen guest operating system has been configured it will appear in the list of available guest systems when the virt-manager is loaded. The virt-manager tool is launched either by selecting the Applications -> System Tools -> Virtual Machine Manager menu option or from the command-line by running /usr/sbin/virt-manager. Note that the manager must be run with root privileges in order to be able to view and manage any guest virtual machines that are configured.
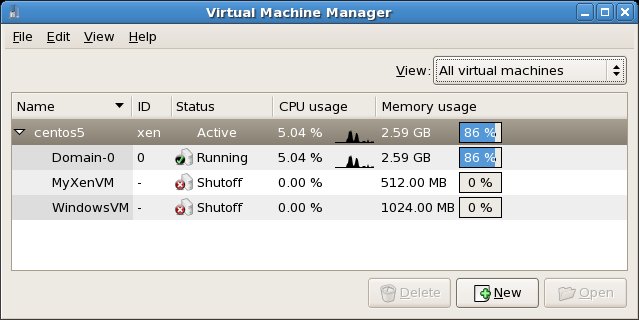
The following screenshot shows the virt-manager tool running on a CentOS system. It lists three systems - Domain 0 which is the host system, and two guest systems named MyXenVM and WindowsVM, both of which are currently shut down:
To launch a guest OS, select the OS in the list, click on Open and select Run from the console toolbar.
To stop a virtual machine running a guest OS it is not sufficient to simply close the Virtual Machine Console and Virtual Machine Manager windows. Doing so only closes the manager and console, leaving the guest operating system running in the background. In fact, if you try closing these windows and then restart the virt-manager tool you will see the guest OS is still listed as running, and selecting open will display the guest OS exactly as it was before you closed the console window.
To shutdown a guest OS, either shut it down using the operating system's own shut down mechanism, click on Shutdown in the Virtual Machine Console toolbar, or right click on the guest OS from the list in the virt-manager main screen and select Shutdown.
Pausing a Xen Guest Operating System
Xen provides the ability to pause and resume a running guest operating system. To pause a running system, either click on the Pause button in the Virtual Machine Console toolbar, or right click the operating system in the virt-manager main screen and select Pause.
A paused guest OS may then be resumed either by clicking again on the Pause button in the Virtual Machine Console toolbar, or right clicking on the corresponding virtual machine in the virt-manager main screen and selecting Resume.
Note that a paused guest system will not survive the reboot of the host operating system and continues to use system memory in the paused state. In the event that the host operating system is rebooted, the guest operating system will need to be restarted and cannot be resumed from its paused state.
To save a session which can be restored in its current state at any point in the future (including after a host system reboot) use the xm suspend and resume command line options:
xm suspend guestname
Conversely, to restore a session:
xm resume guestname
Changing Xen Guest Operating System Settings
During the initial configuration of the guest OS in virt-manager a number of resources such as memory allocation and CPU usage were defined. It is common to discover after the guest OS starts running that these settings need to be changed. Fortunately, virt-manager makes it easy to change these settings.
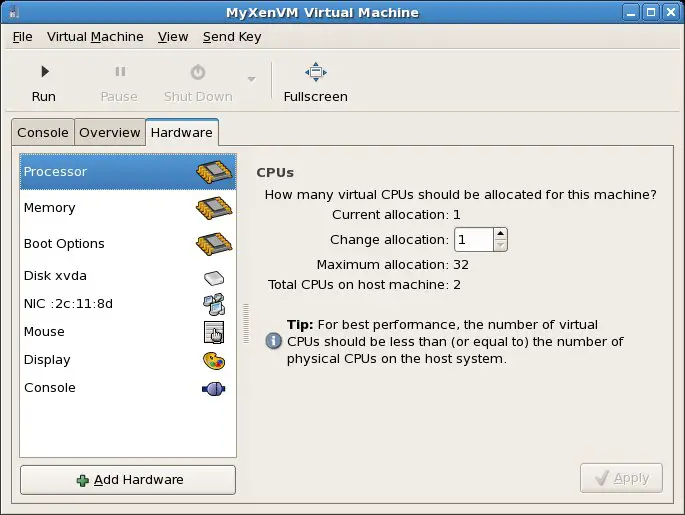
To modify the settings for a specific guest operating system, start virt-manager (Applications -> System Tools -> Virtual Machine Manager), select the virtual machine from the list and choose the Edit -> Virtual Machine Details menu option. This will display the virtual machine console where the settings can be found by clicking on the Hardware tab:
The hardware screen initially displays the CPU settings, allowing the number of CPUs used by the virtual machine to be modified.
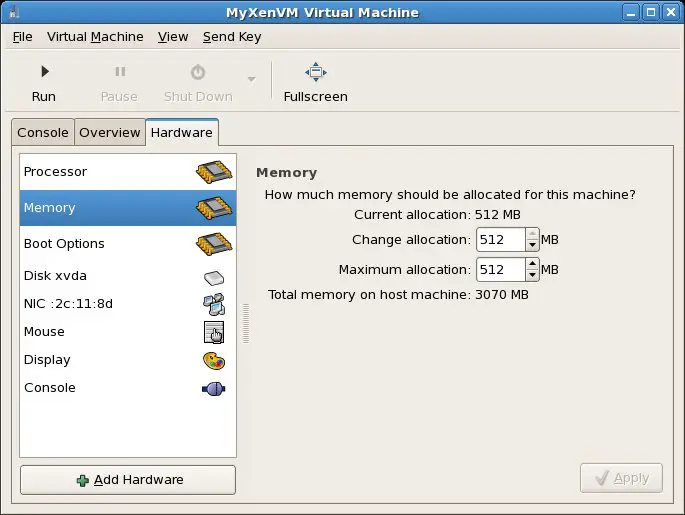
The panel on the left allows the currently displayed category to be changed. For example, to change the memory assigned to the guest system, select the Memory option and change the settings as required:
Additional disks may be added by clicking on the Add Hardware button at the bottom of the hardware category list, selecting Storage from the Hardware type menu and clicking on Forward. Specify either a block device (partition), or a file system based disk image location to act as the new disk.
Monitoring Virtual Machine Performance
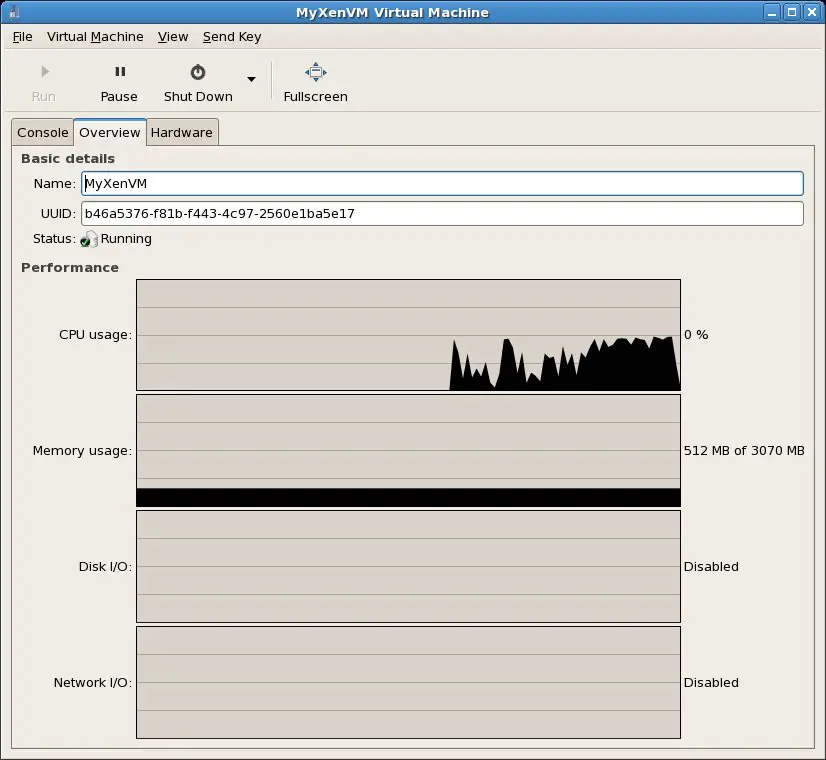
The virt-manager tool provides information on CPU and memory usage for each guest operating system. To view the performance graphs select Overview tab of the virtual machine console. The overview page will display four real-time graphs showing the CPU, Memory, Disk I/O and Network I/O usage for the selected guest:
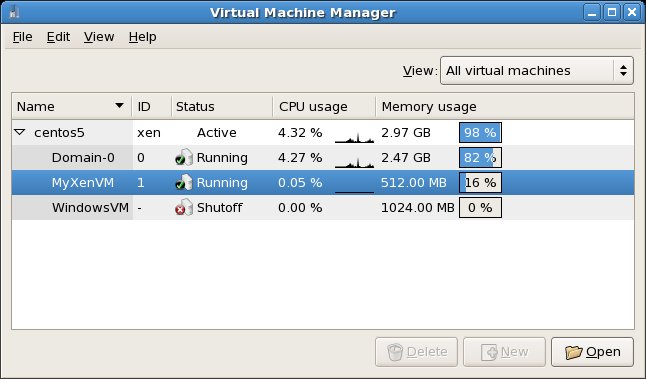
In addition, the virt-manager main window displays smaller CPU graph and Memory scales next to each guest OS together with a bar indicating the percentage of overall available memory used by each operating system:
The overall performance statistic of the host operating system may similarly be viewed by selecting the Edit -> Host details.... menu option.
|
You are reading a sample chapter from the CentOS 5 Essentials Essentials book. Purchase a copy of the fully updated CentOS 8 edition in eBook ($24.99) or Print ($36.99) format CentOS 8 Essentials Print and eBook (ePub/PDF/Kindle) editions contain 31 chapters and over 260 pages. Learn more... |
| Previous | Table of Contents | Next |
| Using Xen Full Virtualization to Run Windows on CentOS | Configuring a New CentOS Xen Virtual Network |


