Difference between revisions of "Submitting an Application to the Amazon Mobile App Distribution Portal"
(→Images and Multimedia) |
m (Text replacement - "<table border="0" cellspacing="0" width="100%">" to "<table border="0" cellspacing="0">") |
||
| Line 1: | Line 1: | ||
| − | <table border="0" cellspacing="0 | + | <table border="0" cellspacing="0"> |
<tr> | <tr> | ||
<td width="20%">[[Handling Different Kindle Fire Devices and Displays|Previous]]<td align="center">[[Kindle Fire Development Essentials|Table of Contents]]<td width="20%" align="right"></td> | <td width="20%">[[Handling Different Kindle Fire Devices and Displays|Previous]]<td align="center">[[Kindle Fire Development Essentials|Table of Contents]]<td width="20%" align="right"></td> | ||
| Line 156: | Line 156: | ||
<hr> | <hr> | ||
| − | <table border="0" cellspacing="0 | + | <table border="0" cellspacing="0"> |
<tr> | <tr> | ||
<td width="20%">[[Handling Different Kindle Fire Devices and Displays|Previous]]<td align="center">[[Kindle Fire Development Essentials|Table of Contents]]<td width="20%" align="right"></td> | <td width="20%">[[Handling Different Kindle Fire Devices and Displays|Previous]]<td align="center">[[Kindle Fire Development Essentials|Table of Contents]]<td width="20%" align="right"></td> | ||
Revision as of 14:44, 5 May 2016
| Previous | Table of Contents | |
| Handling Different Kindle Fire Devices and Displays |
<google>BUY_KINDLE_FIRE</google>
The final step in the process of bringing a Kindle Fire application to market involves submitting it for approval to the Amazon Mobile App Distribution portal. Once accepted, the application will be available for download from the Amazon App Store. If you decide to charge for your application, Amazon will pay a 70% royalty for each sale. In-app purchases are also subject to a 70% royalty payment.
As outlined in this chapter, the application submission process is actually one of the simplest steps in the app creation process.
Logging into the Amazon Mobile App Distribution Portal
At this point, it is highly likely that you already have an Amazon developer login. If not, you can create one at the following URL:
https://developer.amazon.com/welcome.html
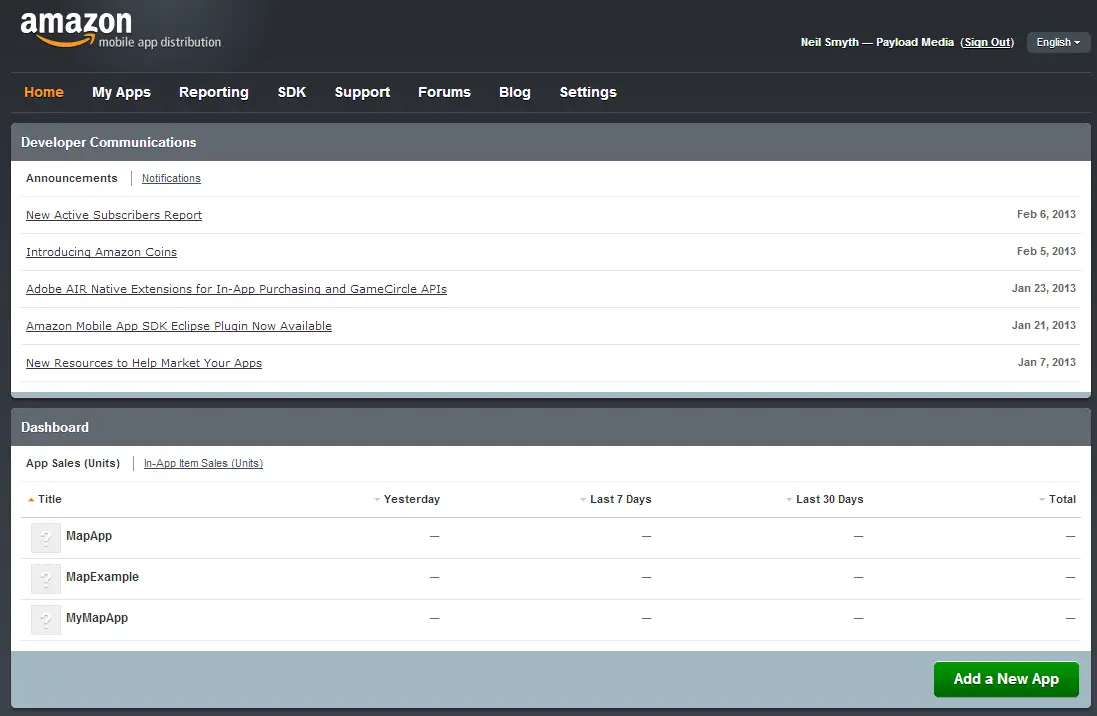
Assuming that you already have an account, go to the above URL and click on the Sign In link located in the top right hand corner of the web page. Once logged in, the developer home page for your account will appear as shown in Figure 48-1:
Figure 48-1
Adding a New App
To add a new app to the portal, simply click on the green Add New App button located in the lower right hand corner of the home page. This will present the New App Submissions screen, which consists of a set of tabs, each of which must be filled in prior to submission, beginning with the General Information screen.
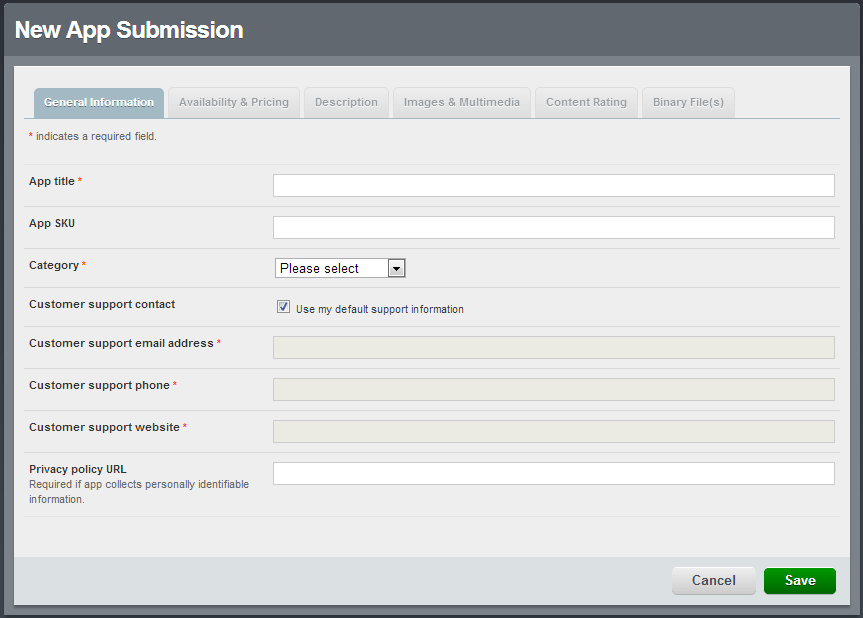
Figure 48-2
General Information
The general information screen appears as illustrated in Figure 48-2. This form must be completed and the information saved before moving on to the other screens. The information requested on this screen is as follows:
- App title – The title by which the app will be listed within the app store.
- App SKU – An optional SKU code that identifies the application.
- Category – The category into which the application fits (for example finance, games, music etc).
- Customer support contact – The contact information that will be listed with your application so that customers can contact you with questions or problems. Select this option to use the information contained in your company profile (accessed via the Settings tab at the top of the page). Alternatively, enter the information into the email, phone and website fields.
- Privacy Policy URL – If your application collects any form of personal information from users, you must post a privacy policy online and reference the URL here.
Once the general information has been configured, click on the Save button to save the information. Once saved, this application will be assigned an Amazon App ID and App Key and you are ready to move on to the Availability & Pricing screen. At any point in the process, it is possible to return to the General Information screen and change any of the settings (with the exception of the Amazon app ID and key).
Availability and Pricing
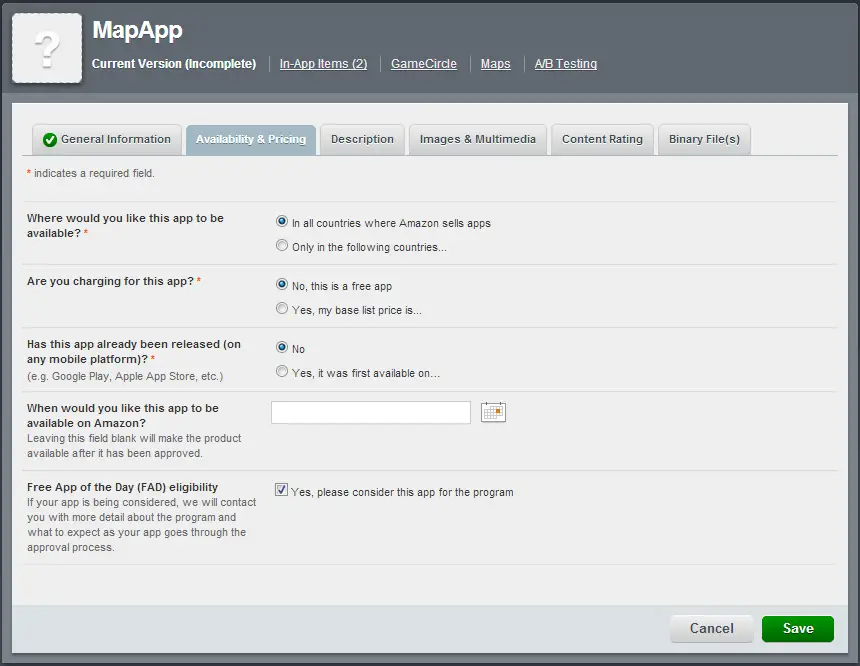
As the title suggests, the Availability and Pricing screen (Figure 48-3) allows information relating to the price and availability of the application to be specified. Availability is configurable in terms of both time and geography:
Figure 48-3
The information requested on this screen is as follows:
- Geographical Markets – The countries in which the application will be made available must be declared. Availability may be configured for every country in which Amazon sells apps, or restricted by either region or country.
- Pricing – In the event that you intend to charge a fee for the app, a base price in your preferred currency must be specified. The choice is then available to let Amazon derive a price for each currency, or to specify the pricing yourself. Pricing includes prevailing taxes in the corresponding countries.
- Previous Availability – Whether or not the application has previously been available on competing app stores such as those offered by Apple and Google.
- Availability Start Date – The date on which the app is to be made available on the Amazon App Store. Note that there is a delay while the app is reviewed so the actual date on which it goes live may be later than the date specified here. Leave this field blank to make the app available as soon as possible.
- Free App of the Day – Every day, Amazon makes one app freely available for download. Check this box if you would like your app considered for eligibility for this program.
Having completed the fields on this page, click on the Save button to proceed.
Description
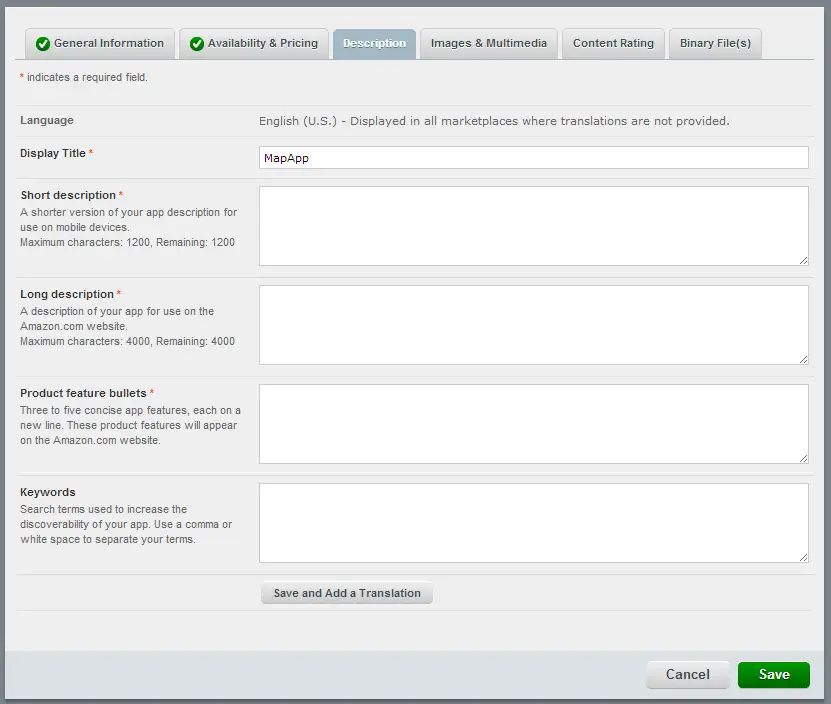
The Description screen (Figure 48 4) provides a valuable opportunity to write detailed promotional copy about your application. It is worth taking extra time to compose the text required on this screen. Much like the text of an advertisement, the content provided here may well govern whether or not a customer decides to purchase your application.
Figure 48-4
The Description screen initially requests the text in English but also provides the option to add translations to other languages. In the absence of a translation to other languages, the English version will be used in those territories. The information required on this screen is as follows:
- Short Description – A short description up to 1200 characters in length. This description appears when a user looks at your application’s description on a mobile device.
- Long Description – The description of your application as it will appear on the Amazon App Store Web site. This description can be up to 4000 characters in length.
- Product Feature Bullets – A list of bullet points that highlight the key features of your application. The list must include between three and five concise points. This information appears on the Amazon web site.
- Keywords – An optional set of comma separated keywords that will make your app easier to find when a user performs a search on the Amazon App Store.
Once this information has been provided in English, click either on the Save and Add a Translation button to add descriptions for other languages, or the Save button if no other translations are available.
Images and Multimedia
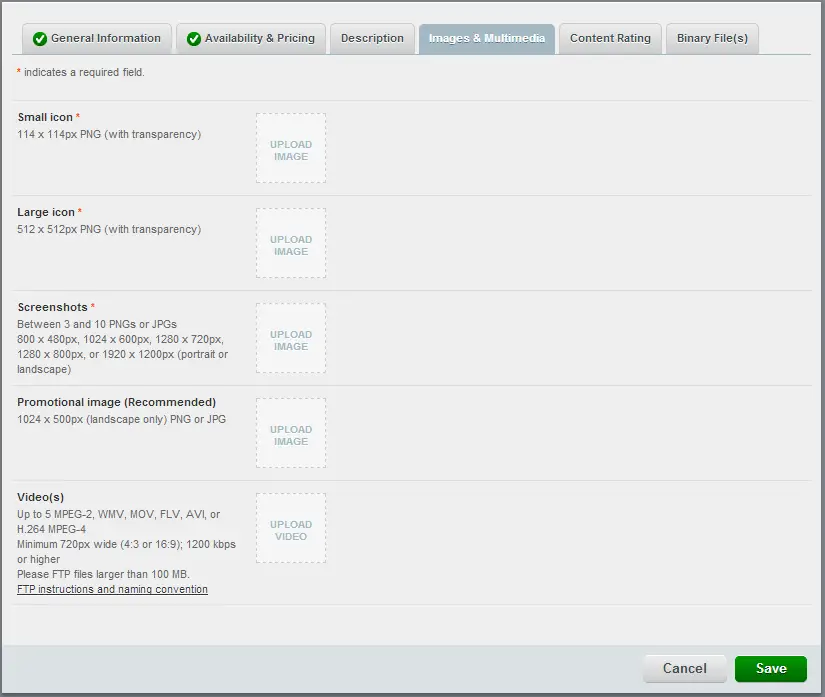
In addition to providing well-written and compelling descriptions of your application, it is also vitally important that the application be accompanied by high quality images. These images, along with an optional promotional video are uploaded via the Images & Multimedia screen:
Figure 48-5
This screen requests the following:
- Small icon – The icon that represents your application as 114x114px PNG image with transparency.
- Large icon - The icon that represents your application as 512x512px PNG image with transparency.
- Screenshots – Three to ten screenshots of your application running in either PNG or JPG format. Screenshots may be 800 x 480px, 1024 x 600px, 1280 x 720px, 1280 x 800px, or 1920 x 1200px in dimension and in either portrait or landscape orientation.
- Promotional Image – An optional image that may be used by Amazon to promote your application. The only stipulated requirement for this image is that it include the name of the application. If provided, this image must be a landscape PNG or JPG image with dimensions of 1024x500px.
- Videos – Up to five optional videos promoting your application. Videos must be in MPEG-2, WMV, MOV, FLV, AVI, or H.264 MPEG-4 format at a minimum of 720px wide at 1200 kbps or higher. Smaller videos may be uploaded using this screen. Video files larger than 100Mb must be uploaded using FTP, details of which can be found by following the provided link.
On Kindle Fire HD devices, screenshots may be taken by simultaneously holding down the volume down and power controls on the side of the device and holding them for at least one second. On releasing the buttons, the screen will flash and a smaller version of the image taken will briefly appear to indicate that the screenshot has been taken. The corresponding image file may be copied from the device by connecting it to a computer, opening a file system browser (i.e. Finder or Windows Explorer) and navigating to the Internal Storage -> Pictures -> Screenshots folder. Within this folder, any screenshots taken using this approach will be stored using a Screenshot_yyyy-mm-dd-hh-mm-ss.png file naming convention.
As an alternative method (and one that also works with Kindle Fire devices lacking volume buttons) is to connect the device to a computer with adb configured. From within Eclipse, display the DDMS perspective (Open Perspective > Other... > DDMS), select the Kindle Fire device from the Devices panel and click on the Camera image. The Device Screen Capture window will subsequently appear showing the screen image that was captured and providing options to rotate, copy, discard or save the image.
Content Rating
The Content Rating screen, as the name suggests, requires that the nature of the application be declared in terms of whether it contains content or features relating to areas such as alcohol, violence, information collection, gambling or advertising.
Binary Files
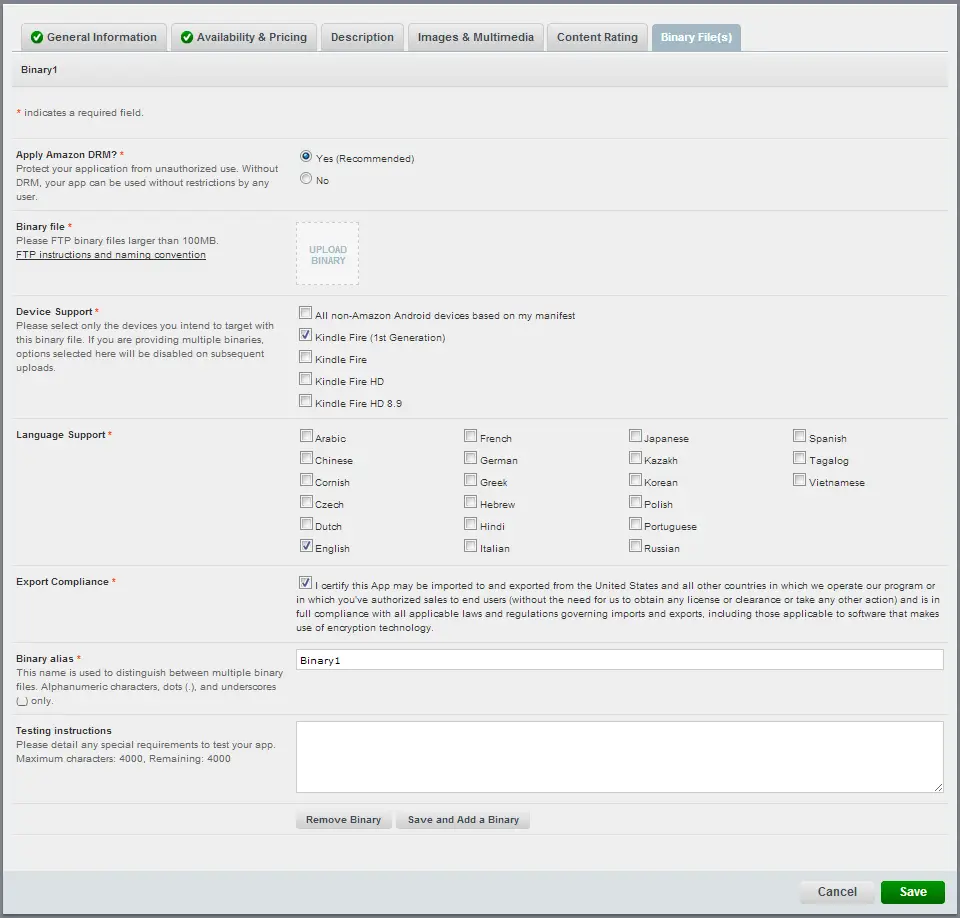
This final category of the app submission process (Figure 48 6) is where the binaries for the application are uploaded. As outlined in the chapter entitled Handling Different Kindle Fire Devices and Displays, a binary can be uploaded to target specific Kindle Fire devices during this process if needed.
Figure 48-6
In order to upload the binary file for your application it will first be necessary to locate the application’s APK package file within your project. To do so, click on the UPLOAD BINARY box in the above screen and navigate to the Eclipse workspace directory into which you have been saving your projects. Move into the directory that contains the application project to be uploaded and then navigate into the bin sub-folder. It is within this folder that you will find the APK file named as <project name>.apk where <project name> is the name of the project as created in Eclipse.
Information required on this screen is as follows:
- Amazon DRM Protection – Whether or not the application binary should be protected by Amazon’s Digital Rights Management technology. If this option is not selected, the user can potentially make unauthorized copies of your application.
- Binary Files – The application APK binary file as outlined above.
- Device Support – The Amazon devices for which the current binary file is configured to work.
- Language Support – The languages for which localized content is provided by the application.
- Export Compliance – Confirmation that the application does not contain any content or software that is subject to U.S. export controls.
- Binary Alias – A name by which the current binary may be identified. For example a binary for HD generation Kindle Fire models might be given an alias of MyApp_Kindle_HD, whilst the binary for the first generation Kindle Fire might be assigned an alias of MyApp_Kindle_First_Gen.
- Testing Instructions – Any special instructions or requirements that Amazon needs to know about to fully test your application prior to acceptance.
If only one binary is required for your application, click on the Save button once the above information has been entered. To add more binaries, click on the Save and Add a Binary button to upload the next binary (making sure to make the appropriate device selections and provide a meaningful binary alias).
Submitting the App
Once the information has been provided and the application images and binaries uploaded, all that remains is to submit the app for review and approval. This is achieved by clicking on the Submit App button. If this button is currently disabled, the most likely explanation is that some mandatory information has not yet been entered. Review the tabs on the app submission screen and visit any screens that do not have the green checkmark circle next to them and provide the missing information. Once the app has been submitted there is little to do but wait to hear back from Amazon. In the event that the app is rejected, you will be given details of the reason for the rejection and given the opportunity to address the issue and re-submit the app.
Once the app is approved it will appear in the app store (unless a later start date was specified in the Availability and Pricing section).
To track sales, simply log into the portal and click on the Reporting link.
Summary
The last phase of the process of bringing a Kindle Fire based Android application to market involves submitting the application for approval using the Amazon Mobile App Distribution portal. Whilst not a complex task, this does require some work, particularly in terms of providing professional descriptions and graphics. Once the application has been accepted, all that remains (aside from making improvements) is to monitor sales figures.
<google>BUY_KINDLE_FIRE</google>
| Previous | Table of Contents | |
| Handling Different Kindle Fire Devices and Displays |
