Difference between revisions of "Creating GUIs in Windows PowerShell 1.0 with WinForms"
m (Text replacement - "<google>BUY_WPS</google>" to "<htmlet>powershell</htmlet>") |
m (Text replacement - "<table border="0" cellspacing="0" width="100%">" to "<table border="0" cellspacing="0">") |
||
| Line 1: | Line 1: | ||
| − | <table border="0" cellspacing="0 | + | <table border="0" cellspacing="0"> |
<tr> | <tr> | ||
<td width="20%">[[An Overview of Windows PowerShell 1.0 and .NET|Previous]]<td align="center">[[Windows PowerShell 1.0 Essentials|Table of Contents]]<td width="20%" align="right">[[Drawing Graphics using PowerShell 1.0 and GDI+|Next]]</td> | <td width="20%">[[An Overview of Windows PowerShell 1.0 and .NET|Previous]]<td align="center">[[Windows PowerShell 1.0 Essentials|Table of Contents]]<td width="20%" align="right">[[Drawing Graphics using PowerShell 1.0 and GDI+|Next]]</td> | ||
Revision as of 14:27, 5 May 2016
| Previous | Table of Contents | Next |
| An Overview of Windows PowerShell 1.0 and .NET | Drawing Graphics using PowerShell 1.0 and GDI+ |
| Purchase and download the full PDF version of this PowerShell eBook for only $8.99 |
The objective of this chapter is to cover the basics of creating a graphical user interface (GUI) using Windows PowerShell. Although Windows PowerShell itself does not include any GUI capabilities, it does have access to the .NET framework, including the WinForms programming interface.
An Overview of WinForms
In the remainder of this chapter we will work through some examples which cover the key aspects of WinForms based GUI development using Windows PowerShell.
Loading the Winforms .NET Assembly
As outlined in the chapter entitled An Overview of Windows PowerShell 1.0 and .NET, only a few .NET assemblies are loaded into Windows PowerShell by default. As WinForms is not amongst the pre-loaded assemblies, it is necessary to load WinForms prior to creating GUIs. Assemblies are loaded using the static LoadWith PartialName method of the [reflection.assembly] class, passing through the name of the WinForms assembly as an argument:
[reflection.assembly]::LoadWithPartialName( "System.Windows.Forms")
Once loaded, we are ready to create a simple GUI from within Windows PowerShell.
A Basic Windows PowerShell GUI
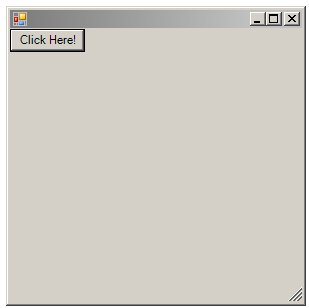
Once the WinForms assembly has been loaded the next step is to create a simple example. As previously discussed, WinForms GUIs consist of containers, controls and events. With this in mind, the following example creates a form (container) and a button (control), adds the button to the form and displays the dialog:
[reflection.assembly]::LoadWithPartialName( "System.Windows.Forms")
$form= New-Object Windows.Forms.Form

$button = New-Object Windows.Forms.Button

$button.text = "Click Here!"

$form.controls.add($button)

$form.ShowDialog()
When executed, the resulting dialog will appear as follows:
Windows PowerShell and WinForms Events
The next area to cover involves the handling of events. An event is typically triggered when a user interacts with a control. For example, clicking on a button control will trigger an event. Event handlers are nothing more than lines of code which define what is to happen when the event is triggered (for example, an event handler may be written to exit the application when a Close button is clicked).
In Windows PowerShell, event handlers take the form of scriptblocks, which are essentially sequences of commands wrapped in braces ({}).
Event handlers are added to a control using methods which have the following syntax:
add_<eventname> (<scriptblock>)
where <eventname> is the name of the event to be handled and <scriptblock> is the code to be executed when the event is triggered. For example, to close the dialog in the above example when the button is clicked:
$button.add_click({ $form.close() })
Using scriptblocks would quickly become unwieldy if all the code to be executed had to be included along with the add_<eventname> method. An alternative to this approach is to call a function instead. The following adaptation of our example defines a function called do_exit and subsequently references it in the event handler scriptblock:
[reflection.assembly]::LoadWithPartialName( "System.Windows.Forms")

function do_exit
{
     $form.close()
}

$form= New-Object Windows.Forms.Form

$button = New-Object Windows.Forms.Button

$button.text = "Click Here!"

$button.add_click({do_exit})

$form.controls.add($button)

$form.ShowDialog()
Setting WinForms Properties
WinForms components are essentially objects, and as such, have properties which can be set to alter component appearance and behavior. As with other object properties, these can be accessed using standard dot notation. In the previous example, we used this approach to set the text of the button control:
$button.text = "Click Here!"
Similarly, we could set the title of the form using the form object's text property:
$form.text = "PowerShell WinForms Example"
Bringing it all Together
Now that we have seen a simple GUI created in Windows PowerShell and covered some of the basic techniques we can create a slightly more complex GUI. The following script creates a GUI containing a label, button and text field. An event handler is configured on the button such that when it is clicked the text is extracted from the text field and used to construct a message which is then displayed on the label control. Note the creation of Drawing.Point objects to configure the size and location of controls on the form:
# Load the Winforms assembly
[reflection.assembly]::LoadWithPartialName( "System.Windows.Forms")

# Create the form
$form = New-Object Windows.Forms.Form

#Set the dialog title
$form.text = "PowerShell WinForms Example"

# Create the label control and set text, size and location
$label = New-Object Windows.Forms.Label
$label.Location = New-Object Drawing.Point 50,30
$label.Size = New-Object Drawing.Point 200,15
$label.text = "Enter your name and click the button"

# Create TextBox and set text, size and location
$textfield = New-Object Windows.Forms.TextBox
$textfield.Location = New-Object Drawing.Point 50,60
$textfield.Size = New-Object Drawing.Point 200,30

# Create Button and set text and location
$button = New-Object Windows.Forms.Button
$button.text = "Greeting"
$button.Location = New-Object Drawing.Point 100,90

# Set up event handler to extarct text from TextBox and display it on the Label.
$button.add_click({

$label.Text = "Hello " + $textfield.text

})

# Add the controls to the Form
$form.controls.add($button)
$form.controls.add($label)
$form.controls.add($textfield)

# Display the dialog
$form.ShowDialog()
<google>BUY_WPS_BOTTOM</google>


