Difference between revisions of "An iOS 9 MapKit Flyover Tutorial"
(→Designing the User Interface) |
|||
| Line 1: | Line 1: | ||
| − | |||
Since iOS 6, the Apple Maps app bundled with iOS has provided the ability to visually navigate photo-realistic 3D models of major cities and landmarks. This feature, referred to as “flyover” enables users to interactively pan, zoom and rotate around three-dimensional representations of key world locations when using the Maps app. From within the Maps app it is possible, for example, to navigate to, rotate around and fly-over a realistic 3D model of Paris. | Since iOS 6, the Apple Maps app bundled with iOS has provided the ability to visually navigate photo-realistic 3D models of major cities and landmarks. This feature, referred to as “flyover” enables users to interactively pan, zoom and rotate around three-dimensional representations of key world locations when using the Maps app. From within the Maps app it is possible, for example, to navigate to, rotate around and fly-over a realistic 3D model of Paris. | ||
| Line 57: | Line 56: | ||
== Designing the User Interface == | == Designing the User Interface == | ||
| − | The first step in this tutorial is to design the user interface. This is a very simple user interface consisting of an MKMapView instance and a single Button object. Select the Main.storyboard file and drag and drop components from the Object Library (View -> Utilities -> Show Object Library) onto the view. Position and size the components and set the text on the button so that the user interface resembles that shown in Figure 83 3: | + | The first step in this tutorial is to design the user interface. This is a very simple user interface consisting of an MKMapView instance and a single Button object. Select the Main.storyboard file and drag and drop components from the Object Library (View -> Utilities -> Show Object Library) onto the view. Position and size the components and set the text on the button so that the user interface resembles that shown in Figure 83-3: |
Revision as of 19:29, 22 December 2015
Since iOS 6, the Apple Maps app bundled with iOS has provided the ability to visually navigate photo-realistic 3D models of major cities and landmarks. This feature, referred to as “flyover” enables users to interactively pan, zoom and rotate around three-dimensional representations of key world locations when using the Maps app. From within the Maps app it is possible, for example, to navigate to, rotate around and fly-over a realistic 3D model of Paris.
With the introduction of iOS 9, these capabilities are now available to iOS app developers as part of the MapKit framework. As will be outlined in the remainder of this chapter, the implementation of flyover behavior within a map involves the use of the MKMapView class together with the MKMapCamera class.
MKMapView Flyover Map Types
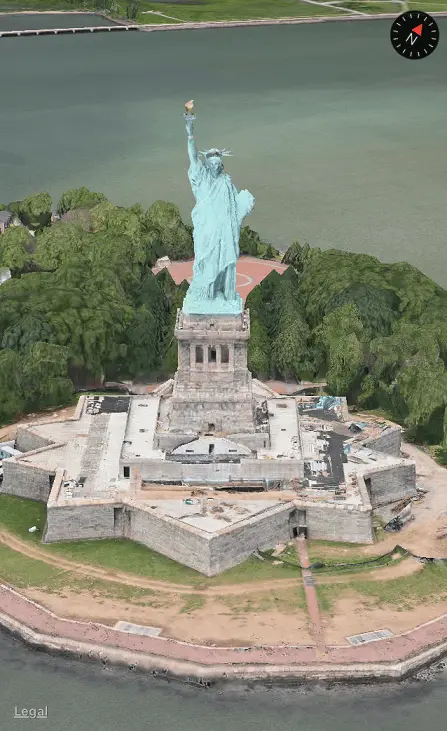
The previous chapters have explored two different map types in the form of satellite and hybrid modes. Flyover support includes two additional map types represented by MKMapType.SatelliteFlyover and MKMapType.HybridFlyover. The SatelliteFlyover mode displays pure 3D imagery while the hybrid mode includes annotations such as road names and point of interest labels. The following code, for example, configures a map view object for SatelliteFlyover mode:
mapView.mapType = .SatelliteFlyover
Figure 83-1 shows an example of an MKMapView object in satellite flyover mode showing a 3D rendering of the Statue of Liberty:
Figure 83-1
The MKMapCamera Class
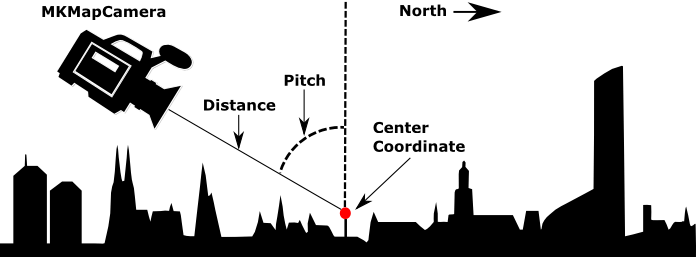
The point of view from which the 3D flyover is represented to the user is controlled by assigning an MKMapCamera object to the MKMapView instance. The MKMapCamera object is configured in terms of the center coordinate of the viewed area, the distance of the camera from the center coordinate and the camera’s pitch and direction in degrees relative to North as represented in Figure 83-2:
Figure 83-2
The following code, for example, configures an MKMapCamera instance located 650 meters from the Empire State Building facing East at a pitch of 30 degrees and assigns it to the camera property of a map view object named mapView:
let distance: CLLocationDistance = 650
let pitch: CGFloat = 30
let heading = 90.0

mapView.mapType = .SatelliteFlyover

let coordinate = CLLocationCoordinate2D(latitude: 40.7484405,
						longitude: -73.9856644)

let camera = MKMapCamera(lookingAtCenterCoordinate: coordinate,
			fromDistance: distance,
			pitch: pitch,
			heading: heading)

mapView.camera = camera
An MKMapKit Flyover Example
The example project implemented in the remainder of this chapter will demonstrate the use of the MKMapCamera class to display a 3D Satellite Flyover rendering of the Empire State Building. The camera view will then slowly rotate around the building using an animation effect.
Begin the project by launching Xcode and creating a new Universal iOS application project named FlyoverDemo using the Single View Application template with the Swift language option selected.
Designing the User Interface
The first step in this tutorial is to design the user interface. This is a very simple user interface consisting of an MKMapView instance and a single Button object. Select the Main.storyboard file and drag and drop components from the Object Library (View -> Utilities -> Show Object Library) onto the view. Position and size the components and set the text on the button so that the user interface resembles that shown in Figure 83-3:
Figure 83-3
Select the Map View object in the scene layout, display the Resolve Auto Layout Issues menu and select the Reset to Suggested Constraints option listed under All Views in View Controller.
Display the Assistant Editor panel and establish an outlet connection from the Map View object named mapView. With the Assistant Editor still displayed, establish an action connection from the button object to a method named animateCamera.
With the connections configured, further modify the ViewController.swift file to import the MapKit framework as follows and to declare constants for the camera settings and a variable to contain a reference to the MKMapCamera object:
import UIKit
import MapKit

class ViewController: UIViewController {

    @IBOutlet weak var mapView: MKMapView!

    let distance: CLLocationDistance = 650
    let pitch: CGFloat = 65
    let heading = 0.0
    var camera: MKMapCamera?

    override func viewDidLoad() {
        super.viewDidLoad()
    }

    @IBAction func animateCamera(sender: AnyObject) {
    }

    override func didReceiveMemoryWarning() {
        super.didReceiveMemoryWarning()
        // Dispose of any resources that can be recreated.
    }
}
Configuring the Map View and Camera
The next step is to configure the MKMapView instance to display the map in SatelliteFlyover mode and then create and initialize the MKMapCamera object so that it is positioned above and to the side of the Empire State Building. Once the camera has been initialized it needs to be assigned to the MKMapView instance. Remaining in the ViewController.swift file, modify the viewDidLoad method to perform these tasks as follows:
override func viewDidLoad() {
    super.viewDidLoad()

    mapView.mapType = .SatelliteFlyover

    let coordinate = CLLocationCoordinate2D(latitude: 40.7484405,
		longitude: -73.9856644)
    camera = MKMapCamera(lookingAtCenterCoordinate: coordinate,
		fromDistance: distance,
		pitch: pitch,
		heading: heading)
    mapView.camera = camera!
}
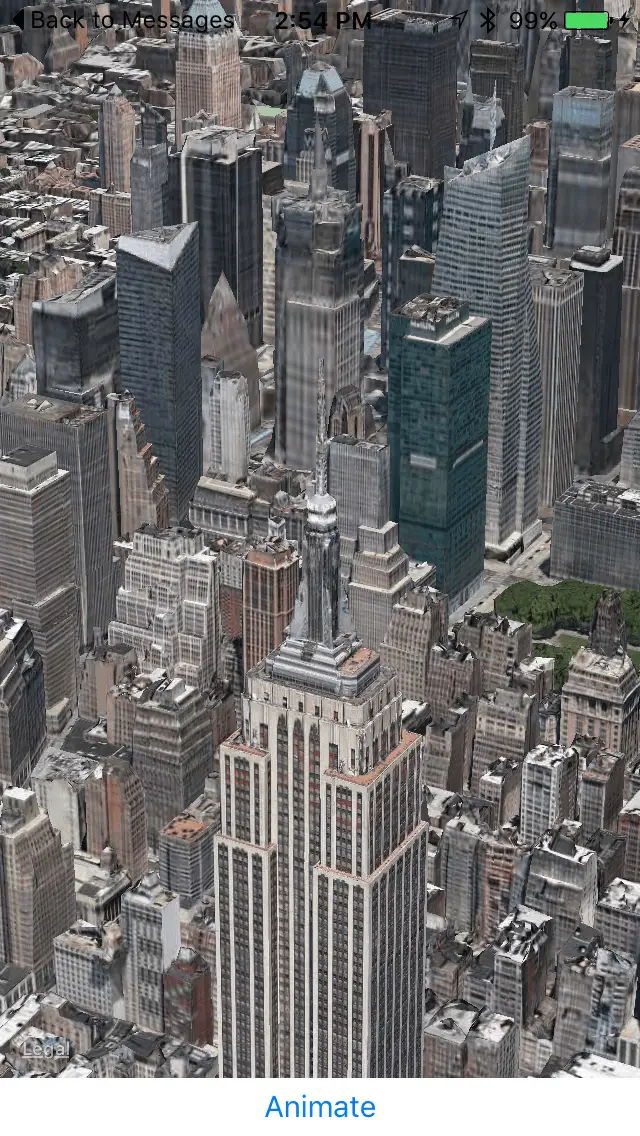
Compile and run the app on a physical iPhone or iPad device (at the time of writing flyover was not supported within the simulator environment). The map view should appear as illustrated in Figure 83-4:
Figure 83-4
The next step is to implement the animation sequence.
Animating Camera Changes
When the Animate button is tapped by the user the camera needs to rotate 180 around the center coordinate combined with a pitch adjustment with the changes animated over a 20 second duration. Locate the animateCamera method in the ViewController.swift file and add code as follows:
@IBAction func animateCamera(sender: AnyObject) {

    UIView.animateWithDuration(20.0, animations: {
        self.camera!.heading += 180
        self.camera!.pitch = 25
        self.mapView.camera = self.camera!
    })
}
The animation is performed using the UIView animateWithDuration method as outlined in the chapter entitled Basic iOS 9 Animation using Core Animation.
Testing the Map Flyover App
Compile and run the app once again and, once running, touch the Animate button. Note that the camera pans around the building in a smooth animation.
Summary
Although available to users of the Apple Maps app, the map flyover feature was not made available as a feature for use by app developers until the introduction of iOS 9. Combining an MKMapView instance with an MKMapCamera object enables photo-realistic 3D map display and navigation to be added to iOS apps. Options available for configuring an MKMapCamera view include center coordinates, distance, pitch and heading. The changes between camera views can be easily animated through the use of Core Animation features.


