Difference between revisions of "Installing and Configuring RHEL 5 Xen Virtualization"
(New page: Virtualization is generically defined as the ability to run multiple operating systems simultaneously on a single computer system. Whilst not necessarily a new concept, Virtualization has ...) |
(No difference)
|
Revision as of 19:48, 3 August 2010
Virtualization is generically defined as the ability to run multiple operating systems simultaneously on a single computer system. Whilst not necessarily a new concept, Virtualization has come to prominence in recent years because it provides a way to fully utilize the CPU and resource capacity of a server system whilst providing stability (in that if one virtualized guest system crashes, the host and any other guest systems continue to run).
Virtualization is also useful in terms of trying out different operating systems without having to configure dual boot environments. For example, you can run Windows in a virtual machine without having to re-partition the disk, shut down Red Hat Enterprise Linux 5 and then boot from Windows. You simply start up a virtualized version of Windows as a guest operating system. Similarly, virtualization allows you to run other Linux distributions from within an RHEL 5 system, providing concurrent access to both operating systems.
There are a number of ways to implement virtualization on RHEL. Options include, but are not limited to, VMware, Oracle VirtualBox and KVM. One of the most popular technologies on RHEL is called Xen. In fact, Red Hat’s engineers have invested considerable effort into making Xen easy to install, configure and manage on Red Hat Enterprise Linux 5.
Before plunging into installing and running Xen it is worth taking a little time to talk about the two different types of virtualization supported by Xen and the corresponding hardware requirements.
Full Virtualization vs. Para-Virtualization
There are two common approaches to virtualization - full virtualization and para-virtualization. Full virtualization provides complete abstraction between the hardware and the guest operating system. In this scenario, the guest operating system is provided a complete virtual physical environment in which to run and, as such, is unaware that it is running inside a virtual machine. One advantage of full virtualization is that the operating system does not need to be modified in order to run in a virtualized environment. This means that proprietary operating systems such as Windows can be run on Linux systems.
Disadvantages of full virtualization are that performance is slightly reduced as compared to para-virtualization, and some virtualization platforms, such as Xen and KVM, require CPUs with special virtualization support built in (such as Intel-VT and AMD-V).
Para-virtualization requires that a guest operating system be modified to support virtualization. This typically means that guest operating systems are limited to open source systems such as Linux. It is also not possible to migrate a running guest OS from one server to another. The advantage to this approach, however, is that a para-virtualized guest system comes closer to native performance than a fully virtualized guest, and the latest virtualization CPU support is not needed.
For a more detailed explanation of virtualization techniques read Virtuatopia.com’s An Overview of Virtualization Techniques:
http://www.virtuatopia.com/index.php/An_Overview_of_Virtualization_Techniques
Checking Xen Hardware Compatibility
Before deploying Xen based virtualization, it is important to first ensure that your current hardware configuration is suitable to support Xen.
Each guest operating system installed will typically reside on the existing file systems of the host RHEL system. It is important, therefore, that there is enough disk space available to install your choice of guest operating system. As a guideline, a command line version of Linux typically requires approximately 600Mb of disk space. A full installation of a Linux distribution (including graphical desktop) requires around 4GB of disk space. Microsoft recommends at least 16GB of disk space for Windows 7 and 32GB for Windows Server 2008 R2.
Of further concern is physical memory. Sufficient memory is required to run both the host operating system and the guest operating systems. If the guest Linux operating system is not using a desktop environment, then it is possible to allocate 256Mb of memory to the guest OS. A full, graphical desktop Linux installation will require considerably more (a minimum of between 300Mb and 400Mb will provide reasonable, but not spectacular, performance). Windows 7 on the other hand requires at least 1GB of RAM to perform adequately.
In order to support Xen virtualization, the CPU must, at a minimum, support the PAE extension. To verify that the CPU in your CentOS system supports, PAE run the following command from a Terminal window:
grep pae /proc/cpuinfo
If no output is displayed, then your CPU is not able to support Xen virtualization. If, on the other hand, you see output similar to the following, then you can proceed with the Xen configuration (note that this line will be repeated for CPUs with multiple cores):
flags           : fpu tsc msr pae mce cx8 apic mtrr mca cmov pat pse36
       clflush dts acpi mmx fxsr sse sse2 ss nx constant_tsc up pni ds_cpl
As mentioned previously, in order to support full hardware virtualization, the CPU must include Intel-VT or AMD-V support. This can be verified using the following commands:
For Intel CPUs:
grep vmx /proc/cpuinfo
For AMD CPUSs:
grep svm /proc/cpuinfo
If your system does not include this support you can still use Xen in para-virtualization mode. You will not, however, be able to run Microsoft Windows as a guest operating system. Keep in mind that whilst support may be present in the processor it is often switched off by default in the system BIOS. If you believe that your processor model includes the appropriate support but it does not show up when one of the above commands is executed, reboot your system and enter the system BIOS settings to verify that it is enabled.
Adding the Red Hat Enterprise Linux 5 Virtualization Channel to the System
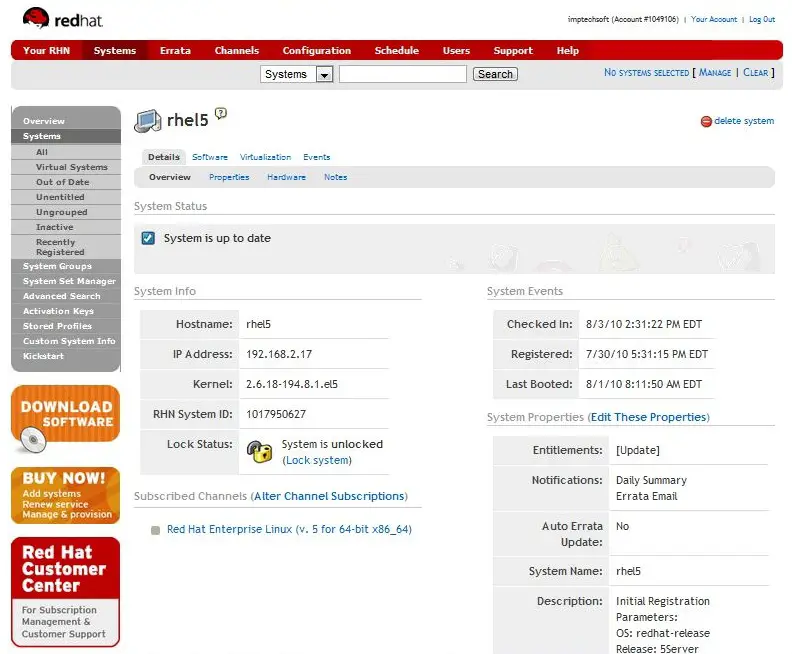
By default, the Virtualization channel is not configured into the Red Hat Network subscription for RHEL 5 systems. Before Xen can be installed, therefore, this channel must first be enabled. To do so, log into http://rhn.redhat.com and locate the system for which the Virtualization channel is to be enabled. Once located, display the system’s overview page as illustrated in the following figure:
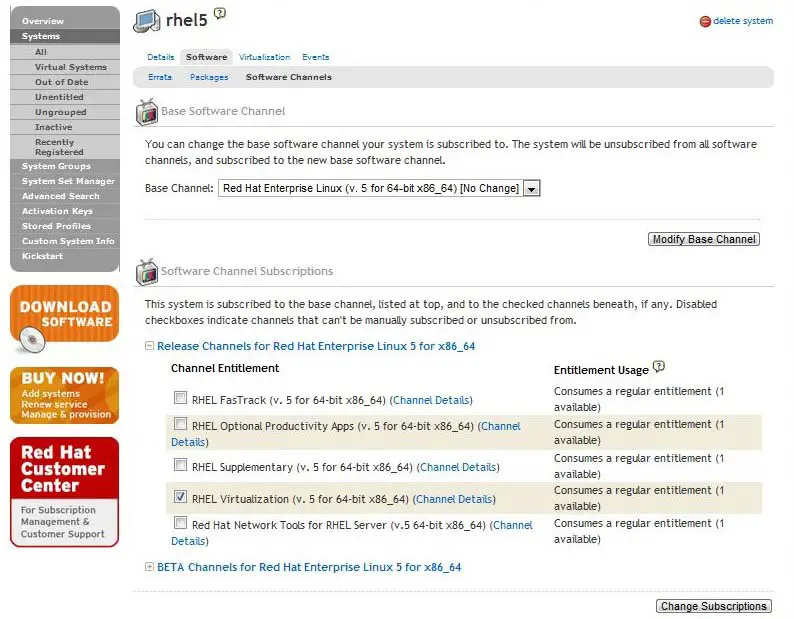
Under the Subscribed Channels heading check to see if the virtualization channel is enabled. If it is not currently enabled, click on the Alter Channel Subscriptions link and check the box next to RHEL Virtualization listed under Channel Entitlements:
Once the channel has been selected, click on the Change Subscriptions button in the lower right hand corner of the web page. On returning to the system overview page, the RHEL Virtualization channel will now be listed under the subscribed channels.
On the RHEL system, open a terminal window, su to root and execute the following command:
# rhn_check
This will force the system to update with the latest channel information.
Preparing RHEL for Xen Virtualization
Xen requires a specially modified Linux kernel and a number of tools in order to operate. By default, RHEL does not install this Kernel or these tools unless you specifically selected the Virtualization group of packages during installation process. The next step, therefore, is to prepare the operating system for Xen. Begin by installing the virtualization tools and kernel as follows:
su -
yum install xen virt-manager
This command will install all the required packages (approximately 23 packages in total), and configure the boot loader to provide a Xen virtualization option when the system is next booted. Once the virtualization packages have been installed close down any running applications and reboot the system. When the boot screen appears hit any key to enter to boot menu and select the RHEL Xen boot option.
When the boot has completed, log in as usual and open a Terminal window. In that window run the following command to verify that kernel with Xen support has loaded:
uname -r
You should expect to see output similar to the following:
2.6.18-194.8.1.el5xen
You can also check that Xen is running with the following command:
su -
/usr/sbin/xm list
This command will list any currently running Xen machines:
Name                                      ID Mem(MiB) VCPUs State   Time(s)
Domain-0                                   0     2622     2 r-----     50.8
At this point the only domain that should be listed is domain-0 representing the host environment. When guest operating systems are running, these too will be listed. It is now time to build a Xen virtual machine to contain a guest operating system.
Building an RHEL Xen Guest System
Guest systems can easily be configured using either the virt-install command-line tool, or the virt-manager GUI tool. For the purposes of this chapter we will use the virt-manager tool. Creation of virtual machines from the command-line will be covered in subsequent chapters.
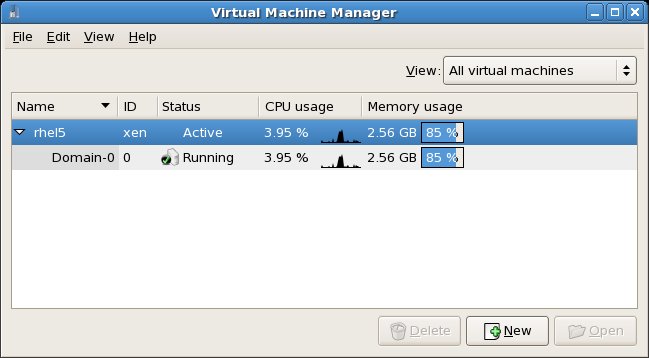
Begin by launching virt-manager either by selecting the Applications -> System Tools -> Virtual Machine Manager or from the command-line by running /usr/sbin/virt-manager. Once loaded, the virtual manager will display the following screen:
To create a new guest system, select the top entry in the list (the host named rhel5 in the above example) and click on the New button to display the first configuration screen. Click the Forward button to proceed to the Naming screen and enter a name for the virtual machine. This can be any name you choose.
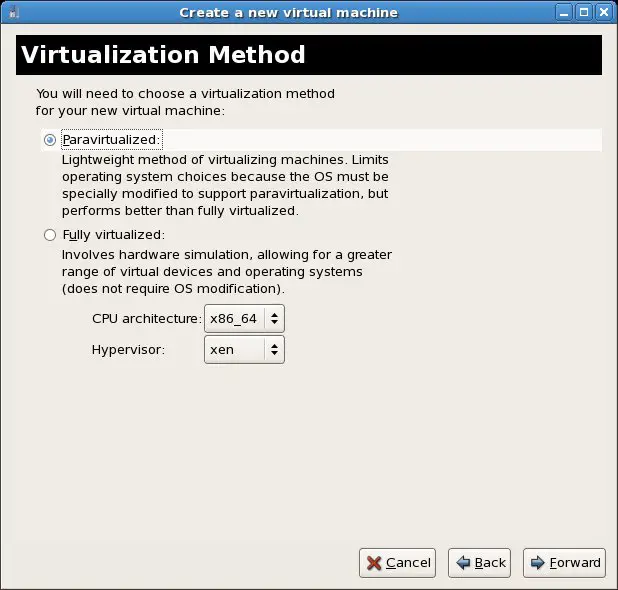
On the next page, you can choose to configure a Full or Para-virtualized method. The Full virtualization option will only be selectable if your hardware supports it:
Select Para-virtualized and press Forward (we will cover full virtualization in the next chapter entitled Using Xen Full Virtualization to Run Windows on RHEL 5). The next screen requires information about the location of the operating system installation files. Currently para-virtualized guest operating systems can only be installed over a network or the internet. The easiest way is to provide the http address of the operating system installation files. To install the i386 Fedora 13 Linux distribution over the internet, for example, you would select the Network Install Tree option and on the next screen enter the URL to the distribution image files provided on-line by Red Hat:
http://download.fedora.redhat.com/pub/fedora/linux/releases/13/Fedora/i386/os/
In order to install a different Linux operating system simply reference the URL of the operating system installation tree, or create your own tree by mounting the ISO installation image on a network server and reference it on this screen.
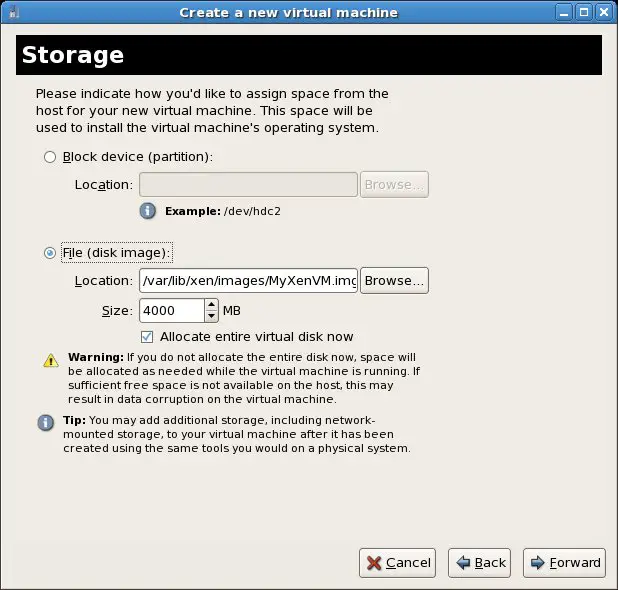
Once an appropriate address has been entered, click the next button to assign storage space:
If you have a disk partition available for the guest operating system, enter the device path into the Block device (partition) text field. Otherwise, select File (disk image), enter the path of the file to be created (or accept the default provided) and select a file size (keeping in mind the space requirements for your chosen guest OS). Having defined these settings, click the Forward key once more to proceed.
On the Connect to network host screen select Shared physical device and click Forward. This will configure the guest OS to share the host operating system's network connection, thereby appearing as though it is directly and independently connected to the same network as the host. Alternatively select the Virtual network option to connect to an internal virtual network. This will allow the virtual machine to connect to other virtual machines also connected to the virtual network and to operate on the external network using Network Address Translation (NAT) provided by the Xen environment.
The next screen allows configuration of memory and CPU usage of the guest virtual machine:
[[Image:|Configuring memory and CPU settings for an RHEL 5 Xen guest]]
Select a memory setting which allows sufficient memory for the host system and the guest system to co-exist. If you plan to run multiple guest operating systems, be sure to allow for this.
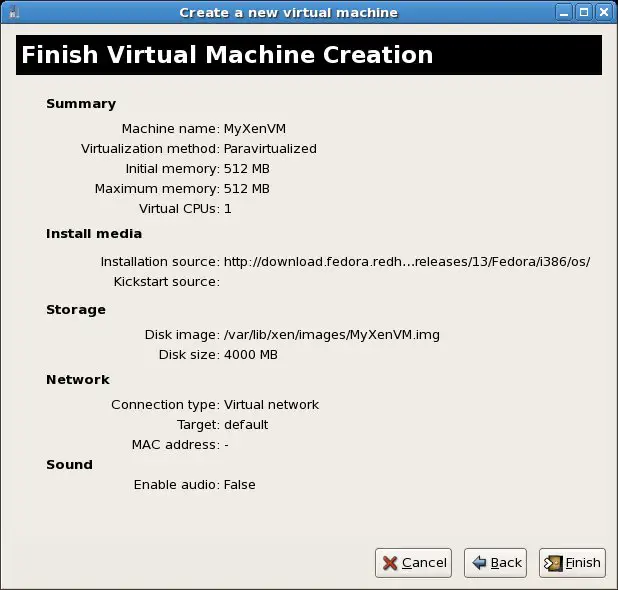
On a multi-CPU or multi-core CPU environment it is possible to define how many CPUs the guest OS will have access to. Note that assigning more virtual CPUs than the number physical CPUs in the host is possible, but not recommended. The final screen displays a summary of the configuration:
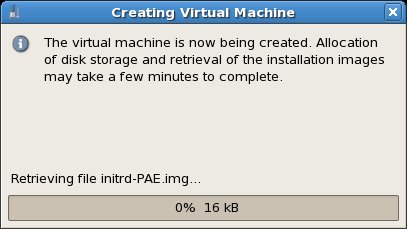
Click on the Finish button to begin the creation process. The virtualization manager will create the disk and retrieve the installation images from the designated location before starting the system. Note that depending on connection speed and the size of the installation images of your selected guest operating system, this process may take some time:
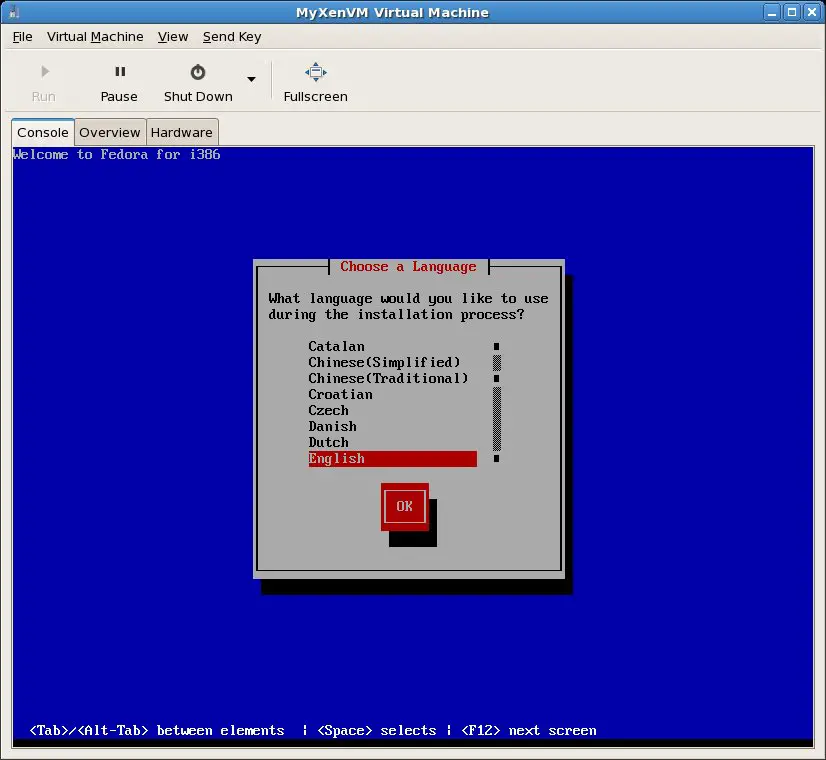
Once started, the guest OS installation will begin:
From this point on, simply follow the operating system installation instructions to install the guest OS.
Summary
In this chapter we have briefly explained the concept of virtualization before looking in particular at Xen in terms of both full and para-virtualization and the system requirements of each method. Having covered these basics, a step by step tutorial to installing a Linux distribution as a Xen based para-virtualized guest on RHEL 5 was provided. In the next chapter will look at Using Xen Full Virtualization to Run Windows on RHEL 5.
