How to Download and Try Ubuntu 11.04
| Previous | Table of Contents | Next |
| A Brief History of Ubuntu | Performing a Clean Ubuntu 11.04 Installation |
In order try out Ubuntu 11.04 you first need to obtain it. By far the best way to obtain Ubuntu is to download it from the Ubuntu web site, though it is also possible to purchase a CDROM containing Ubuntu if downloading is not a viable option.
There are, however, a number of options to consider in terms of the best download choice for your needs.
Ubuntu 11.04 Download Options
A variety of download of options are provided on the Ubuntu web site which is accessible at http://www.ubuntu.com. Firstly, Ubuntu is provided in Desktop and Server editions:
- Desktop Edition– This edition is intended for desktop and laptop computer systems. It includes graphical desktop environments and a range of applications needed by a typical user.
- Server Edition – This edition is optimized for enterprise level server deployment. It contains only those packages that are essential for server systems allowing for high performance with minimal complexity and resource usage. Additional packages are then installed on an as needed basis by the system administrator.
Though this book will cover aspects of Ubuntu that are common to both editions of the operating system, the main focus will be on Ubuntu 11 Desktop Edition.
The next choice involves a decision about the architecture of the operating system. This can take the form of either a 32-bit or 64-bit version of Ubuntu. If your computer contains a 32-bit processor then you must use the 32-bit edition of Ubuntu. Alternatively, if you have a 64-bit processor you can use either the 32-bit or 64-bit version of Ubuntu, though Canonical recommends that the 64-bit edition of the operating system be installed on 64-bit hardware.
Another option is also available to use the Ubuntu Windows Installer to install Ubuntu within an existing Windows installation. Details of this installation process are covered later in this book in the chapter entitled Installing Ubuntu 11 on a Windows Disk with Wubi.
Having made an appropriate architecture choice the download may be initiated by clicking on the Start download button. The download will take the form of a single ISO image file which may then be burned onto a CDROM, written to a USB flash drive, or used as an image for a network based or virtual machine installation.
Check the documentation for your preferred CD writing software or current operating system for steps on how to write an ISO image file to a CD if you do not already know how to do this.
Writing the Ubuntu Image to a USB Flash Drive
As previously mentioned an alternative to booting from a CDROM is to write the Ubuntu image to a USB flash drive and then boot from that. This has the advantage that the Ubuntu distribution will boot and run in live mode much faster from a USB flash drive than from a CDROM drive.
In order to write the Ubuntu image to a USB drive, the Pendrive Linux Universal USB Installer is required. This tool is currently only available for Windows XP, Windows Vista and Windows 7 and can be downloaded from the Pendrive Linux web site at:
http://www.pendrivelinux.com/universal-usb-installer-easy-as-1-2-3/
Once the Pendrive installer has been downloaded and launched, and the license agreement accepted, the main screen should appear. From within this window, select the version of Ubuntu from the drop down menu that matches the image previously downloaded:
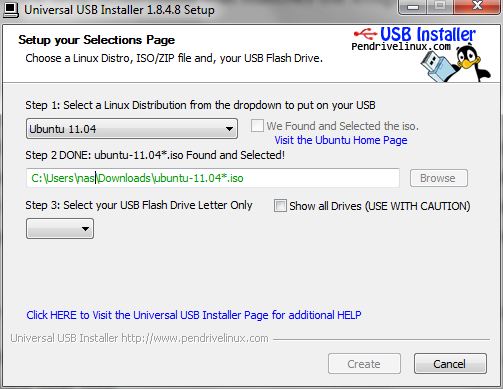
After selecting the Ubuntu distribution, the tool will scan the system in an attempt to locate the downloaded Ubuntu installation ISO image. If the scan is successful the “Step 2” section of the dialog will indicate “DONE” and the text box will be pre-populated with the path to the corresponding ISO image file. If the tool is unable to locate the image, use the Browse button to navigate to the location of the Ubuntu 11 ISO image. Insert a USB flash drive (at least 2GB is recommended) into a spare USB port of the computer and then select the corresponding drive letter from the menu located in Step 3. If the USB device is not listed, try enabling the Show all Drives option. Once the target drive has been selected, choose the option to format the USB drive as part of the image creation process (the assumption is made here that any data already on the drive is expendable).
Finally, select the amount of space on the USB drive to be allocated to store any user files created from within the running Ubuntu system. The amount of persistent storage space to allocate will depend on the capacity of the USB drive and the amount of data you feel you will be likely to need to store on the drive whilst using Ubuntu from this boot device.
Clicking the Create button will begin the process of writing the image to the USB drive.
Once the Ubuntu ISO image is either burned to a CDROM or written to a flash drive it is time to move on to the next step.
Trying Ubuntu without Installing it
There is a good chance you already own a PC which is probably running Microsoft Windows. If this is the case and you are new to Linux then there is also a good chance you don't want to install Ubuntu until you've had a chance to try it out for a few hours, days or even weeks. If you'd like to try Ubuntu without having to install you can easily do so. The Ubuntu image you now (hopefully) have in your possession is able to run as a Live Image. This essentially means that the operating system can be run from a CD or USB flash drive without having to be installed on your hard disk drive.
To run Ubuntu from the CD or USB flash drive, simply insert the media into your computer and reboot your system. If your system reboots once again as Windows then it is likely you will need to change the boot order in your system BIOS. To achieve this, restart your system and watch closely as the system boots. Early in the boot process the BIOS will display instructions to enter BIOS Setup (which often, but not always, involves pressing DEL or a function key). Press whichever key you are instructed to press and you should find yourself in the BIOS setup menu. Find the setting for the boot sequence and, if it shows your hard disk as being the first device to boot from, change this so that either your CD/DVD drive or USB device appears as the first device in the boot order. Note that the BIOS firmware in some older systems does not support booting from a USB connected device.
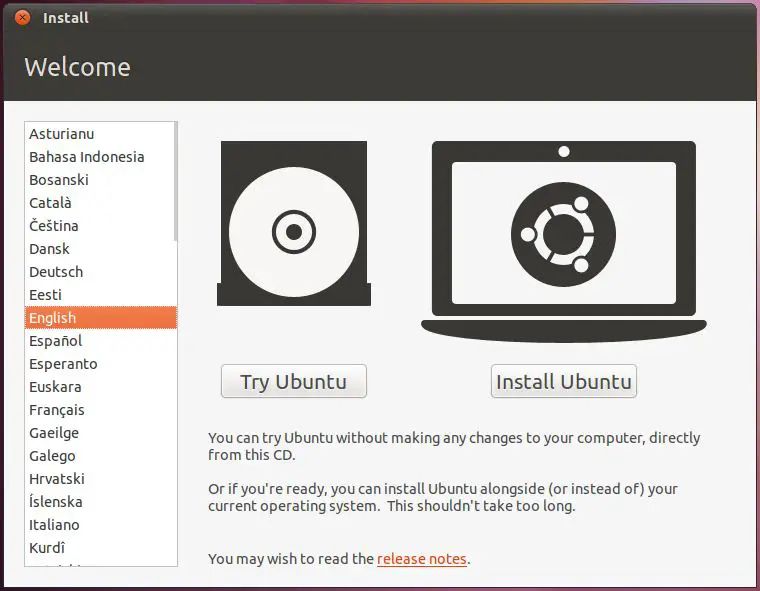
Select the "Save and Exit" option from the BIOS main menu and allow the system to boot. As long as the Ubuntu CD or USB drive is still inserted, you should find that Ubuntu boots instead of Windows. Once loaded, Ubuntu will provide the option to try out Ubuntu without installing, or to perform an installation to a hard drive:
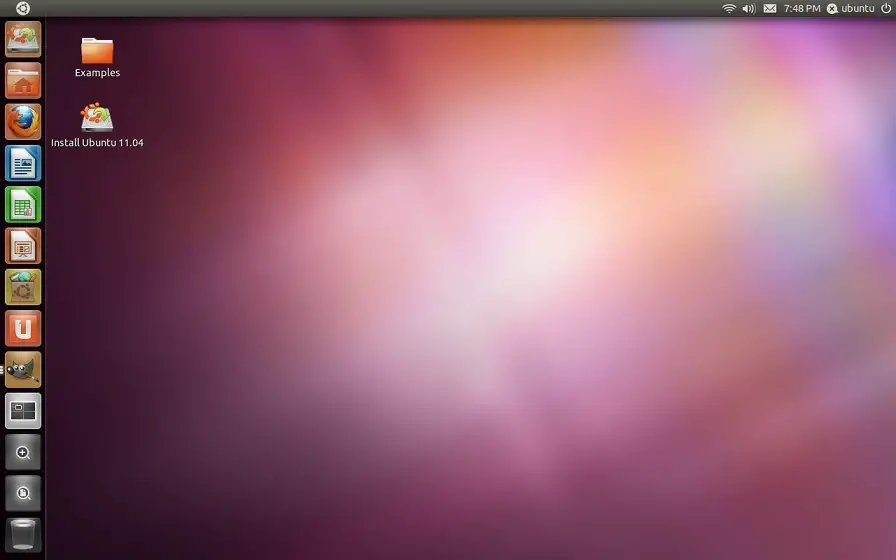
In order to try Ubuntu without installing, click on the Try Ubuntu button. The live Ubuntu image will subsequently load and display the GNOME desktop environment ready for use. Ubuntu 11 supports two variations of the GNOME desktop. These are the new Unity desktop and older Classic desktop. By default the Unity desktop should appear as illustrated in the following figure:
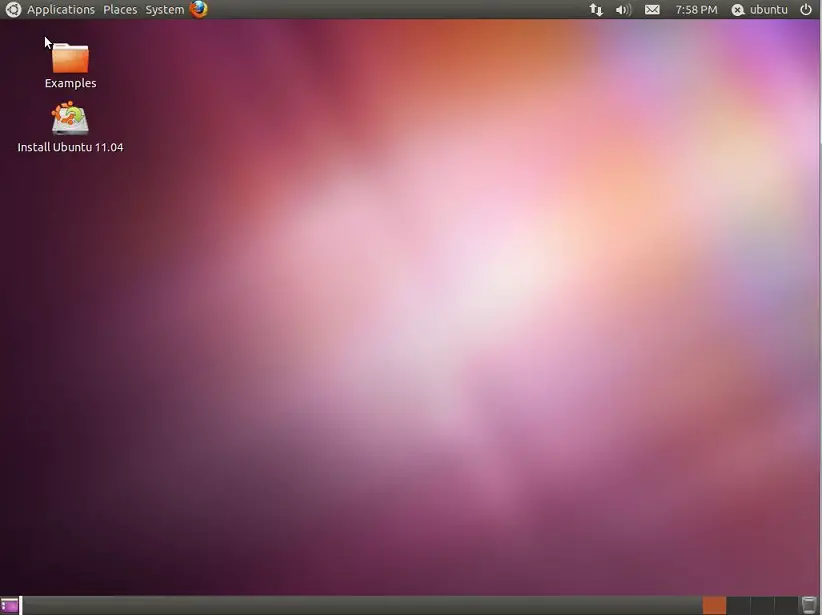
The Unity desktop requires that the system on which Ubuntu is running contain a graphics adaptor with a graphics processing unit (GPU) containing 3D acceleration and support for OpenGL version 1.4 or later. If the graphics adaptor in the system on which Ubuntu is being installed is not adequate to support Unity, the classic version of the desktop will appear as illustrated in the following figure:
In order to experience many of the benefits of the Unity desktop environment on systems lacking appropriate display hardware, it is possible to install the Unity 2D desktop. Unity 2D provides much of the same functionality as Unity but without some of the more advanced visual effects. Details on and how to test your system for compatibility with Unity and installing the Unity 2D environment are covered in the chapter entitled Performing a Clean Ubuntu 11.04 Installation.
There are a few minor downsides to using the live image booted from a CDROM as opposed to a USB flash drive. The first is that performance will be slow if using a CDROM. This is because Ubuntu needs to load software from the CD drive which is orders of magnitude slower than a hard disk drive (though the USB flash drive option should be fast). Secondly, any files you may create or any changes you make to the system during a live session will be lost when the system shuts down or reboots. One advantage of this, however, is that you also can't break anything, so feel free to experiment as much as you like.
Installing Ubuntu on a Disk Drive Containing Microsoft Windows
If you already have Windows installed on your PC you can install Ubuntu onto the same disk drive and boot from either operating system (a configuration known as dual booting). During the installation process Ubuntu will resize the Windows partition on your hard disk to make room for the Ubuntu installation (you will be asked how much of your disk drive you wish to use for Linux) and set up a special boot manager that will allow you to choose whether to boot Linux or Windows each time you power up your system. All of this is non-destructive, in that your Windows partition and all the applications and data therein will be kept intact. All that will happen is that the Windows part of the disk will be smaller than it was originally.
Another useful feature of a Windows/Ubuntu dual-boot configuration is that your Windows logical drives (C:, D: etc) will be accessible from Ubuntu, so you will be able to access your Windows data files from Linux. This means, for example, that you will be able to access your Microsoft Word and Excel files using the Linux version of LibreOffice included with Ubuntu.
For detailed steps on creating a Windows/Ubuntu dual boot environment see Installing Ubuntu 11.04 on a Windows System (Dual booting).
Installing Ubuntu Inside a Windows Installation
Ubuntu also provides the ability to install Ubuntu onto the file system of an existing Windows installation. This is similar to the dual booting approach outlined above with the exception that the hard disk does not need to be repartitioned to create Linux partitions for the Ubuntu installation. Instead, all the files which make up Ubuntu are installed in a new folder on the Windows disk just like any other files. All that is required is enough disk space on a Windows disk drive to accommodate the Ubuntu installation (around 8GB is recommended).
This type of installation is achieved using technology called the Ubuntu Windows Installer, or Wubi for short. The process involves downloading and running the Wubi installation executable, selecting a target disk drive, providing a user name and password for accessing the Ubuntu installation and clicking an Install button. Wubi will then download the Ubuntu distribution and perform the installation into a folder on the chosen Windows disk drive. When the system is subsequently rebooted, the user is given the option to boot either Windows or Ubuntu.
Refer to Installing Ubuntu 11.04 on a Windows Disk with Wubi for more details on this installation option.
Running Ubuntu in a Virtual Machine
If you need to keep your Windows or other environment and want to run Ubuntu concurrently with your current operating system, Ubuntu may also be run within a virtual machine. A number of free virtualization technologies are available for this purpose such as VirtualBox and VMware Server.
Performing a Clean Ubuntu Installation
If you are installing Ubuntu on a clean hard disk drive, or plan to overwrite the existing Windows or other operating system installation on the drive then installing Ubuntu is straightforward. Simply follow the steps in Performing a Clean Ubuntu 11.04 Installation to install Ubuntu on the entire disk drive.
| Previous | Table of Contents | Next |
| A Brief History of Ubuntu | Performing a Clean Ubuntu 11.04 Installation |
