
By default, the KVM virtualization environment on RHEL 9 creates a virtual network to which virtual machines may connect. It is also possible to configure a direct connection using a MacVTap driver. However, as outlined in the chapter entitled An Overview of RHEL 9 Virtualization Techniques, this approach does not allow the host and guest systems to communicate.
This chapter aims to cover the steps involved in creating a network bridge on RHEL 9, enabling guest systems to share one or more of the host system’s physical network connections while still allowing the guest and host systems to communicate.
In the remainder of this chapter, we will explain how to configure a RHEL 9 network bridge for KVM-based guest operating systems.
Getting the Current Network Manager Settings
A network bridge can be created using the NetworkManager command-line interface tool (nmcli). The NetworkManager is installed and enabled by default on RHEL 9 systems and is responsible for detecting and connecting to network devices and providing an interface for managing networking configurations.
A list of current network connections on the host system can be displayed as follows:
 |
You are reading a sample chapter from Red Hat Enterprise Linux 9 Essentials. Buy the full book now in eBook or Print format.
Includes 34 chapters and 290 pages. Learn more. |
# nmcli con showNAME UUID TYPE DEVICEeno1 99d40009-6bb1-4182-baad-a103941c90ff ethernet eno1virbr0 7cb1265e-ffb9-4cb3-aaad-2a6fe5880d38 bridge virbr0The above output shows that the host has an Ethernet network connection established via a device named eno1 and the default bridge interface named virbr0, which provides access to the NAT-based virtual network to which KVM guest systems are connected by default.
Similarly, the following command can be used to identify the devices (both virtual and physical) that are currently configured on the system:
# nmcli device showGENERAL.DEVICE: eno1GENERAL.TYPE: ethernetGENERAL.HWADDR: AC:16:2D:11:16:73GENERAL.MTU: 1500GENERAL.STATE: 100 (connected)GENERAL.CONNECTION: eno1GENERAL.CON-PATH: /org/freedesktop/NetworkManager/ActiveConnection/1WIRED-PROPERTIES.CARRIER: onIP4.ADDRESS[1]: 192.168.86.59/24IP4.GATEWAY: 192.168.86.1IP4.ROUTE[1]: dst = 0.0.0.0/0, nh = 192.168.86.1, mt = 100IP4.ROUTE[2]: dst = 192.168.86.0/24, nh = 0.0.0.0, mt = 100IP4.DNS[1]: 192.168.86.1IP4.DOMAIN[1]: lanIP6.ADDRESS[1]: fe80::6deb:f739:7d67:2242/64IP6.GATEWAY: --IP6.ROUTE[1]: dst = fe80::/64, nh = ::, mt = 100IP6.ROUTE[2]: dst = ff00::/8, nh = ::, mt = 256, table=255 GENERAL.DEVICE: virbr0GENERAL.TYPE: bridgeGENERAL.HWADDR: 52:54:00:59:30:22GENERAL.MTU: 1500GENERAL.STATE: 100 (connected)GENERAL.CONNECTION: virbr0GENERAL.CON-PATH: /org/freedesktop/NetworkManager/ActiveConnection/2IP4.ADDRESS[1]: 192.168.122.1/24IP4.GATEWAY: --IP4.ROUTE[1]: dst = 192.168.122.0/24, nh = 0.0.0.0, mt = 0IP6.GATEWAY: --..The above partial output indicates that the host system on which the command was executed contains a physical Ethernet device (eno1) and a virtual bridge (virbr0).
The virsh command may also be used to list the virtual networks currently configured on the system:
# virsh net-list --all Name State Autostart Persistent---------------------------------------------------------- default active yes yesCurrently, the only virtual network present is the default network provided by virbr0. Now that some basic information about the current network configuration has been obtained, the next step is to create a network bridge connected to the physical network device (in this case, eno1).
|
You are reading a sample chapter from Red Hat Enterprise Linux 9 Essentials. Buy the full book now in eBook or Print format.
Includes 34 chapters and 290 pages. Learn more. |
Creating a Network Manager Bridge from the Command-Line
The first step in creating the network bridge is adding a new connection to the configuration. This can be achieved using the nmcli tool, specifying that the connection is to be a bridge and providing names for both the connection and the interface:
# nmcli con add ifname br0 type bridge con-name br0Once the connection has been added, a bridge slave interface needs to be established between physical device eno1 (the slave) and the bridge connection br0 (the master) as follows:
# nmcli con add type bridge-slave ifname eno1 master br0At this point, the NetworkManager connection list should read as follows:
# nmcli con showNAME UUID TYPE DEVICEeno1 66f0abed-db43-4d79-8f5e-2cbf8c7e3aff ethernet eno1virbr0 0fa934d5-0508-47b7-a119-33a232b03f64 bridge virbr0br0 59b6631c-a283-41b9-bbf9-56a60ec75653 bridge br0bridge-slave-eno1 395bb34b-5e02-427a-ab31-762c9f878908 ethernet --The next step is to start up the bridge interface. If the steps to configure the bridge are being performed over a network connection (i.e., via SSH) this step can be problematic because the current eno1 connection must be closed down before the bridge connection can be brought up. This means the current connection will be lost before the bridge connection can be enabled to replace it, potentially leaving the remote host unreachable.
If you are accessing the host system remotely, this problem can be avoided by creating a shell script to perform the network changes. This will ensure that the bridge interface is enabled after the eno1 interface is brought down, allowing you to reconnect to the host after the changes are complete. Begin by creating a shell script file named bridge.sh containing the following commands:
|
You are reading a sample chapter from Red Hat Enterprise Linux 9 Essentials. Buy the full book now in eBook or Print format.
Includes 34 chapters and 290 pages. Learn more. |
#!/bin/bashnmcli con down eno1nmcli con up br0Once the script has been created, execute it as follows:
# sh ./bridge.shWhen the script executes, the connection will be lost when the eno1 connection is brought down. After waiting a few seconds, however, it should be possible to reconnect to the host once the br0 connection has been activated.
If you are working locally on the host, the two nmcli commands can be run within a terminal window without any risk of losing connectivity:
# nmcli con down eno1# nmcli con up br0Once the bridge is up and running, the connection list should now include both the bridge and the bridge-slave connections:
# nmcli con showNAME UUID TYPE DEVICEbr0 59b6631c-a283-41b9-bbf9-56a60ec75653 bridge br0bridge-slave-eno1 395bb34b-5e02-427a-ab31-762c9f878908 ethernet eno1virbr0 0fa934d5-0508-47b7-a119-33a232b03f64 bridge virbr0eno1 66f0abed-db43-4d79-8f5e-2cbf8c7e3aff ethernet --Note that the eno1connection is still listed but is no longer active. To exclude inactive connections from the list, use the –active flag when requesting the list:
|
You are reading a sample chapter from Red Hat Enterprise Linux 9 Essentials. Buy the full book now in eBook or Print format.
Includes 34 chapters and 290 pages. Learn more. |
# nmcli con show --activeNAME UUID TYPE DEVICEbr0 c2fa30cb-b1a1-4107-80dd-b1765878ab4f bridge br0bridge-slave-eno1 21e8c945-cb94-4c09-99b0-17af9b5a7319 ethernet eno1virbr0 a877302e-ea02-42fe-a3c1-483440aae774 bridge virbr0Declaring the KVM Bridged Network
At this point, the bridge connection is on the system but is not visible to the KVM environment. Running the virsh command should still list the default network as being the only available network option:
# virsh net-list --all Name State Autostart Persistent---------------------------------------------------------- default active yes yesBefore a virtual machine can use the bridge, it must be declared and added to the KVM network configuration. This involves the creation of a definition file and, once again, using the virsh command-line tool.
Begin by creating a definition file for the bridge network named bridge.xml that reads as follows:
<network> <name>br0</name> <forward mode="bridge"/> <bridge name="br0" /></network>Next, use the file to define the new network:
# virsh net-define ./bridge.xmlOnce the network has been defined, start it and, if required, configure it to autostart each time the system reboots:
|
You are reading a sample chapter from Red Hat Enterprise Linux 9 Essentials. Buy the full book now in eBook or Print format.
Includes 34 chapters and 290 pages. Learn more. |
# virsh net-start br0# virsh net-autostart br0Once again, list the networks to verify that the bridge network is now accessible within the KVM environment:
# virsh net-list --all Name State Autostart Persistent---------------------------------------------------------- br0 active yes yes default active yes yesUsing a Bridge Network in a Virtual Machine
To create a virtual machine that uses the bridge network, use the virt-install –network option and specify the br0 bridge name. For example:
# virt-install --name demo_vm_guest --memory 1024 --disk path=/tmp/demo_vm_guest. img,size=10 --network network=br0 --cdrom /home/demo/rhel-baseos-9.1-x86_64-dvd. isoWhen the guest operating system is running, it will appear on the same physical network as the host system and will no longer be on the NAT-based virtual network.
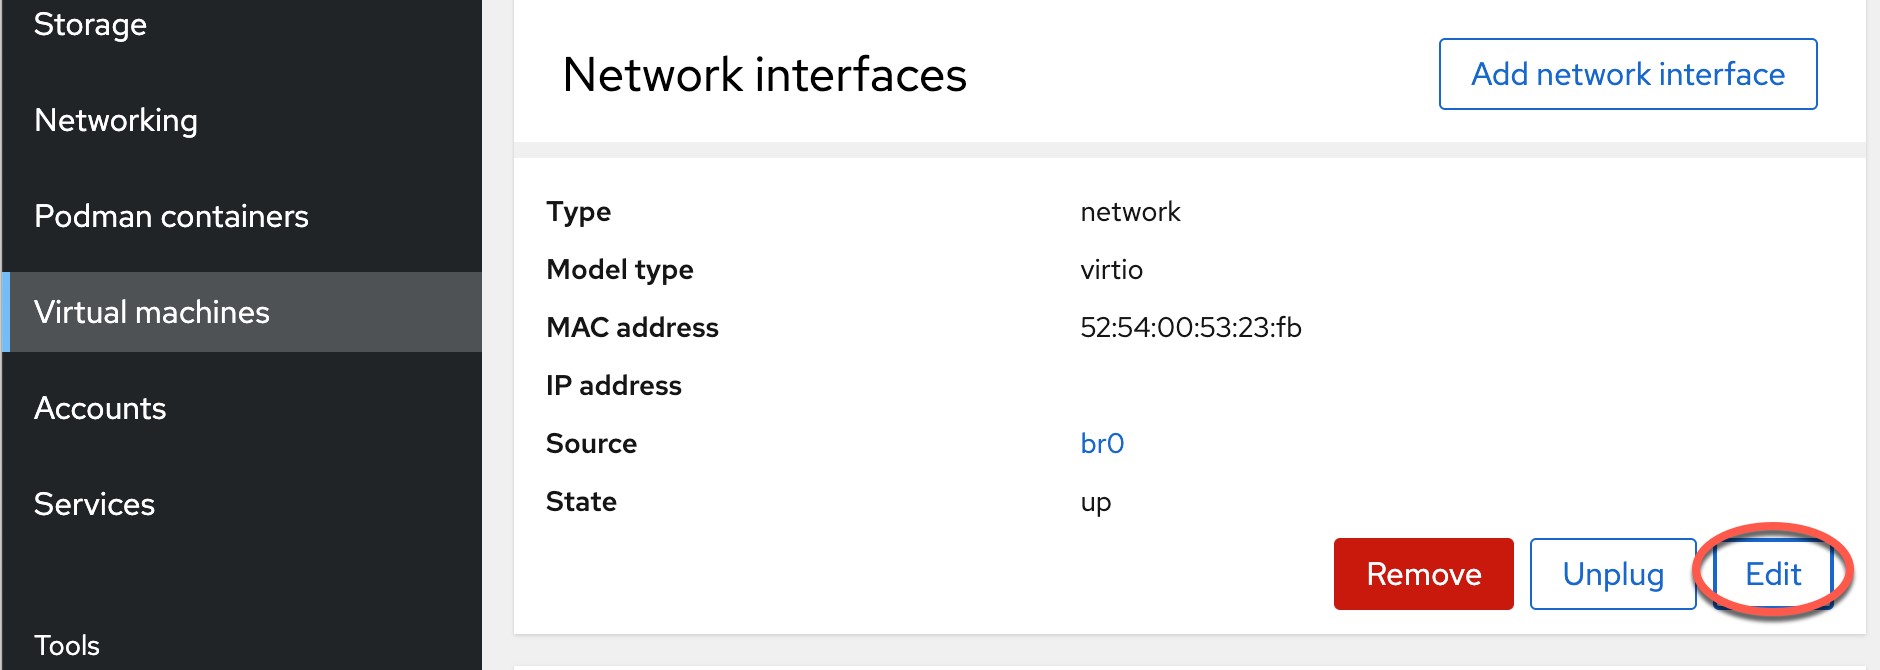
The bridge may also be selected for virtual machines within the Cockpit interface by editing the virtual machine, locating the Network interfaces section, and clicking the Edit button as highlighted in Figure 25-1 below:
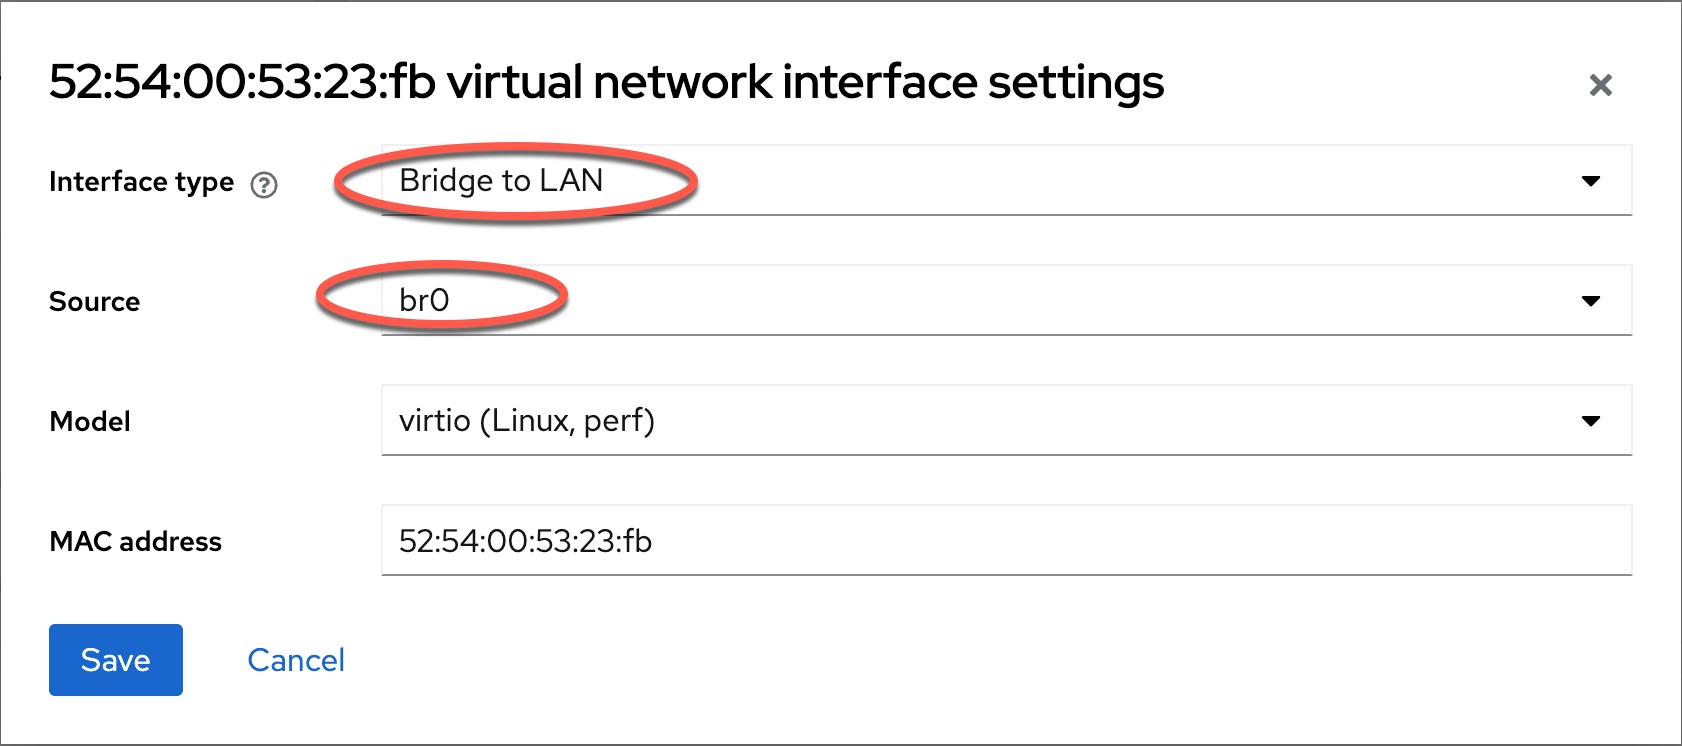
Within the resulting interface settings dialog, change the Interface type menu to Bridge to LAN and set the Source to br0 as shown in Figure 25-2:
|
You are reading a sample chapter from Red Hat Enterprise Linux 9 Essentials. Buy the full book now in eBook or Print format.
Includes 34 chapters and 290 pages. Learn more. |
Similarly, when creating a new virtual machine using the virt-manager tool, the bridge will be available within the Network selection menu:

To modify an existing virtual machine so that it uses the bridge, use the virsh edit command. This command loads the XML definition file into an editor where changes can be made and saved:
# virsh edit GuestNameBy default, the file will be loaded into the vi editor. To use a different editor, change the $EDITOR environment variable, for example:
# export EDITOR=geditTo change from the default virtual network, locate the <interface> section of the file, which will read as follows for a NAT-based configuration:
<interface type='network'> <mac address='<your mac address here>'/> <source network='default'/> <model type='virtio'/> <address type='pci' domain='0x0000' bus='0x01' slot='0x00' function='0x0'/></interface>Alternatively, if the virtual machine was using a direct connection, the entry may read as follows:
|
You are reading a sample chapter from Red Hat Enterprise Linux 9 Essentials. Buy the full book now in eBook or Print format.
Includes 34 chapters and 290 pages. Learn more. |
<interface type='direct'> <mac address='<your mac address here>'/> <source dev='eno1' mode='vepa'/> <model type='virtio'/> <address type='pci' domain='0x0000' bus='0x01' slot='0x00' function='0x0'/>To use the bridge, change the source network property to read as follows before saving the file:
<interface type='network'> <mac address='<your mac address here>'/> <source network='br0'/> <model type='virtio'/> <address type='pci' domain='0x0000' bus='0x01' slot='0x00' function='0x0'/></interface>If the virtual machine is already running, the change will not take effect until it is restarted.
Creating a Bridge Network using nm-connection-editor
If either local or remote desktop access is available on the host system, much of the bridge configuration process can be performed using the nm-connection-editor graphical tool. To use this tool, open a Terminal window within the desktop and enter the following command:
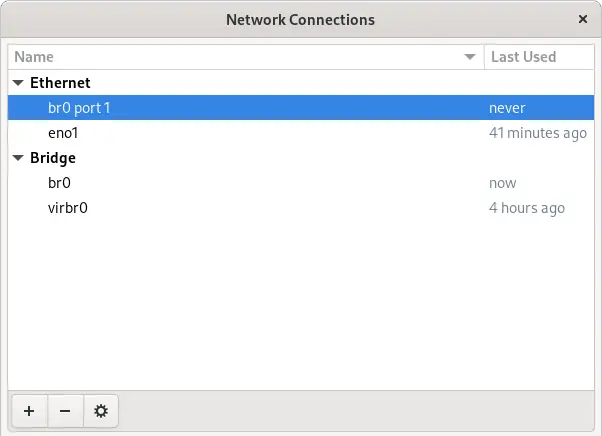
# nm-connection-editorWhen the tool has loaded, the window shown in Figure 25-4 will appear listing the currently configured network connections (essentially the same output as that generated by the nmcli con show command):
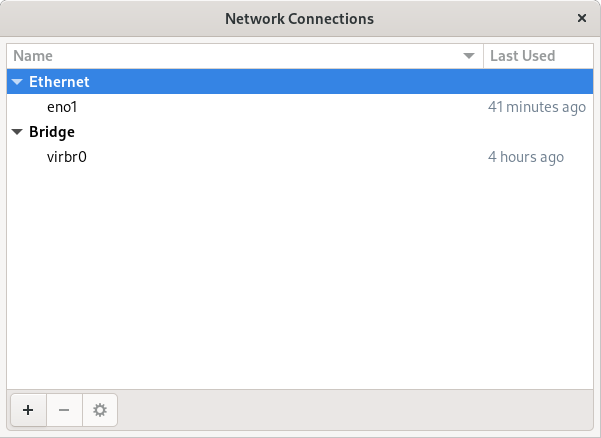
To create a new connection, click on the ‘+’ button in the window’s bottom left-hand corner.
|
You are reading a sample chapter from Red Hat Enterprise Linux 9 Essentials. Buy the full book now in eBook or Print format.
Includes 34 chapters and 290 pages. Learn more. |
Then, from the resulting dialog (Figure 25-5), select the Bridge option from the menu:
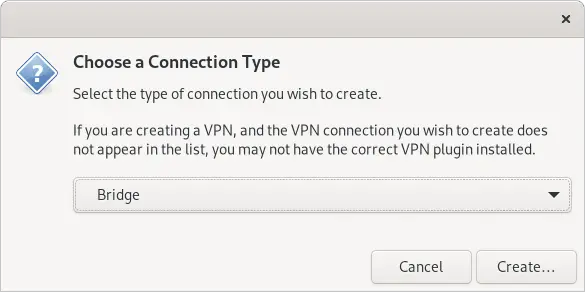
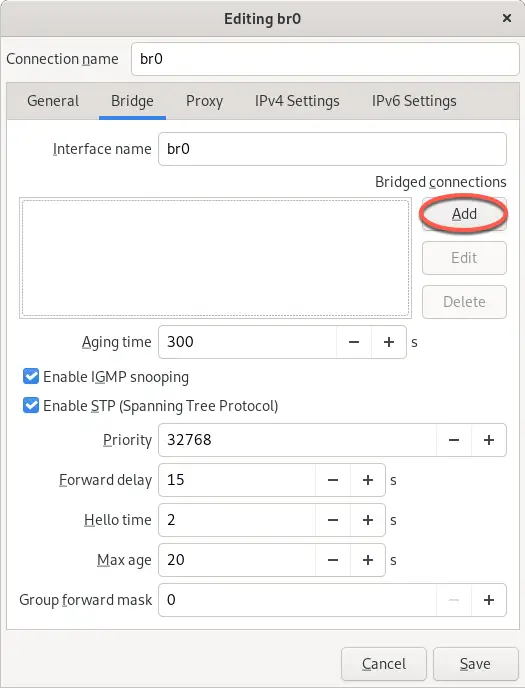
With the bridge option selected, click the Create button to proceed to the bridge configuration screen. Begin by changing both the connection and interface name fields to br0 before clicking on the Add button located to the right of the Bridge connections list, as highlighted in Figure 25-6:
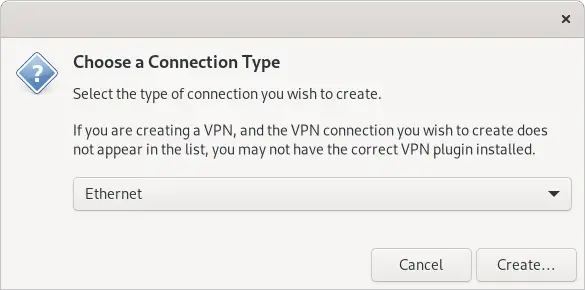
From the connection type dialog (Figure 25-7), change the menu setting to Ethernet before clicking on the Create button:
Another dialog will now appear in which the bridge slave connection needs to be configured. Within this dialog, select the physical network to which the bridge is to connect (for example, eno1) from the Device menu:
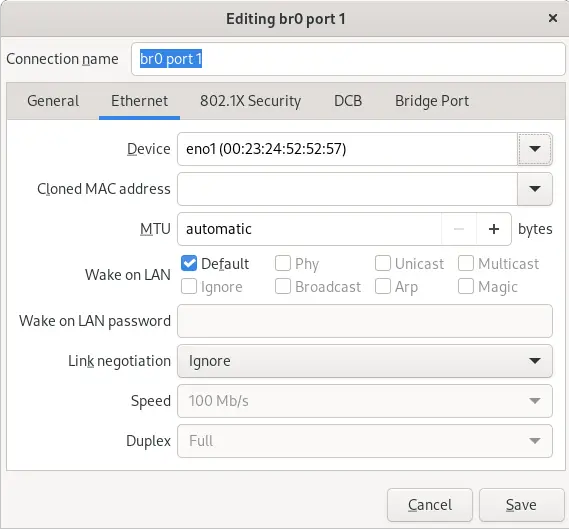
Click on the Save button to apply the changes and return to the Editing br0 dialog (as illustrated in Figure 25-6 above). Within this dialog, click on the Save button to create the bridge. On returning to the main window, the new bridge and slave connections should now be listed:
|
You are reading a sample chapter from Red Hat Enterprise Linux 9 Essentials. Buy the full book now in eBook or Print format.
Includes 34 chapters and 290 pages. Learn more. |
All that remains is to bring down the original eno1 connection and bring up the br0 connection using the steps outlined in the previous chapter (remembering to perform these steps in a shell script if the host is being accessed remotely):
# nmcli con down eno1# nmcli con up br0It will also be necessary, as it was when creating the bridge using the command-line tool, to add this bridge to the KVM network configuration. To do so, repeat the steps outlined in the “Declaring the KVM Bridged Network” section above. Once this step has been taken, the bridge is ready to be used by guest virtual machines.
Summary
By default, KVM virtual machines are connected to a virtual network that uses NAT to provide access to the network to which the host system is connected. If the guests are required to appear on the network with their own IP addresses, they need to be configured to share the physical network interface of the host system. This chapter outlines that this can be achieved using the nmcli or nm-connection-editor tools to create a networked bridge interface.