Adding New GPT and MBR Disks to Windows Server 2008 Systems
| Previous | Table of Contents | Next |
| Configuring Windows Server 2008 Remote Desktop Administration | Creating and Managing MBR Disk Partitions on Windows Server 2008 Basic Disks |
| Purchase and download the full PDF and ePub versions of this eBook only $9.99 |
The purpose of this chapter of Windows Server 2008 Essentials is to provide an overview of the decisions and steps necessary to add new disk drives to a Windows Server 2008 system. Installing a new disk drive is not just about formatting the drive and creating volumes. With Windows Server 2008 decisions need to be made about the partitioning style since both Master Boot Record (MBR) and GUID (Globally Unique Identifier) Partition Table (GPT) disks are supported in this latest version of Windows. Given this requirement, this chapter will also provide an explanation of the difference between MBR and GPT disks. The concepts described in this chapter relate primarily to basic disks. Dynamic disks are covered in a later chapter.
An Overview of MBR and GPT Partitions Styles
The MBR style was originally developed for x86-based computer systems and is by far the most common style in use at present. GPT, on the other hand, was originally developed for 64-bit Itanium based systems. With the arrival of Windows Server 2008 both x86 32-bit and 64-bit systems support MBR and GPT partition styles. It is important to note, however, that 32-bit systems can only boot from MBR based disks and 64-bit systems can only boot from GPT disks.
Understanding MBR Disks
With MBR the first sector of the disk is reserved to store a partition table and the master boot record. The remainder of the disk is divided into partitions, information about which is stored in the partition table. MBR supports volume sizes up to 4TB.
MBR on a basic disk supports two partition types, primary and extended. The primary partition has a file system created directly on it and is then either assigned a drive letter or mount point by which it is referenced by the user. An extended partition is divided into one or more logical drives, each of which is then formatted and then assigned drive letter or mount point.
A basic disk with MBR partition style can support either four primary partitions or three primary partitions and one extended partition (which in turn can support multiple logical volumes).
Understanding GPT Disks
GPT disks differ quite considerably from MBR disks. In terms of capability, GPT supports disks up to 18 Exabytes in size with up 128 partitions. GPT also differs from MBR in terms of layout. <google>WIN28BOX</google> At the start of a GPT disk is an MBR. The MBR in this case, however, is provided purely so that the disk will be recognized by disk utilities that do not recognize GPT disks. To an MBR disk utility, the disk will appear to be an MBR disk with a single partition taking up the entire disk space.
Located immediately after the MBR is the primary GPT header. This header defines the blocks on the disk available for partitions and contains information about the number and respective sizes of any partitions on the disk. The GPT header also includes information about its own location on the disk drive and a pointer to a backup GPT header located in the final sectors of the drive. The backup GPT header is used in the event that the primary header becomes corrupted. Finally, the GPT header contains a CRC32 checksum of itself (including the partition table) so that the system firmware can verify the integrity of the header information before accessing the data on the disk. If the checksum fails, the firmware switches to the backup GPT header. If the checksum on backup GPT header also fails the disk is unusable.
In between the primary GPT header at the start of the disk and backup GPT in the final sectors of the disk are the primary partitions. In addition to any data, each partition on a GPT disk has a header containing information about the partition type, the start and end blocks of the partition and a unique partition GUID.
There are a number of additional partitions often required on a GPT disk. These are the EFI system partition (ESP) and the Microsoft Reserved Partition (MSR). The ESP must be present on the first disk in a system and is required to boot the operating system. The ESP is not mandatory on other disks. When the 64-bit version of Windows Server 2008 is installed both the ESP and MSR are created by the setup process.
One important point of note regarding GPT is that it is not supported on removable disks such as USB and Firewire connected storage devices or disks attached to storage clusters.
Initializing a New Disk
Once a new disk has been installed into a Windows Server 2008 system it must be initialized before any partitions can be created on it. This is performed using the Initialize Disk Wizard which can be accessed from the Disk Management snap-in. This can be accessed either from the Server Manager or Computer Management tools. To launch the Server Manager open the Start menu and click on the Server Manager option, or click on the Server Manager icon in the task bar. Alternatively launch Computer Management from Start -> All Programs -> Administration Tools -> Computer Management or run compmgmt.csc.
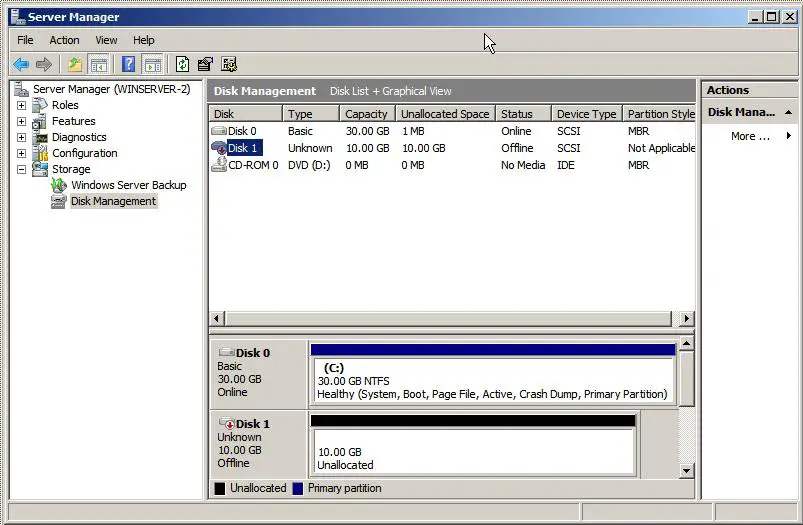
With either the Server Manager or Computer Management tools running, select the Storage option from the left hand panel followed by Disk Management. The Disk Manager will subsequently appear. Ensure that the top pane is displaying the Disk List so that the new drive is visible. This is configured by selecting the View->Top-Disk List option from the top menu bar. Any uninitialized disks will be listed in the disk view as Offline and with a red down arrow on the disk drive icon in both the list and graphical views. In addition, the disk space will be indicated as unallocated in the graphical view. The following image shows a newly installed and uninitialized disk drive shown in the Disk Manager:
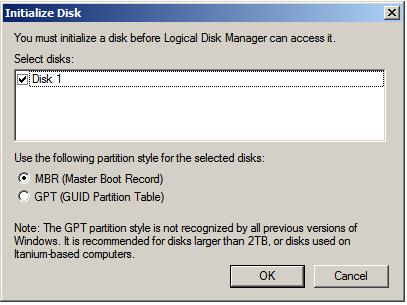
Before a new disk can be initialized it must first be brought online. To bring this disk online right click on the disk icon in either disk or graphical list and select Online from the popup menu. Once this disk is brought online the graphical view will categorize the disk as Not Initialized. To initialize the disk right click once again on the disk icon and select Initialize Disk. In the resulting dialog ensure that the correct disk is selected for initialization and then choose whether to initialize the disk using the MBR or GPT partition styles. The Initialize Disk dialog is shown in the following figure ready to initialize disk 1 using the MBR partition style:
Click on OK to initialize the disk. Once completed, the disk will be listed with the chosen partition style with the space marked as Unallocated in the graphical view. The next step is to create partitions on the disks or use them as dynamic disks. These topics are covered in subsequent chapters.
Converting Disks between MBR and GPT Partition Styles
Once a disk has been initialized as GPT or MBR it is quite possible that one day the disk partition style will need to be changed. There is good news and bad news regarding converting partition style in Windows Server 2008. The good news is that this can be achieved either using the Disk Management tool or from the command line using diskpart. The bad news is that conversions can only be performed on empty disks. This means that any pre-existing volumes on the disk must be backed up and deleted before performing the conversion.
To perform a conversion from the Disk Management interface, right click on the icon for the empty drive in the graphical view. If the disk is currently using MBR then the menu will provide the option to Convert to GPT Disk. Alternatively, if the disk is currently using the GPT partition style the Convert Disk to MBR menu option will be presented. In either case, selecting the conversion option will immediately and silently change the partition style.
To perform the same task using diskpart, begin by listing the available disks:
DISKPART> list disk

  Disk ###  Status      Size     Free     Dyn  Gpt
  --------  ----------  -------  -------  ---  ---
  Disk 0    Online        30 GB      0 B
  Disk 1    Online        10 GB    10 GB
Select the desired disk (in this case disk 1):
DISKPART> select disk 1

Disk 1 is now the selected disk.
Finally, convert the disk using the convert command followed by mbr or gpt depending on whether the disk is being converted to MBR or GPT partition style respectively:
DISKPART> convert mbr

DiskPart successfully converted the selected disk to MBR format.

DISKPART> convert gpt

DiskPart successfully converted the selected disk to GPT format.
Type exit to close the diskpart session.
| Purchase and download the full PDF and ePub versions of this eBook only $9.99 |


