An Example iOS 4 iPhone Location Application (Xcode 4)
| Previous | Table of Contents | Next |
| Getting iPhone Location Information using the iOS 4 Core Location Framework (Xcode 4) | Accessing the iPhone Camera and Photo Library (Xcode 4) |
Learn SwiftUI and take your iOS Development to the Next Level |
Having covered the basics of location management in iOS 4 iPhone applications in the previous chapter it is now time to put theory into practice and work step-by-step through an example application. The objective of this chapter is to create a simple iOS application that tracks the latitude, longitude and altitude of an iPhone. In addition the level of location accuracy will be reported, together with the distance between a selected location and the current location of the device.
Creating the Example iOS iPhone Location Project
The first step, as always, is to launch the Xcode 4 environment and start a new project to contain the location application. Once Xcode is running, select the File -> New Project… menu option and configure a new iOS iPhone application named location using the View-based Application template.
Adding the Core Location Framework to the Project
In order to access the location features of the iPhone the Core Location Framework must be included into the project. This can be achieved by selecting the product target entry from the project navigator panel (the top item named location) and clicking on the Build Phases tab in the main panel. In the Link Binary with Libraries section click on the ‘+’ button, select the CoreLocation.framework entry from the resulting panel and click on the Add button.
Configuring the View Controller
The view controller for our application is going to require a number of outlets that will enable the controller to display location information on the labels we will build into the user interface of the application. In addition an action method needs to be defined to connect to a button that will reset the distance counter when touched by the user. Also required are references to CLLocationManager and CLLocation objects which, in turn, require that the CoreLocation.h file be imported. Bringing all these requirements together gives us a locationViewController.h file that reads as follows:
#import <UIKit/UIKit.h>
#import <CoreLocation/CoreLocation.h>

@interface locationViewController : UIViewController
        <CLLocationManagerDelegate>
{
        CLLocationManager *locationManager;
        UILabel *latitude;
        UILabel *longitude;
        UILabel *horizontalAccuracy;
        UILabel *altitude;
        UILabel *verticalAccuracy;
        UILabel *distance;
        UIButton *resetButton;
        CLLocation *startLocation;
}
@property (nonatomic, retain) CLLocationManager *locationManager;
@property (nonatomic, retain) IBOutlet UILabel *latitude;
@property (nonatomic, retain) IBOutlet UILabel *longitude;
@property (nonatomic, retain) IBOutlet UILabel *horizontalAccuracy;
@property (nonatomic, retain) IBOutlet UILabel *verticalAccuracy;
@property (nonatomic, retain) IBOutlet UILabel *altitude;
@property (nonatomic, retain) IBOutlet UILabel *distance;
@property (nonatomic, retain) CLLocation *startLocation;
- (IBAction)resetDistance;
@end
Note the inclusion of the <CLLocationManagerDelegate> declaration in the above file. This is required to notify the compiler that the view controller class implements the Location Manager Delegate protocol.
Having declared the outlets, the next step is to design the user interface.
Designing the User Interface
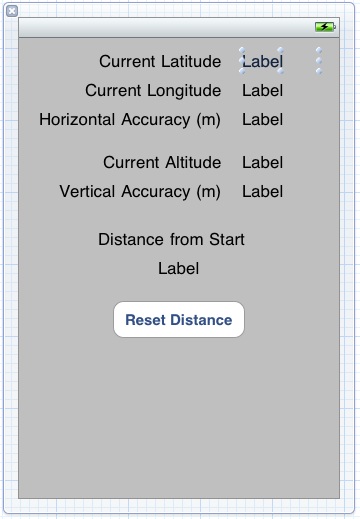
The user interface for this example location iPhone app is going consist of a number of labels (some of which will be connected to the outlets declared in the preceding section) and a button that will be connected to the previously declared resetDistance action method. Initiate the user interface design process by selecting the locationViewController.xib file. Once the view has loaded into the Interface Builder editing environment, create a user interface that resembles as closely as possible the view illustrated in the following figure:
In the case of the five labels in the right hand column that will display location and accuracy data, make sure that the labels are stretched to the right until the blue margin guideline appears. The data will be displayed to multiple levels of decimal points that require space beyond the default size of the label.
Establish a connection between the latitude outlet declared in the view controller and the corresponding user interface label by Ctrl-clicking on the File’s Owner icon and dragging the blue line to the label located to the right of the Latitude label. Release the line and select the latitude outlet from the resulting menu. Repeat this task to establish outlet connections of the remaining six data display labels.
The final step of the user interface design process is to connect the button object to the resetDistance action method. This is achieved by selecting the button in the view window and displaying the Connections Inspector window (View -> Utilities -> Connections Inspector). Click in the round circle to the right of the Touch Up Inside event and drag the line to the File’s Owner object. On releasing the mouse button, select the resetDistance method from the resulting menu.
Creating the CLLocationManager Object
The next task is to implement the code to create an instance of the CLLocationManager class. Since this needs to occur when the application starts up an ideal location is in the view controller’s viewDidLoad method. Whilst making this code change it is also a good opportunity to add the necessary @synthesize directives to the locationViewController.m file:
#import "locationViewController.h"

@implementation locationViewController
@synthesize longitude, latitude, horizontalAccuracy, verticalAccuracy, altitude, distance;
@synthesize locationManager, startLocation;
.
.
.
- (void)viewDidLoad {
    self.locationManager = [[CLLocationManager alloc] init];
    locationManager.desiredAccuracy = kCLLocationAccuracyBest;
    locationManager.delegate = self;
    [locationManager startUpdatingLocation];
    startLocation = nil;
    [super viewDidLoad];
}
The above code creates a new CLLocationManager object instance and configures it to use the “best accuracy” setting. It then declares itself as the application delegate for the object. The location manager object is then instructed to begin updating location information via a call to the startUpdatingLocation method. Since location tracking has just begun at this point, the startLocation object is also set to nil.
Implementing the Action Method
The button object in the user interface is connected to the resetDistance action method so the next task is to implement that action. All this method needs to do is set the startlocation object to nil:
-(void)resetDistance
{
        startLocation = nil;
}
Implementing the Application Delegate Methods
When the location manager detects a location change, it calls the didUpdateToLocation delegate method. Since the view controller was declared as the delegate for the location manager in the viewDidLoad method, it is necessary to now implement this method:
#pragma mark -
#pragma mark CLLocationManagerDelegate

-(void)locationManager:(CLLocationManager *)manager
   didUpdateToLocation:(CLLocation *)newLocation
                  fromLocation:(CLLocation *)oldLocation
{
     NSString *currentLatitude = [[NSString alloc]
                  initWithFormat:@"%g",
                  newLocation.coordinate.latitude];
     latitude.text = currentLatitude;

     NSString *currentLongitude = [[NSString alloc]
          initWithFormat:@"%g",
          newLocation.coordinate.longitude];
     longitude.text = currentLongitude;

     NSString *currentHorizontalAccuracy =
              [[NSString alloc]
             initWithFormat:@"%g",
             newLocation.horizontalAccuracy];
     horizontalAccuracy.text = currentHorizontalAccuracy;

     NSString *currentAltitude = [[NSString alloc]
                  initWithFormat:@"%g",
                  newLocation.altitude];
     altitude.text = currentAltitude;
     [currentAltitude release];

     NSString *currentVerticalAccuracy =
              [[NSString alloc]
              initWithFormat:@"%g",
              newLocation.verticalAccuracy];
     verticalAccuracy.text = currentVerticalAccuracy;

     if (startLocation == nil)
            self.startLocation = newLocation;

     CLLocationDistance distanceBetween = [newLocation
            distanceFromLocation:startLocation];

     NSString *tripString = [[NSString alloc]
           initWithFormat:@"%f",
           distanceBetween];
     distance.text = tripString;

     [currentLatitude release];
     [currentLongitude release];
     [currentHorizontalAccuracy release];
     [currentVerticalAccuracy release];
     [tripString release];
}
Despite the apparent length of the method it actually performs some very simple tasks. To begin with it extracts location and accuracy information from the newLocation CLLocation object passed through to the method as an argument. In each case, it creates an NSString object containing the extracted value and displays it on the corresponding user interface label.
If this is the first time that the method has been called either since the application was launched or the user pressed the Reset Distance button, the locationDistance object is set to the current location. The distanceFromLocation method of the newLocation object is then called passing though the locationDistance object as an argument in order to calculate the distance between the two points. The result is then displayed on distance label in the user interface.
Finally the NSString objects created within the method are released.
The didFailWithError delegate method is called when an error is encountered by the location manager instance. This method should also, therefore, be implemented:
-(void)locationManager:(CLLocationManager *)manager
didFailWithError:(NSError *)error
{
}
The action taken within this method is largely up to the application developer. The method, might, for example, simply display an alert to notify the user of the error.
Releasing Memory
The final step prior to testing the application is to make sure that any memory allocated during the application lifecycle is released. This is achieved within the viewDidUnload and dealloc methods:
- (void)viewDidUnload {
        // Release any retained subviews of the main view.
        // e.g. self.myOutlet = nil;
        self.latitude = nil;
        self.longitude = nil;
        self.horizontalAccuracy = nil;
        self.verticalAccuracy = nil;
        self.altitude = nil;
        self.startLocation = nil;
        self.distance = nil;
        self.locationManager = nil;
}
- (void)dealloc {
        [latitude release];
        [longitude release];
        [horizontalAccuracy release];
        [verticalAccuracy release];
        [altitude release];
        [startLocation release];
        [distance release];
        [locationManager release];
        [super dealloc];
}
Building and Running the iPhone Location Application
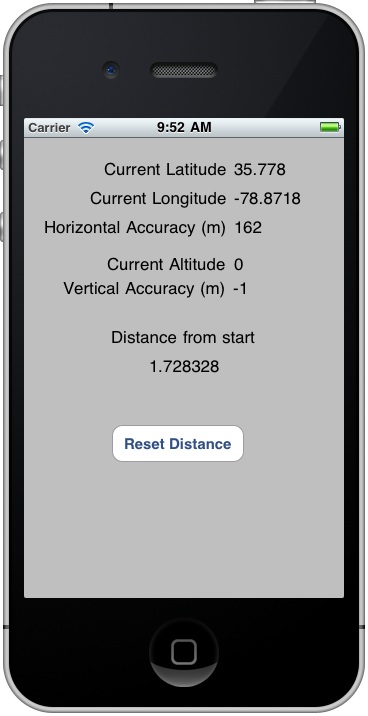
Click on the Run button located in the Xcode project window toolbar. If any compilation errors are encountered correct those problems and try again. Once the application has compiled and linked it will launch into the iOS Simulator. Before location information can be gathered, the user is prompted to grant permission. Once permission is granted, the application will begin displaying location information: <google>IOSBOX</google>
Keep in mind that when running in the iOS Simulator environment, the location information is based on the IP address of the internet connection. To experience the full functionality of the application it will necessary to install it on a physical iPhone device, a process that is outlined in the chapter entitled Testing iOS 4 Apps on the iPhone – Developer Certificates and Provisioning Profiles. Once the application is running on an iPhone the location data will update as you change location with the device.
One final point to note is that the distance data relates to the distance between two points, not the distance travelled. For example, if the device accompanies the user on a 10 mile trip that returns to the start location the distance will be displayed as 0 (since the start and end points are the same).
Learn SwiftUI and take your iOS Development to the Next Level |
| Previous | Table of Contents | Next |
| Getting iPhone Location Information using the iOS 4 Core Location Framework (Xcode 4) | Accessing the iPhone Camera and Photo Library (Xcode 4) |


